Entertainment
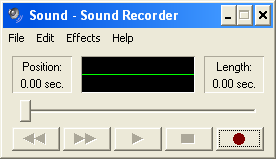
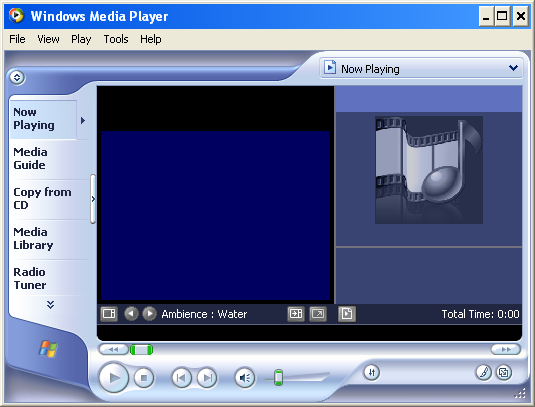
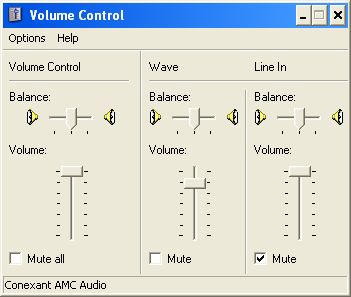
The multimedia folder contains the various utilities for the Multimedia Tolls in Windows XP. The Multimedia utilities are as follows
| Utility | Function |
| Sound Recorder | Record sound if a microphone is attached to your system. |
| Volume Control | Set the volume and balance for sound related devices |
| Windows Media Player | Play a variety of multimedia files but not edit them. |
Figures of all above are displayed below
Games
Windows XP provides many games. You can play them as a pass time.
To start the games, you do as follows
- Click the Start Button on the Taskbar
- Highlight Programs menu item and choose Accessories
- From the Accessories group select games and choose the game you want to play.
- Solitaire
- Minesweeper
- Hearts
- FreeCell
System Tools
The System Tool folder contains the various utilities that help you in maintaining your PC system.
To run the system tools do the following
Click the Start button, highlight Program then highlight accessories and choose System Tools. The system tools are given in the table.
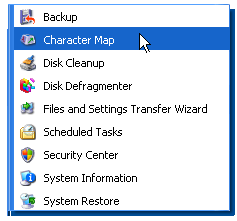
| System Tool | Description |
| Backup | This utility recompresses your files |
| Disk Cleanup | Automatically clears not required files from your hard disk |
| Disk Defragmenter | Rearranges the files and programs on your hard disk |
| Schedule Tasks | Allows scheduling of tasks at predetermined times |
| System Information | Displays information about software and hardware of the system |
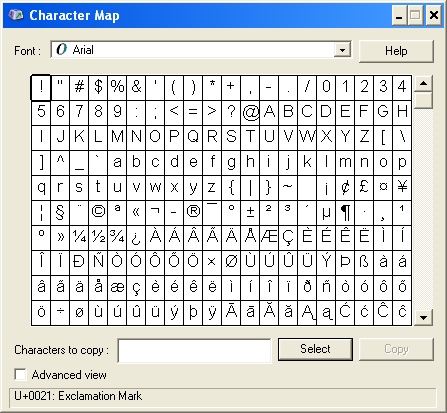
| Character Map | To print and use special characters |
Character Map
It is used to insert a special character into a document. Character Map works only with Windows-based programs. You can magnify the characters you click in Character Map by holding down the mouse button. To open Character Map, click Start, pointing to Programs, pointing to Accessories, pointing to System Tools, and clicking Character Map. Using it requires following steps
- In Font, click a font.
- Double-click each character you want to insert.
- Click Copy.
- In your document, click where you want the characters to appear.
- On the Edit menu, click Paste.
Calculator
The calculator available in windows XP is useful for doing calculations while you are working in any other package. The calculator has two options. The standard calculator that does simple arithmetic, and a more complicated Scientific Calculator, that can be used by scientists and engineers. To use the calculator do as the following
- Click the Start button, highlight Program menu item select Accessories group and choose calculator
- The Calculator program opens in Standard View. To use the Scientific Calculator, open the View menu and choose Scientific.
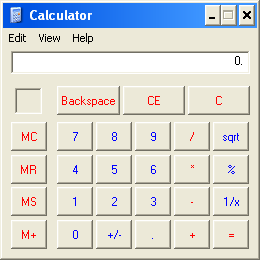
- Using the Standard Calculator can be used to add, subtract, multiply and divide. You can also take square rots, calculate percentages, and finds multiplicative inverses.
Performing arithmetic
To perform an arithmetic calculation, enter the calculation, as you would type it, left to right
Storing Numbers in memory
The four buttons on the left side of the Standard Calculator are used to control its memory.
Using scientific Calculator
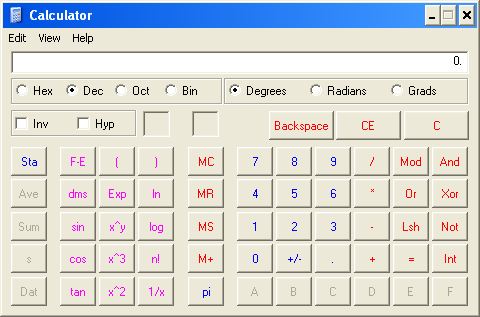
The scientific Calculator is considerably larger, more powerful, than the Standard Calculator. It has many functions that can be used depending on your needs.
Both the calculator are shown below
Scientific Calculator
Standard Calculator
Date and Time
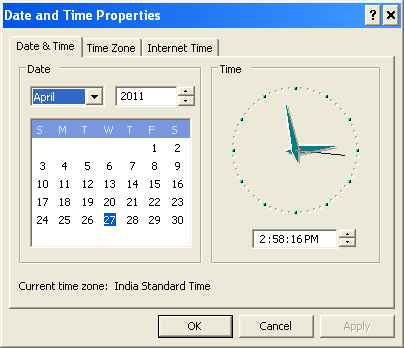
It is used to change the date and time being reported by the computer system. Windows XP treats it as Date and Time Properties dialog box that appears in the control panel by the name ‘Date and Time’. It can also be activated by double-clicking in the clock in the right end of taskbar. The dialog box of date and time –
Date and Time
Notepad
It is basic text editor used for text editing. Default file extension for notepad files is “TXT”.
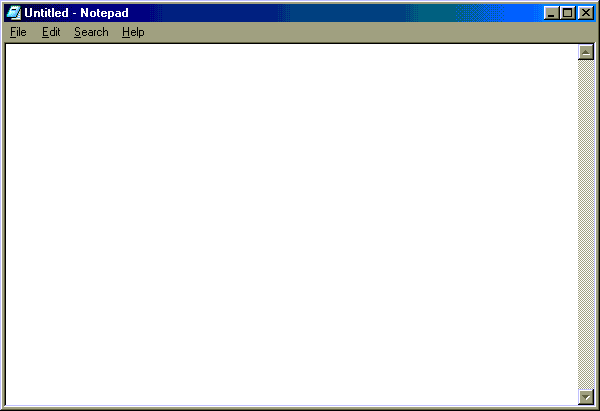
File Menu
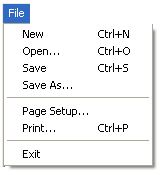
| Option | Use |
| New | It allows creating a new document or TXT file. |
| Open | It retrieves an existing TXT file or user specified file. |
| Save | Saves the active document |
| Save as | Save the active document to the file and folder or name that you designate |
| Page Setup | The page specifications like margins, orientation, and paper size are set. |
| Sends the document to the printer for printing | |
| Exit | Closes notepad. |
Edit Menu
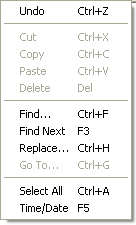
| Option | Use |
| Undo | Undo the recent editing |
| Cut – Copy | To remove or copy selected text in the document |
| Paste | Pastes text which was copied or removed with cut or copy option |
| Delete | Delete selected text |
| Find | Displays dialog box to search characters. |
| Find Next | It repeats the previous find. The shortcut key is F3. |
| GoTo | To jump to a specified line number in the document. |
| Replace | It finds and replaces given text with new text. |
| Select All | Selects all text in the document |
| Time/Date | Inserts the time & date at the said position |
Format Menu

| Option | Use |
| Word Wrap | When turned on the long lines going across screen width are wrapped on to next line so that they are visible in the screen. |
| Font | Opens up font formatting dialog box to change font type, size |
View Menu

It enables or disables the display of status bar at the bottom of the window
Help Menu
It shows help topics about the Notepad.
Paint
It is a drawing program with colorful shapes and lines are drawn including text and graphics. Default file extension is “BMP” but we can also save in JPG, GIF and PNG as per our need. As shown in the figure below
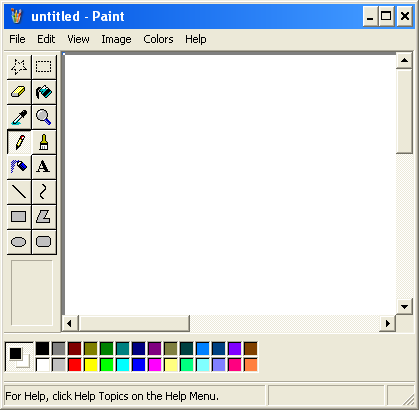
File Menu
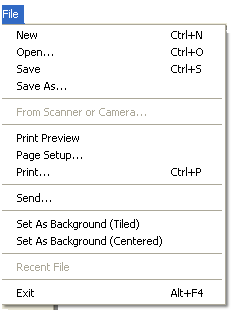
| Option | Use |
| New | It allows to create a new art object |
| Open | It retrieves an existing object |
| Save | Saves the active object |
| Save as | Save the active object to the file and folder that you designate |
| Print Preview | It allows to see the object as to it will be printed |
| Page Setup | The page specifications like margins, orientation, and paper size are set. |
| Sends the object to the printer | |
| Send | It allows to send the object to a different computer |
| Set as Wallpaper (Tiled) | It allows to create a background wallpaper design which will be repeated in a tiled manner |
| Set as Wallpaper (centered) | It allows to create a background wallpaper design that is centered on the screen |
Edit Menu
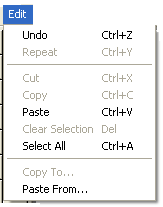
| Option | Use |
| Undo | Undoes the previous action undo can be done up to three times |
| Repeat | Repeats the previous actions |
| Cut | Deletes a selected part of the object & places it on the keyboard |
| Copy | Duplicates the selected part of the object & places it on the keyboard |
| Paste | Pastes the contents of the clipboard on the drawing area. |
| Clear selection | Clear selected part of the screen. Selection should be done before by Select tools |
| Select all | Selects all objects in the drawing area |
| Copy to | To copy the selected object to a file |
| Paste from | To insert a file |
View Menu
It determines whether you can see the toolbox, color box and status bar. It also controls the size of the image and whether it is seen as a bitmap.
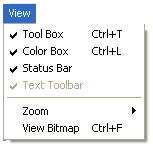
| Option | Use |
| Tool Box | Displays the toolbox on the left of the screen |
| Color Box | Displays the color palette below the drawing area |
| Status bar | Displays the status bar beneath the color box. |
| Zoom | Zoom can display normal size, large size, custom (allows you to define the view you want), show grid (displays a grid over the object), show thumbnail (in an enlarged view, displays a small thumbnail display of the object on the screen) |
| View Bitmap | Displays a full screen view click on the screen to return to normal view |
| Text toolbar | Displayed when the text tool is selected |
As shown in the figure below
Image Menu
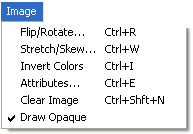
| Option | Use |
| Flip/Rotate | Allows you to flip horizontal, flip vertical or rotate by angle (90,180, or 270) |
| Stretch/Skew | An object can be stretched or skewed vertically or horizontally |
| Invert Colors | Colors displayed in their complements |
| Attributes | To change the attribute of the drawing (height, width, unit of measurement etc.) |
| Clear Image | Clears the current image from the screen |
Colors Menu
| Option | Use |
| Edit Colors | See the basic colors and create custom color by clicking on define custom colors |
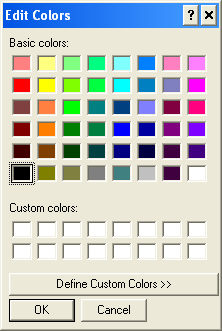

The Tool Box
The paint toolbox displays the tools available for creating and changing your drawings, using lines, shapes, text and colors. The tools available in the toolbox are as follows
| Option | Use |
| Free-Form | Selects an area by allowing you to draw a line around an irregularly shaped select area |
| Select | It creates a rectangular shaped |
| Eraser/Color Eraser | It erases part of a drawing, both color & lines as you move the eraser tool over it. |
| Fill With Color | It fills an enclosed area with color. |
| Pick Color | It duplicates the color in one area and transfers it another. |
| Magnifier | Enlarges a defined area |
| Pencil | It draws a line |
| Brush | It draws lines of varying shapes and widths |
| Airbrush | It draws groupings of dots, or slouches, on the drawing |
| Text | It types text onto a drawing. |
| Curve | It draws a curved line between two points |
| Line | It draws a straight line |
| Rectangle | It draws a box |
| Polygon | It draws straight lines connecting in various shapes and angles |
| Ellipse | It creates an elliptical shape. Press Shift to get a perfect circle |
| Rounded Rectangle | Same as rectangle except the corners are rounded |

The Color Box
The foreground color is displayed in the top square on the left. The background color is displayed in the square beneath the foreground one. The foreground color can be selected by using the left mouse button and the background color with the right mouse button. As shown in the figure below

Word Pad
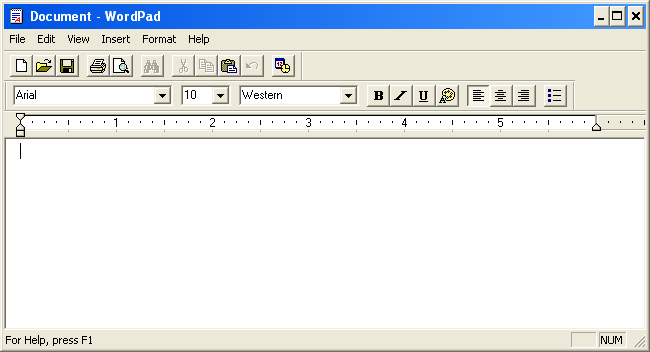
It is a basic word processor, which can directly read and write both word 6.0 & text files. Its default file extension is “RTF”. It has ruler, bullets and more text formatting options compared to Notepad. The WordPad window is shown
File Menu
It is lists about opening existing files, create new files, save and print files. New, Open, Save, Save As, Print, and Exit being the same options as that of Notepad the special options are
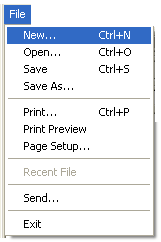
- Print Preview Displays the document, as it will be printed
- Page Setup You can set the paper size and source, orientation and margins
Edit Menu
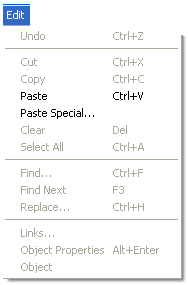
It contains cut, copy, paste & in addition the following.
| Option | Use |
| Paste Special | It copies linked or embedded information from the clipboard into a document |
| Find | It searches for a character string |
| Find Next | It repeats the previous find command. |
| Replace | It replaces a sequence of character with another as per the search criteria. |
| Links | For automatically or manually updating any linked objects |
| Objects Properties | It displays the package of properties of the object. |
| Object | It allows you to edit a linked object |
View Menu
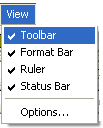
| Option | Use |
| Toolbar | Toggles display of standard toolbar having common tools as icons |
| Format Bar | Toggles display of formatting toolbar beneath the standard toolbar |
| Ruler | Toggles display of the ruler. |
| Status Bar | Toggles display of the status bar which displays command messages & status. |
| Options | It has six tabs regarding word wrap and toolbar display settings for different document or data type |
Insert Menu

| Option | Use |
| Date & Time | It inserts the date and time where the pointer is positioned |
| Objects | To insert an object (whether it is already present or can be created) |
Format Menu
It gives formatting options for font, bullet, paragraph and tabs.
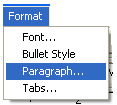
| Option | Use |
| Font | Select the font, font style, size, & special effects like strikeout and underline |
| Bullet style | Places a bullet where pointer is placed. |
| Paragraph | Sets left, right & first line indentation and an alignment of Left, Right & Center. |
| Tabs | To set and clear the tabs. |
There are two toolbars that help in working easily and efficiently.
Standard Toolbar
It has icons which are used extensively and are a minimum for requirement.

| Name | Description |
| New, Open, Save | New creates a new document; Open retrieves an existing document; Save the active document to disk. |
| Print, Print Preview | Print sends document to the printer; Print Preview displays the current document page on the screen as it will be printed |
| Find | Find searches for characters matching the criteria you specify |
| Cut, Copy, Paste | Cut deletes text; Copy duplicates text; Paste inserts cut or copied text from Clipboard into document. |
| Undo | Cancels or undoes the last action |
| Date/ Time | Inserts the date and time into the document |
Formatting Toolbar
It has icons for formatting purpose for formatting of font, paragraph and bullet. Tabs are formatted by ruler.

| Control/Button and Name | Description |
| Font Size | Allow you to change the font and its size for selected text |
| Bold, Italics, Underline | Make the selected text boldface, italics, or underlined |
| Color | Lets you specify color for selected text |
| Bullets | Places bullets at the beginning of the paragraph |
| Align Left, Center, Align Right | Align the selected text to the left, center, or right |
Windows Explorer
Windows Explorer shows the files, folders, drives and their content in two panes – Left or Explorer and Right or Content pane. Left pane displays a hierarchical (tree) structure of the devices and folders in the system. Right pane shows the content of item selected in left pane.
Explorer pane has “+” icon along with folder to expand or collapse them. Windows explorer provides a graphical view of all local and networked resources. It is used to copy move rename and search for files and folders. It gives option of sorting the right pane display according to filename, size, type or modified time. It also gives various views options to see content in right pane. It can be started by-
Starting Windows Explorer
You can start windows Explorer in one of the three ways –
- Start Menu -> Programs -> Accessories -> Windows Explorer
- Right click on Start -> Select Explorer
- Windows Key + E
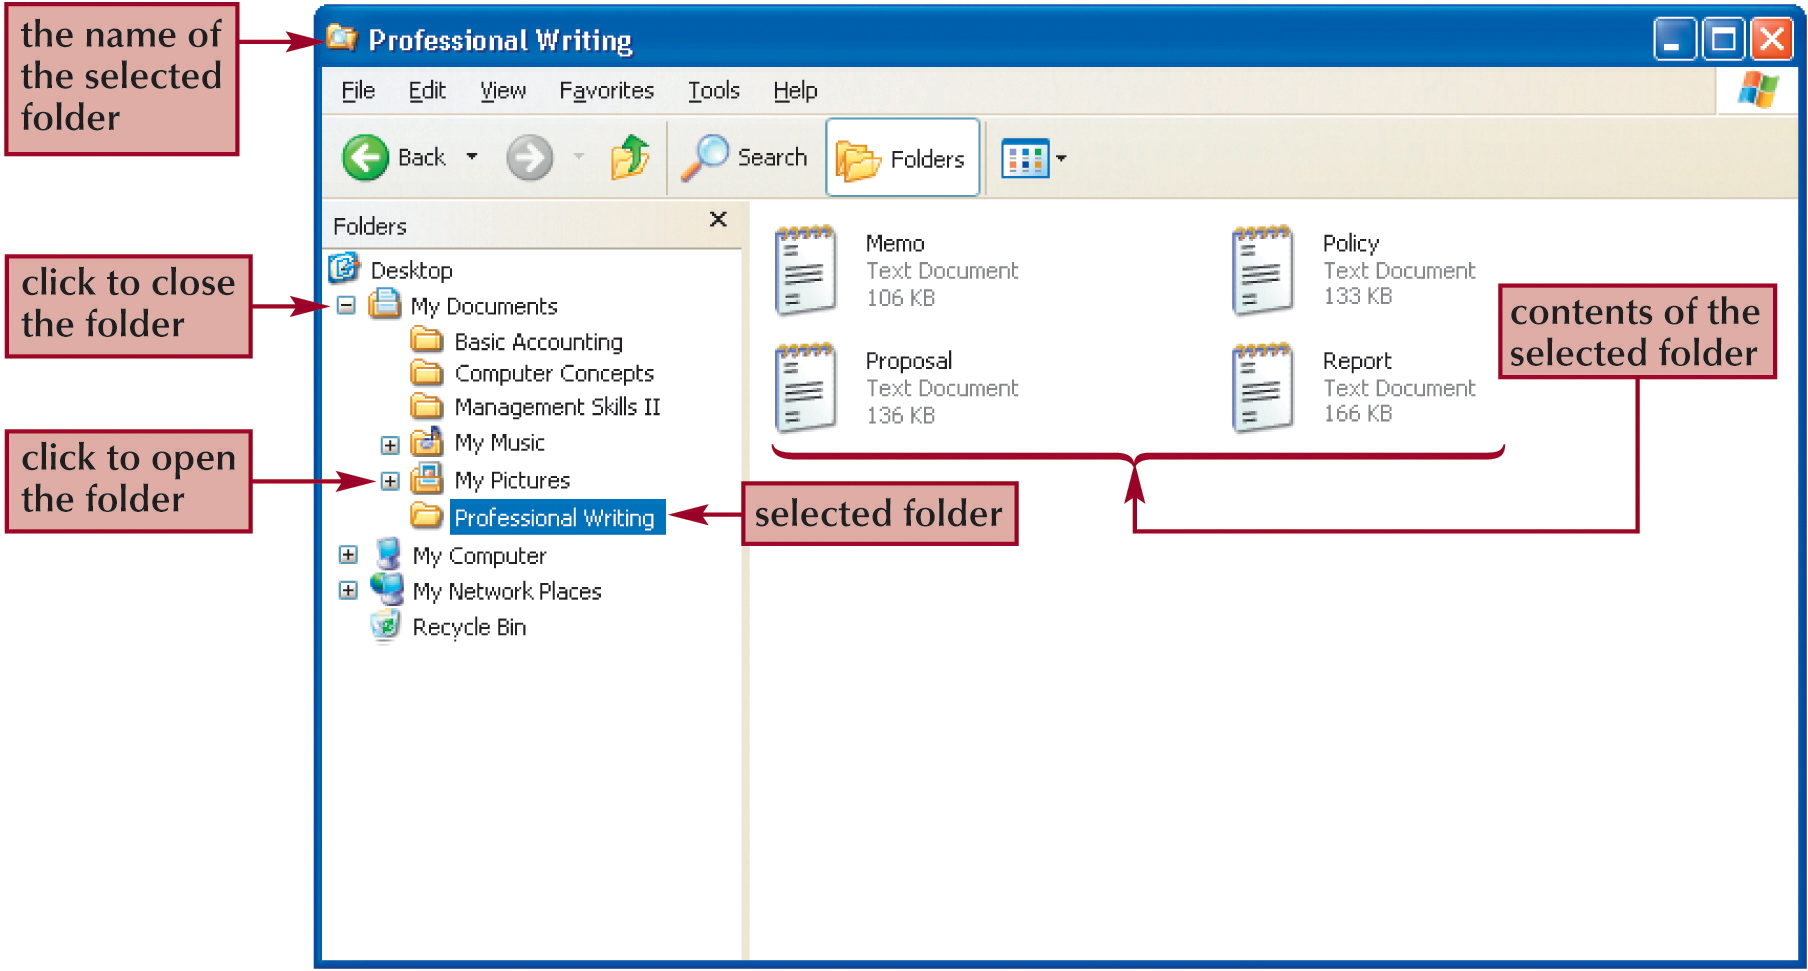
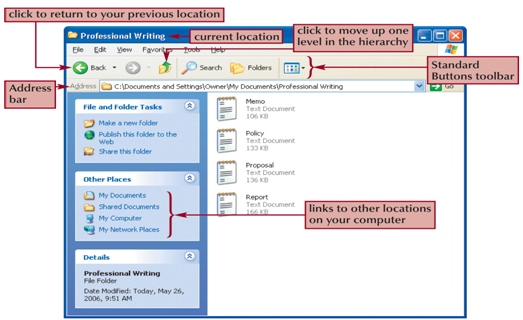
Standard toolbar
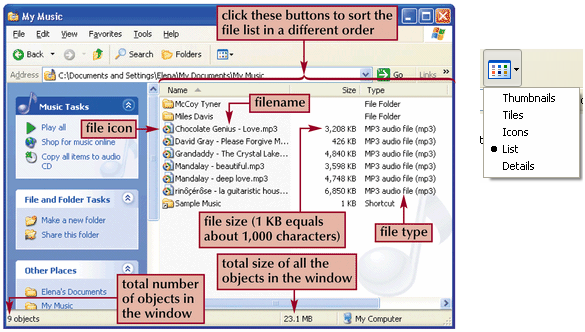
The role played by the various elements in explorer are given in the table
| Element | Function |
| Standard toolbar | It is just below the menu bar. |
| Up button | It makes the window up the folder tree. |
| Editing Tool Buttons | The five buttons are cut, copy, paste undo and delete. These editing buttons provide short cut to the file /folder operation. |
| Back, Forward Buttons | The back button moves to the previous folder it displayed. The forward button does the opposite. If the back button appears grayed, it means you are at the first folder in the window. If the forward button appears grayed it means you are in the last folder window. If back /forward buttons have downward pointing arrows attached to them. Clicking the arrow produces a list of locations you can go back or forward. |
| View Button | The view button allows you to choose among the several options for representing the contents of a folder |
| Address Bar | The address box on the Address bar displays the name and addresses of the current location. |
| Status Bar | The right side of the status bar displays the name of the folder |
Organize files and folders
Your computer puts information at your fingertips. Over time, however, you might have so many files that it can be difficult to find the specific file you need. Just like a physical filing cabinet, your computer files can benefit from better organization. In order to keep your information organized, try these tips
- First, create a folder structure that organizes your files according to category.
- Once you’ve done that, you will be able to find most files by simply clicking the folder. If a folder has a large number of files, you can use the Details view to locate the file you need
- If you aren’t sure which folder contains the file you need, you can search your computer for the file.
Create a folder structure
The most effective way to organize your files is to create a folder structure that fits how you use your computer. For example, you might have folders within My Documents for
- Finances: Documents related to your budget and taxes
- School: Class notes and reports
- Work: Your résumé and other work-related documents
- Shopping: Notes comparing different products and stores
- Home: Records relating to home maintenance and improvements
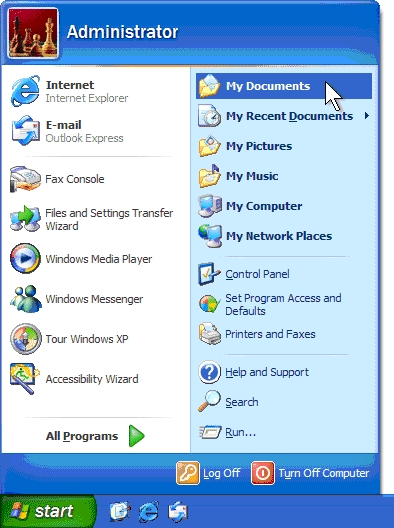
1. Click Start, and then click My Documents.
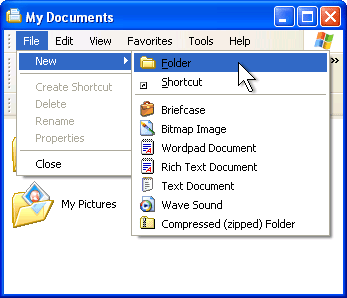
2. Click the File menu, click New, and then click Folder.
3. Type the name for your new folder, and then press ENTER.
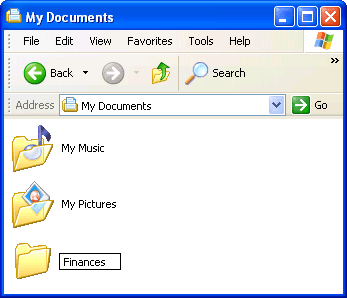
- Repeat steps 2 and 3 to create additional folders.
Note: You can create sub-folders within folders for multiple levels of organization
After you have created your folder structure, you can move files into your new folders using the following steps
- In My Documents, select the files or folders that you want to move. To select multiple files, hold down the CTRL key and click each file you want to select.
- Click the Edit menu, and then click Cut.
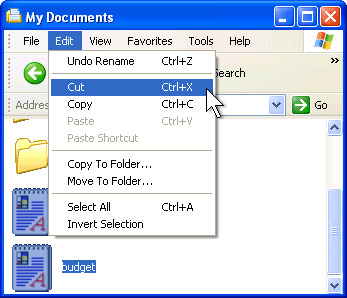
- Open the folder you want to store your files in. Click the Edit menu, and then click Paste.
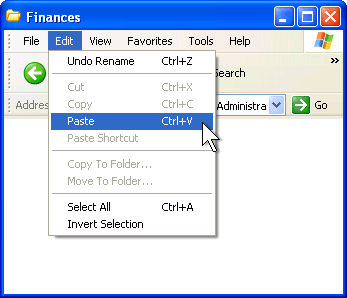
- Repeat steps earlier steps until you have moved all of your files to their new locations.
Now that you have an organized system of folders, when you save new files, be sure to save them in one of your folders to keep things organized.
Browsing files
Sometimes you know where a file is stored, but there are so many files in the folder that it’s difficult to find the file you want. The best way to search through a large folder is to use the Details view. The Details view allows you to quickly sort your files and view different types of information about all the files in a folder.
To use the Details view
- Open the folder you want to browse
- Click the Views button, and then click Details.
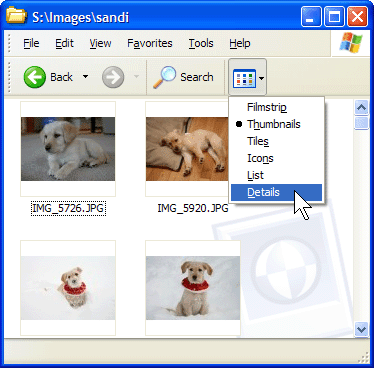
To sort the files, click the column heading that you want to sort by. For example, to sort files from oldest to newest, click the Date Modified heading. To reverse the sort order (for example, to sort from newest to oldest), click the column heading twice.
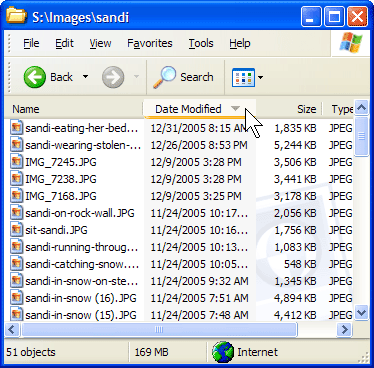
By default, the Details view shows the file name, date, size, and type. You can add other information as well. To add or remove columns, right-click a column heading, and then click More option.
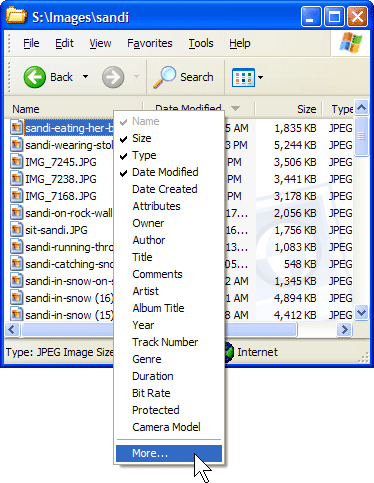
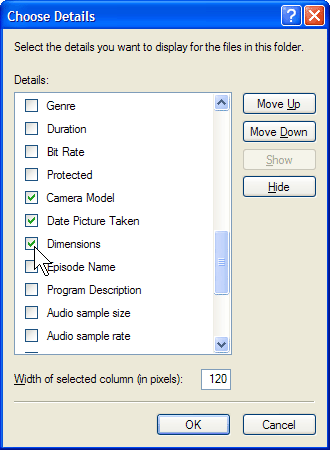
In the Choose Details dialog box, select the columns you want to see in the Details view. For pictures and videos, you can add Dimensions to sort by image size. For music, you can add Artist, Album Title, and Genre to make it easier to find the songs you want.
Click OK to add the columns to your Details view.
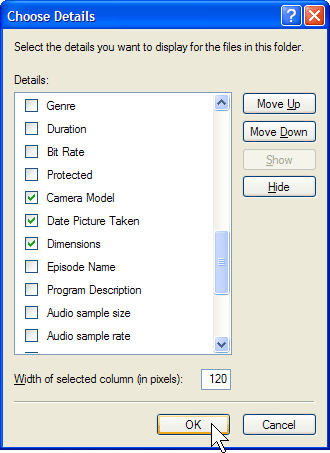
When you modify the columns in the Details view, it affects only the folder you are viewing.
Mobile Computing
It means that even when a person is moving i.e. traveling than still he can still do any particular computing from a laptop computer. The computation done on the laptop computer can be synchronized with the data on his personnel computer.
Plug and Play
It is a technology from Microsoft, through which installing a new hardware becomes easier. When the computer is restarted after installing the hardware, Windows XP itself detects and tries to install the requisite software from its internal driver database else it asks for driver to be either downloaded from Microsoft website or to be given by the user.
Web Browsers
It is application software, which helps in browsing the Internet. Commonly used browsers are Mozilla Firefox from Mozilla Foundation with the latest release is version 4 and Internet Explorer from Microsoft and the latest release is version 9.
Shutting Down Windows XP
Shutting down windows XP is done by clicking “Turn Off Computer” option in Start menu. Shut down screen is given and description of various shut down option is also given in the table –
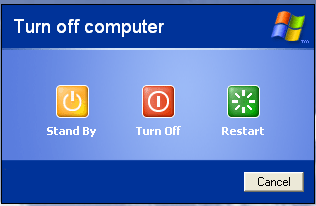
| Option | Description | Restore the computer |
| Standby | Computer switches to low power; monitor and hard drive turn off; memory is not saved; saves battery power for laptops | Press the computer’s power ON button |
| Turn Off | Shuts down Windows XP and turns off all power to the computer | |
| Restart | Shuts down Windows XP; warm- boots the computer | N/A |

