Understanding SoapUI Settings
This section is dedicated to understanding SoapUI Settings.
SoapUI Settings: HTTP Settings
In these properties are set specific to HTTP protocol (protocol version, User-Agent header, request and response compression etc.).
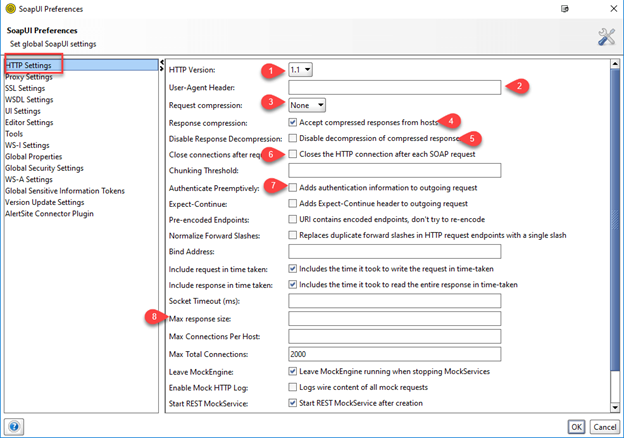
Explanation of HTTP settings in SoapUI
| Option | Description |
| HTTP Version | Selects the HTTP version |
| User-Agent Header | Sets the HTTP User-Agent Header. If none is specified the default HttpClient header is used |
| Request Compression | Selects the request compression type |
| Response Compression | Indicates if compressed responses from hosts are accepted |
| Disable Response Decompression | Disables decompression of compressed responses |
| Close connections after request | Disables HTTP Keep-Alives by requesting to close the HTTP connection after each request. This will have a negative impact on performance but may give more realistic values during load testing |
| Chunking Threshold | Using content-chunking for requests larger than thresholds, blank to disable |
| Authenticate Preemptively | Send Authentication headers with each request without first receiving an authentication challenge. This is a potential security hazard but will improve performance since only one request will be required for authenticated endpoints instead of two |
| Expect-Continue | Adds Expect-Continue header to outgoing request.For further info on this feature check rfc 2616 |
| Preencoded Endpoints | Do not URL-encode endpoints, set this if your endpoint URLs are already URL-encoded (containing for example %20 or %3A) |
| Bind Address | The local address to bind to when sending requests, can be overridden on a request level (with the corresponding request property) and on a system level by setting the soapui.bind.address system variable. |
| Include request in time taken | Includes the time it took to write the request in time-taken |
| Include response in time taken | Includes the time it took to read the response body in time-taken |
| Socket Timeout | The socket timeout for HTTP requests in milliseconds |
| Max Response Size | The maximum number of bytes to read from a response (0 = unlimited) |
| Max Connections Per Host | The maximum number of simultaneous connections to a specific host. Increase this value if you are running LoadTests with more than 500 threads on a particular host. |
| Max Total Connections | The total maximum number of connections. Increase this value if you are running LoadTests with more than 2000 threads. |
| Leave MockEngine | Will leave the MockEngine running even when all MockServices have stopped resulting in much faster startup-times for new MockServices and 404 errors when trying to call a stopped MockService (instead of connection failure) |
| Enable Mock HTTP Log | Logs wire content of all mock requests. Selecting this option will degrade Mock Engine performance marginally and may require restart to enable or disable. |
Steps to configure HTTP settings in SoapUI
To configure HTTP settings in SoapUI, follow these steps:
Open SoapUI: Launch the SoapUI application on your computer.
Create or Open a Project: Create a new project or open an existing project in which you want to configure the HTTP settings.
Select Test Suite or Test Case: In the Navigator panel, select the desired test suite or test case within the project.
Open HTTP Settings: In the main SoapUI window, you will see various tabs. Click on the “HTTP Settings” tab.
Configure HTTP Settings:
a. Endpoint: Specify the endpoint URL of the web service or API you want to test. Enter the complete URL, including the protocol (e.g., http:// or https://).
b. Proxy Settings: If your network requires a proxy to connect to the internet, enter the proxy details such as host, port, username, and password. This step is optional and only required if you are using a proxy server.
c. Timeout: Set the timeout value for HTTP requests. This defines the maximum time SoapUI waits for a response from the server before considering it a timeout.
d. Request Compression: Enable this option if you want to compress the request payload. This can be useful for reducing network bandwidth usage.
e. Follow Redirects: Choose whether you want SoapUI to automatically follow redirects (HTTP 3xx responses) or not.
f. Request GZIP Encoding: If the server supports GZIP encoding, enabling this option allows SoapUI to request a compressed response and automatically decompress it.
g. Enable HTTP Keep-Alive: Select this option to keep the connection open after a request is completed, enabling subsequent requests to reuse the same connection.
h. Enable HTTP Chunking: Enable this option if you want SoapUI to send large requests in smaller chunks.
i. Enable Chunked Encoding: This option allows SoapUI to receive and handle responses that are sent in chunks.
j. HTTP Headers: Configure any additional HTTP headers that you want to include in the requests. This can include custom headers, authentication headers, or specific content-type headers.
k. HTTP Authentication: If the web service or API requires authentication, you can specify the authentication type (Basic, Digest, NTLM, etc.) and provide the necessary credentials.
l. SSL Settings: If your web service uses SSL/TLS, you can configure SSL settings, including truststores, keystores, and client certificates.
Save the Settings: After configuring the desired HTTP settings, click the “OK” or “Save” button to save the changes.
By following these steps, you can successfully configure the HTTP settings in SoapUI for your test suites or test cases, allowing you to interact with the web service or API and perform various HTTP operations such as GET, POST, PUT, DELETE, etc.
SoapUI Settings: WSDL Settings
Moving on, in this section all the WSDL properties are specified.
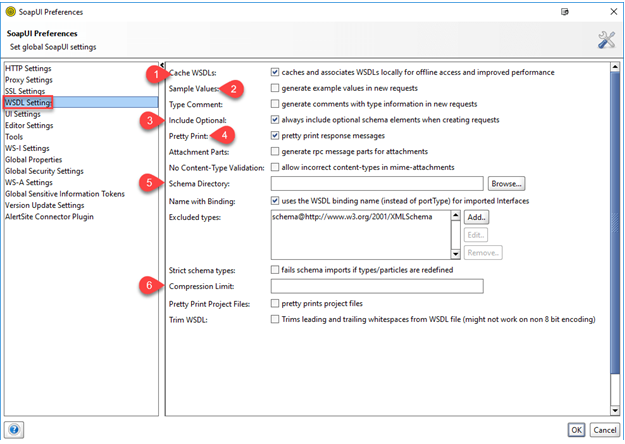
Detailed explanation of WSDL settings in SoapUI
| Option | Description |
| Cache WSDLs | Turns on and off caching of WSDL’s |
| Sample Values | Generates example values in requests when creating from schema |
| Type Comment | Generates comments with type information in new requests |
| Include Optional | Always includes optional elements in generated requests |
| Pretty Print | Pretty prints response messages in response editor |
| Attachment Parts | Generates part-elements in request messages for mime-attachments in RPC messages (required by some ws-stacks) |
| No Content-Type Validation | Does not validate the content-type of a mime-attachment against the type(s) specified in the SOAP-Binding |
| Schema Directory | Specifies a directory containing schema (.xsd) files that should be automatically added when parsing or validating wsdl or requests. Changing the contents of this directory requires a restart. |
| Name with Binding | Tells SoapUI to name imported interfaces with the name of their corresponding soap/http binding, and not with their portType. This ensures that WSDL containing bindings for both SOAP 1.1 and SOAP 1.2 will get unique names during import. This setting defaults to true. |
| Excluded Types | A list of XML-Schema types and global elements in the form of name@namespace which will be used when generating sample requests and responses and input forms in the SoapUI Pro Form editor. By default the XML-Schema root element is added since it is quite common in .NET services and generates a sample xml fragment of about 300 kb!. |
| Strict Schema Types | Check this to not allow schema type redefinitions in included/imported xsd:s for a specific WSDL (default behavior in versions prior to 1.7.5) |
| Compression Limit | The minimum message size to compress in the SoapUI project file for preserving space. Compression is performed with gzip and the result is base64 encoded into the project file. For large requests, this can save up to 90% file-space, but be aware that the requests are no longer readable or diffable. |
| Pretty Print Project Files | Pretty prints project files when they are saved, which makes it easier to work with a source-control system (diffing, etc…). Be aware that when selecting this option the size of the project files will increase substantially and also cached WSDLs and XSDs will be pretty-printed. |
Steps to configure WSDL settings in SoapUI
To configure WSDL (Web Services Description Language) settings in SoapUI, follow these steps:
Open SoapUI: Launch the SoapUI application on your computer.
Create or Open a Project: Create a new project or open an existing project that contains the WSDL you want to configure.
Import WSDL: If you haven’t imported the WSDL into the project, import it by clicking on “File” in the menu bar, selecting “Import WSDL,” and providing the location of the WSDL file.
Select the WSDL Definition: In the Navigator panel, expand the project and locate the WSDL definition you want to configure. It will be listed under the project name.
Open WSDL Settings: Right-click on the WSDL definition and select “WSDL Settings” from the context menu.
Configure WSDL Settings:
a. Endpoint: Verify or modify the endpoint URL of the web service defined in the WSDL. Ensure that the URL is correct and points to the actual location of the web service.
b. Bindings: SoapUI allows you to select different bindings defined in the WSDL. Choose the appropriate binding that you want to use for testing. This is particularly useful if the WSDL contains multiple bindings.
c. SOAP Version: Specify the SOAP version to be used for communication with the web service. SoapUI supports SOAP 1.1 and SOAP 1.2. Select the appropriate version based on the WSDL and web service requirements.
d. Enable MTOM: If your web service uses MTOM (Message Transmission Optimization Mechanism) for efficient transmission of binary data, enable this option. MTOM is used to improve performance when handling large attachments in SOAP messages.
e. Request/Response Validation: SoapUI allows you to validate the incoming and outgoing SOAP messages against the WSDL definition. Enable or disable the validation as per your testing requirements.
f. WSS (Web Services Security) Settings: If your web service requires security features such as digital signatures or encryption, you can configure WSS settings. This includes options for specifying keystore, security profiles, and certificate details.
g. Headers: Configure any additional SOAP headers that need to be included in the requests. This can include custom headers, SOAP headers for authentication, or other specific headers required by the web service.
h. Attachments: If the web service involves sending or receiving attachments, you can configure attachment settings, including the location, type, and size of attachments.
Save the Settings: After configuring the desired WSDL settings, click the “OK” or “Save” button to save the changes.
By following these steps, you can successfully configure the WSDL settings in SoapUI for your web service testing. These settings allow you to define the endpoint, SOAP version, security settings, headers, and other parameters necessary to interact with the web service defined by the WSDL.
SoapUI Settings: UI Settings
Further, in this section all the User interfacr properties are defined.
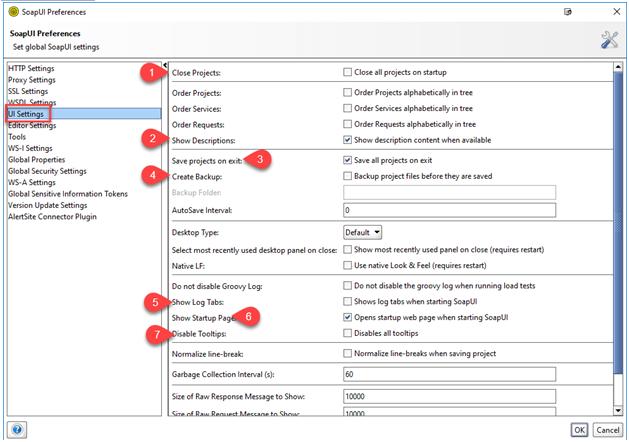
Detailed explanation of UI settings in SoapUI
| Option | Description |
| Close Projects | Closes all projects at startup for improved startup-time and less memory consumption. |
| Order Projects | Sorts Projects in alphabetical order in the navigator. |
| Order Services | Sorts Services in alphabetical order in the navigator. |
| Order Requests | Sorts Requests in alphabetical order in the navigator. |
| Show Descriptions | Show description content when available |
| Save Projects On Exit | Automatically save all projects on exit. |
| Create Backup | Creates a backup copy of a projects project-file before saving. |
| Backup Folder | The folder where to save backups, if relative or empty the folder is relative to the project files folder |
| Auto Save Interval | Sets a project auto save interval (in minutes). If set over 0, SoapUI will automatically save all projects that have no running tests (both Functional and Load) at the specified interval |
| Desktop Type | Selects which desktop layout to use. SoapUI Pro adds a Tabbed Desktop (Read Reference Tabbed Desktop ) as an alternative to the default layout. Changing this setting will be applied when closing the preferences dialog. |
| Native L&F | Turns off the use of the default Look & Feel and uses the JRE default instead. Requires a restart. |
| Do not disable Groovy Log | Keeps the groovy log active during LoadTests, which can be useful for debugging, etc. |
| Show Log Tabs | Expands the log tabs when starting SoapUI. |
| Show Startup Page | Opens startup web page when starting SoapUI. |
| Disable Tooltips | Disables all tooltips |
| Normalize Line-Break | Normalize line-breaks when saving project |
| Garbage Collection Interval | Sets the Garbage Collector interval in seconds (o means the garbage collection is only performed by JRE) |
| Size of Raw Response Message | Sets the size of raw response message to show |
| Size of Raw Request Message | Sets the size of raw request message to show |
| Wrap content in Raw Message Viewers | Wraps the content in Raw Message Viewer |
| Disable Usage Statistics | Defines if anonymous usage statistics are to be sent or not. |
Configure UI settings in SoapUI
SoapUI does not provide specific UI settings as it is primarily focused on testing web services and APIs programmatically. However, if you are referring to customizing the SoapUI user interface (UI) preferences and appearance, there are a few options available. Here’s how you can customize the SoapUI UI settings:
Theme and Look:
SoapUI provides a light and dark theme. You can switch between the themes by going to “File” in the menu bar, selecting “Preferences,” and navigating to the “Appearance” section. Choose the desired theme from the available options.
Font and Colors:
In the “Preferences” dialog, you can also modify the font and color settings for different elements in the UI, such as the editor font, log font, and color scheme for various components.
Layout Customization:
SoapUI allows you to customize the layout of the UI by docking or undocking panels, rearranging panels, or resizing them according to your preference. You can drag and drop panels, collapse or expand them, and create custom layouts to suit your workflow.
Window Management:
SoapUI supports multiple project windows and allows you to open multiple instances of the application simultaneously. You can manage windows by using the options available in the menu bar, such as “Window” > “New Window” or “Window” > “Close Window.”
Toolbars and Views:
SoapUI provides various toolbars and views that can be enabled or disabled based on your requirements. You can access these options from the “View” menu in the menu bar. Customize the toolbars and views to display the components you frequently use.
Keyboard Shortcuts:
SoapUI allows you to customize keyboard shortcuts for specific actions. Go to “File” > “Preferences” and navigate to the “Keymap” section. Here, you can define your preferred keyboard shortcuts or modify existing ones.
Logging and Reporting:
SoapUI provides options for configuring logging and reporting settings. You can define the log level, choose the log output format, specify the log file location, and configure report generation settings. These options are available in the “File” > “Preferences” dialog under the respective sections.
It’s worth noting that SoapUI’s focus is primarily on the functional and performance testing of web services and APIs. While some customization options exist for the UI, they may be limited compared to dedicated UI design tools.
SoapUI Settings: Proxy Settings
After UI comes Proxy Setting. Moreover, here all the Proxy servers are defined.

| Option | Description |
| Proxy setting | How the proxy is determined. Automatic tries to automatically determine proxy by looking at Java settings, environment variables, browser settings and operating system settings. None turns off the proxy. Manual uses the host, port and excludes entered below. |
| Host | The HTTP Proxy host to use (only applicable for manual proxy). |
| Port | The HTTP Proxy port to use (only applicable for manual proxy). |
| Excludes | A comma-separated list of hosts to exclude, for example “127.0.0.1:8080,myserver.com” will not use a proxy for 127.0.0.1 on port 8080 and myserver.com on any port (only applicable for manual proxy). |
| Username | The username sent for proxy authentications |
| Password | The password sent for proxy authentications |
SoapUI Settings: SSL Settings

| Option | Description |
| KeyStore | Path to the keyStore to use when locating client certificates |
| KeyStore password | the keyStore password |
| Enable Mock SSL | Enables SSL support for MockServices |
| Mock Port | The port for SSL connections |
| Mock KeyStore | The keystore to use for SSL certificates |
| Mock Password | The keystore password |
| Mock Key Password | The default keys password |
| Mock TrustStore | The truststore to use (optional) |
| Mock TrustStore Password | The truststore password |
| Client Authentication | Indicates if client authentication is required |
SoapUI Settings: Editor Settings
This section is dedicated to Editor Settings. Further, all the Editor properties like font, line numbers visibility and response validation etc.

| Option | Description |
| Editor Font | The font to be used by all XML Editors. The “Select Font” button opens a dialog for selecting the desired font and size. |
| XML Line Numbers | Shows line-numbers by default in all XML-Editors (use Alt-L in editors to toggle). |
| Groovy Line Numbers | Shows line-numbers by default in all Groovy-Editors (use Alt-L in editors to toggle). |
| Disable auto-resize | Disables automatic resizing of request/response editors. |
| Tabbed Request view | Sets the tab-layout as the default layout for request/response editors (Read Reference Requests). |
| Validate Requests | Turns on automatic validation of requests before they are submitted from a request editor. The validation performed is the same as when pressing Alt-V in the editor. |
| Abort on Invalid | Enabled in conjunction with “Validate Requests”, if selected any requests that fail validation will not be submitted. |
| Validate Responses | Turns on automatic validation of response messages when they are received in a response editor. The validation performed is the same as when pressing Alt-V in the editor. |
Tools
This section defines all the external tools executables. So, to run tools from the Tools main application menu, all the executbale must be already defined.
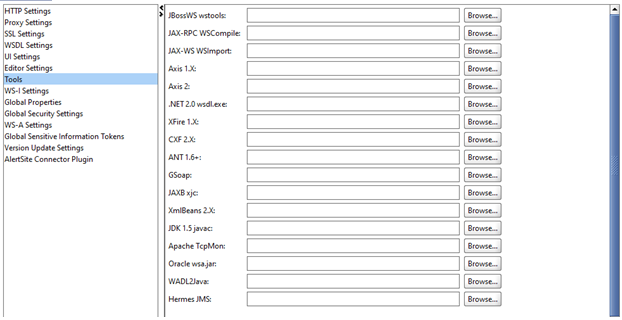
| Option | Description |
| JBossWS wstools | Location of JBossWS wstools |
| JAX-RPC WSCompile | Location of JAX-RPC wscompile |
| JAX-WS WSImport | Location of JAX-WS wsimport |
| Axis 1.X | Location of Axis 1.X |
| Axis 2.X | Location of Axis 2.X |
| .NET 2.0 wsdl.exe | Location of .NET 2.0 wsdl.exe |
| XFire 1.X | Location of XFire 1.X |
| CXF 2.X | Location of CXF 2.X |
| ANT 1.6+ | Location of Apache ANT 1.6.5 or later |
| GSoap | Location of GSoap 2.X |
| JAXB xjc | Location of JAXB xjc |
| XmlBeans 2.X | Location of XmlBeans 2.X |
| JDK 1.5 javac | Location of JDK 1.5 javac |
| Apache TcpMon | Location of TcpMon directory |
| Oracle wsa.jar | Location of Oracle wsa.jar |
| WADL2Java | Location of WADL2Java script |
| Hermes JMS | Location of Hermes JMS |
WS-I Settings
Since this section, includes WS-I Settings. therefore, all the WS-I properties must be defined.

| Option | Description |
| Verbose | Sets verbose output of WS-I tools |
| Profile | WS-I Profile |
| Correlation | Header for correlation between encrypted and unecrypted messages. |
| Message Entry | Shows message entries in report |
| Failure Message | Includes defined failure messages in report |
| Assertion Description | Includes description of each test assertion in report |
| Tool Location | Local path to installed WS-I test tools |
| Show Log | Shows Log window when running WS-I tools |
| Output Folder | If specified, generated HTML reports will automatically be exported to this folder, which is required when running ws-i validation from the command-line or one of the Maven plug-ins |
Global Properties
All the custom Global Properties have to be defined here.

| Option | Description |
| Global Properties Table | (Read Reference Properties) |
| Enable Override | Enables overriding of any property-reference with global properties |
Global Security Settings
In this section, you are going to loearn all about Global Security Settings. Therefore, all the shadowing proxy password must be mentioned in seeting file.

| Option | Description |
| Password | Password for shadowing proxy password in settings file |
WS-A Settings
To implement WS-A Setting, all the parameters should be related to web services address.

| Option | Description |
| Soap Action Overrides WS-S Action | If present in the WSDL soap action overrides wsa:Action |
| Use default RelationshipType | Indicates using default ‘reply’ for RelationshipType as specified in Message Addressing Properties |
| Use default RelatesTo | Indicates using default ‘unspecified’ for RelatesTo as specified in Message Addressing Properties |
| Override existing headers | Indicates replacing/skipping(if unchecked) already existing headers |
| Enable for optional Addressing policy | Enables WS Addressing for Policy Addressing Assertion attribute Optional=”true” |
Global Sensitive Information Tokens
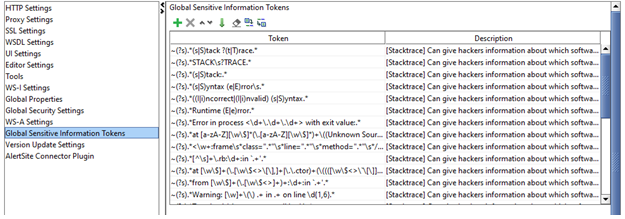
| Option | Description |
| Token | The token can either contain a plain string or a regular expression prefixed with a ~ tilde sign (to separate it from a plain string) |
Make your resume stand out and become a Certified SoapUI Testing Professional. Try free practice tests here!
A great career is just a certification away. So, practice and validate your skills to become Certified SoapUI Testing Professional Now!

