SoapUI Projects

In SoapUI, the work is organized into projects. These are further displayed under the root node in the workspace navigator. However, a project can contain any number of functional tests, load tests, and service simulations.
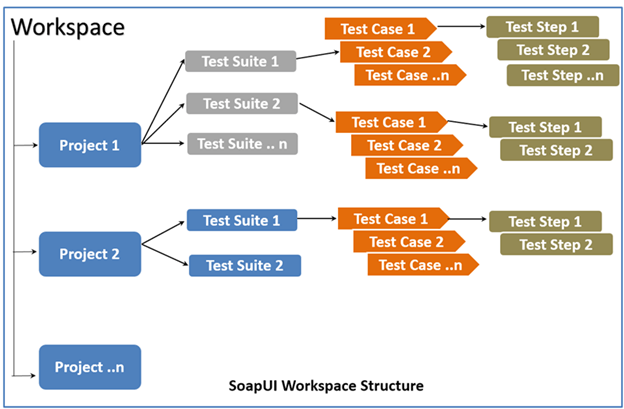
Hence, the project structure is as
- Firstly, create a workspace. There can be several projects associated with a workspace. Users can create more than one workspace. In SOAP UI Pro version, we can seamlessly switch environments to map it to different endpoints.
- Secondly, for each project, we can create several test suites.
- Thirdly, for each Test Suite, there can be several test cases attached to it.
- Lastly, for each Test Case, there can be several test steps associated with it.

Project Formats
SoapUI offers two project formats: standalone projects and composite projects.
- Firstly, Standalone Projects – The default project format is standalone. SoapUI stores them as a single XML file that contains all project artifacts – such as interfaces, tests, mock services, scripts, and so on.
- Subsequently, Composite Projects – SoapUI Poffers a suaim of the composite projects is team testing. These allow several people to work on the project at the same time.
Project Types
There are three main types of projects in SoapUI:
- SOAP Projects – SOAP projects can be created from a WSDL file or single service call. You can use these projects to test every aspect of your SOAP services, verify that the services support commonly used standards such as WS-Security, WS-Addressing, and MTOM, create functional and load tests, and much more.
- REST Projects – REST projects can be created from WADL file or, directly, URI and its parameters. You can use these projects to test RESTful services, create various requests and check the information you receive, give a try to a multitude of methods and operations, and so on.
- Generic Projects – Generic projects are all-purpose project for services with varied interfaces and methods. They may combine tests you create for REST and SOAP services, as well as data-driven tests, mockups, and all the functionality SoapUI provides.
Creating a Workspace
- All the artifacts which will be created, from now on would be contained in this workspace.
- Enter a name for the workspace and click ‘OK.’
- Now the user has to select the path where this workspace has to be saved.
- Select the path where the workspace has to be saved
- The name of the workspace XML, which has to be located when the user wants to open the workspace in the future.
- Click ‘Save’.
Add Project to Workspace
There are two ways to add a project to the workspace:
- By creating a new project
- By importing an existing local, composite, packed, or remote project
Create a New Project
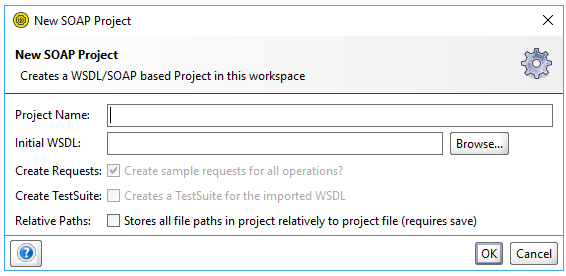
- To create a new SOAP project, select File > New SOAP Project. Specify the name for your new project and the WSDL file that SoapUI will use for the initial configuration, then select the necessary options.
- Click OK. SoapUI will generate the service and, optionally, test suite and mock service.
- To create a new REST project, select File > New REST project. Specify a URI to use for the project generation in the subsequent dialog and click OK.
- You can also click Import WADL to switch to the New WADL project dialog. With this dialog, you create a REST project based on WADL.
- To create a new empty project, select File > Create Empty Project. It will immediately appear in the Navigator, and the editor for the project will become available in the Workspace.

Import Project
By Local Project File
- To import an existing project file from your computer: Select File > Import Project.
- Specify a path to the project XML file, or click Browse and navigate to the file manually.
- Click OK.
By Local Packed Project
- To import an existing packed project ZIP file from your computer: Select File > Import Packed project.
- Specify a path to the project ZIP file, or click Browse and navigate to the file manually.
- Click OK.
By Local Composite Project
- To import a composite project consisting of multiple files: Select File > Import Project.
- Specify a path to the folder that contains the project files, or click Browse and navigate to the folder manually.
- Click OK.
To Import Remote Project
- To import a remote project (for example, a tutorial, demonstration, bug report, and so on) using HTTP:
- Select File > Import Remote Project.
- In the subsequent dialog, specify an URL that leads to the project.
- Click OK. SoapUI saves all changes you apply to the imported remote project to the local copy.
Resolve Projects
When you import a project, SoapUI checks it to verify it is consistent and has all necessary external dependencies available. This process is called resolving.
If errors are found, the Resolve Project dialog appears. It shows all errors, so you can resolve them as you need. To take a closer look on a specific item, double-click it in the list, and the corresponding editor will appear.
In the Resolve Project dialog, you handle conflicting resources in your project when you import it.

To resolve a potential problem:
- Select a needed action from the drop-down list to the right of each item.
- Enter parameters or values as needed.
- Click OK.
Import Postman Collection
- To create a project based on the Postman Collection: Select File > Import Postman Collection.
- In the subsequent dialog, specify the path to the collection file.
- Click OK.
Resource Root Property
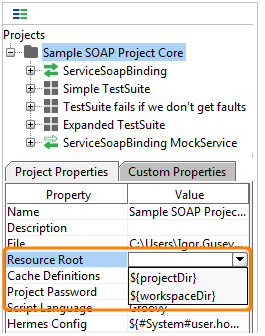
The Resource Root property controls how SoapUI handles paths for the project resources. If the project contains references to an external resource, they will need to be included with the project when distributed.
| Option | Description |
| An absolute path | Use this absolute path. |
| ${projectDir} | Resolves files relative to the project folder. |
| ${workspaceDir} | Resolves files relative to the folder containing the workspace file. |
SoapUI also applies this setting to external files the project uses.

Example – A testdata.xls file is needed from the project. The d:\projects\ folder contains workspace files, and d:\projects\webservice\ is the folder of the project.
- Absolute path – The d:\data path resolves to d:\data\testdata.xls.
- Project path – The ${projectDir}\data path resolves to d:\data\testdata.xls.
- Workspace path – The {workspaceDir}\data path resolves to d:\proects\webservice\data\testdata.xls.
Project Encryption
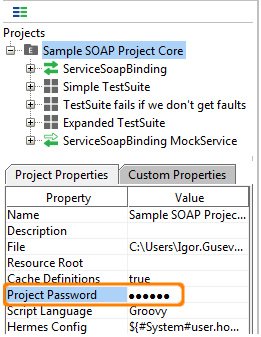
You can use the Project Password project property to encrypt the entire contents of the project file. When you save such project, the project icon will contain a small E character to indicate it has been encrypted.
When you open the password-protected project, SoapUI will suggest to decrypt the project before using it.
To remove the encryption, clear the project password value and save the project. Do not lose your password. SoapUI provides no means to recover an encrypted project file if the password has been lost.

A great career is just a certification away. So, practice and validate your skills to become Certified SoapUI Testing Professional Now!

