REST API Testing
Let’s understand the REST API Testing. REST stands for Representational State Transfer. It is a software architecture style that relies on a stateless communications protocol, most commonly, HTTP. REST structures data in XML. REST is very data-driven.
There is no standard for the description format of REST services. You can import your REST service in SoapUI by using WADL files. Besides, SoapUI Pro supports the OpenAPI, Swagger and RAML formats.
So in a nutshell here is what each of these request types maps to:
- First of all, GET – Read or retrieve data
- Secondly, POST – Add new data
- Subsequently, PUT – Update data that already exists
- Lastly, DELETE – Remove data
REST API Testing: REST Headers
The REST headers and parameters contain a wealth of information that can help you track down issues when you encounter them. HTTP Headers are an important part of the API request and response as they represent the meta-data associated with the API request and response. Headers carry information for:
- Firstly, request and Response Body
- Secondly, request Authorization
- Subsequently, Response Caching
- Lastly, Response Cookies
Other than the above categories HTTP headers also carry a lot of other information around HTTP connection types, proxies etc. Headers are mostly classified as request headers and response headers, know the major request and response headers.
The Headers
Authorization: Carries credentials containing the authentication information of the client for the resource
WWW-Authenticate: This is sent by the server if it needs a form of authentication before it can respond with the actual resource. Often sent along with a response code of 401, which means ‘unauthorized’.
Accept-Charset: This is a header which is set with the request and tells the server about which character sets are acceptable by the client.
Content-Type: Indicates the media type (text/html or text/JSON) of the response sent to the client by the server, this will help the client in processing the response body correctly.
Cache-Control: This is the cache policy defined by the server for this response, a cached response can be stored by the client and re-used till the time defined by the Cache-Control header.
REST API Testing: REST Request Methods
The HyperText Transfer Protocol – HTTP – defines several methods (referred to as “verbs”) that indicates the desired action to be performed on a resource. The resource is specified by the URI (Uniform Resource Identifier), more commonly, the URL. The most common are: GET, POST, PUT, and DELETE, but there are several others.
The concept of idempotence is relevant to this discussion. If something is idempotent, then no matter how many times you do it, the result will always be the same. A very simple example comes from mathematics: multiplication by 1; no matter how many times you multiply any number by 1, the result will always be the same: the original number.
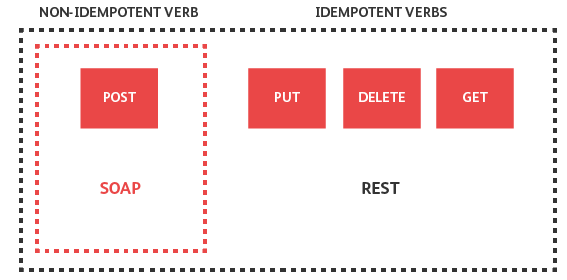
SOAP APIs, when sending over HTTP, can use only the POST verb, and the exact action depends on the SOAP method that is being called. REST.
POST
Out of the four discussed here, POST is the only method that is assumed to be non-idempotent. This is the preferred method when creating new objects in an application. for example, creating a new order. Every POST method call should result in a new object being created (or possibly deleted) in the database.
PUT
The PUT method should be idempotent. The word “should” indicates that the server is able to implement this method differently. A tester should flag such an implementation as an inconsistency.
PUT can still be used for creating objects, although since it is idempotent, repeatedly executing the same request will have the same end result as the first time. For example, no matter how many times you send in a request to create that same customer ID, it should only be created once in the database.
DELETE
The DELETE method is idempotent; multiple requests should result in only one thing being deleted. A DELETE request should accept a unique identifier to remove only one of the products from the order, thereby sending the same DELETE request will result in the correct idempotent operation: the one instance of the product.
More correct implementation of this “multi-delete” functionality would be a POST operation in combination with correctly crafted URL, such as:
/{order_number}/{product_name}/remove
GET
The GET operation normally uses only retrieve information from the system. Nothing adds or changes, so it is more than idempotent, it is actually nullipotent – it has absolutely no side-effect on the data, other than possibly logging.
REST API Testing: RESTful Resources
In any RESTful service, it is very desirable to have all your resources structured by their hierarchy. These are then specified in the hierarchical part of the URL. The hierarchical parts are all 1) required, and 2) unique. This means that none of them can be omitted, and all of them can appear only once.
Fragment Parameters
The fragment part of the URL, everything after a hash symbol, is information that is normally used only by the client, such as a browser, and not processed by the server. Therefore it is uninteresting when discussing REST parameters. The only interesting item is if you need to send the actual hash character as a value (instead of representing the hash control symbol) to one of the options. In that case you need to encode the URL.
Character Encoding
Special character encodes in the URL, by a mechanism called “percent encoding”. In this mechanism, any character replaces the percent symbol, followed by a two-digit hexadecimal value of the character. If special characters (such as the hash character) sends as actual data, they are encoded. All other characters encode.
Size Limits
Although the URI standard does not specify a maximum size of the URL, most clients enforce an arbitrary limit of 2000 characters. Sending data that is difficult to express in a hierarchical manner, and especially data that is larger than this 2000 character limit, should be transmitted in the body of the request.
REST API Testing: REST Parameters
Use request parameters to set varying parts in simulated requests. SoapUI supports the following parameter types:
- First of all, QUERY
- Secondly, TEMPLATE
- Thirdly, HEADER
- Lastly, MATRIX
You can find them in the request editor. The drop-down list also includes an additional PLAIN type. You use it in SoapUI to make testing more flexible
Query Parameter – The query parameters are sometimes known as optional parameters; this is the first distinguishing feature from the hierarchical parameters: they are all optional. The second feature is that they are non-unique, meaning that you can specify any one parameter multiple times.
Create REST Request
Start by creating a new REST project with a single request:
- Firstly, click Rest on the main toolbar or select File > New Rest Project.
- Subsequently, in the dialog box, enter the following URL and click OK:
https://petstore.swagger.io/v2/pet/findByStatus?status=available
- Further, SoapUI creates the project complete with a Service, Resource, Method and the actual Request and opens the Request editor.
- Subsequently, click Run on the Request toolbar and you will see the XML output returned by the service:
- Moreover, the request seems fine, so let’s create an actual functional test for this resource. Click Add to test case. Specify a name for the test suite, test case and for the REST Request test step:
- Last but not least, SoapUI creates a test case with a corresponding REST Request test step:

Adding Assertion
Add an assertion to validate the content of the response. In our case we are just going to check that we get 1 place back from the service. The steps are
- Firstly, open the REST Request test step and click Run to send the request.
- Secondly, click Add assertion to add assertion:
- Subsequently, select Property Content > JSONPath Count and click Add:
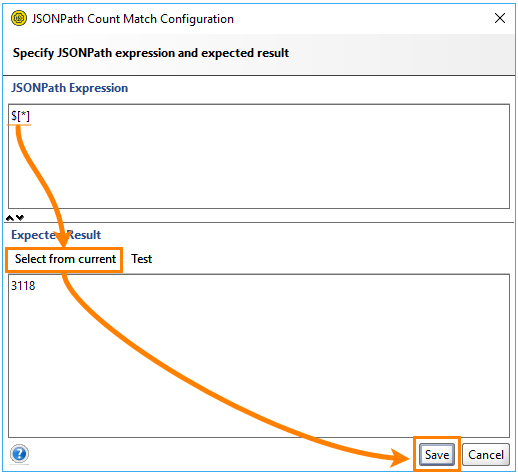
- Further, In the dialog box, specify the following JSONPath expression: $[*]
- In addition, Click Select from current to obtain the value from the current response:
- Moreover, Click Save to create the assertion.
- Lastly, Run the test case and check that the assertion passes:
QUERY Parameters Test
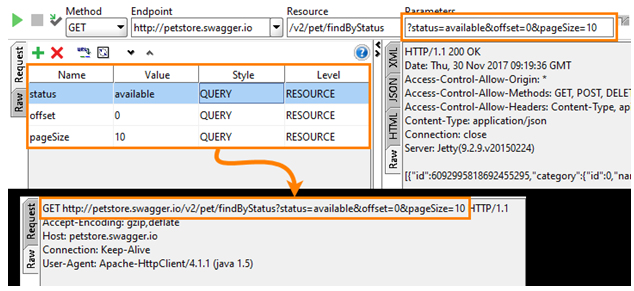
QUERY parameters appear in the URL after the question mark (?) after the resource name:
https://myserver.com/resource-name?param1=value1¶m2=value2
In SoapUI, you can see them at the top of the REST Request editor:
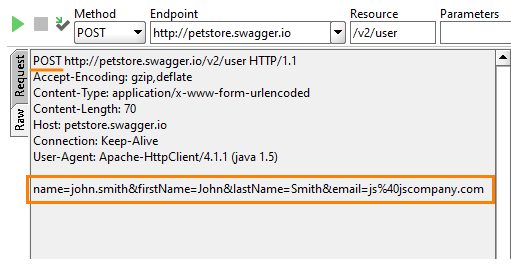
If you submit an HTML form, you use a POST or PUT request. For such requests, you can include parameters of the QUERY type into the request body. To do this, simply select the Post QueryString check box.
This will remove QUERY parameters from the URL and will add them to the request body. You can see this in the Raw page after you simulate the request:
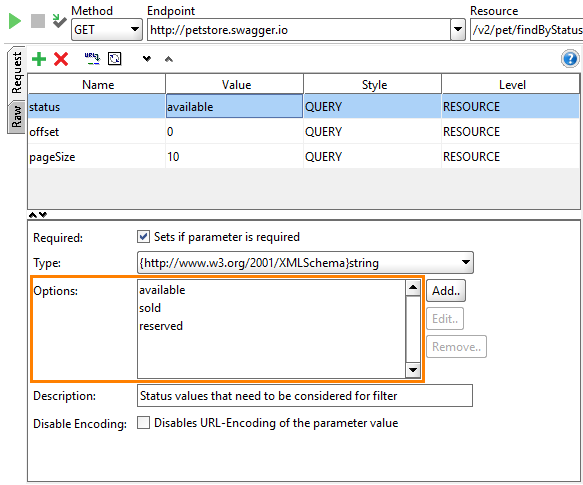
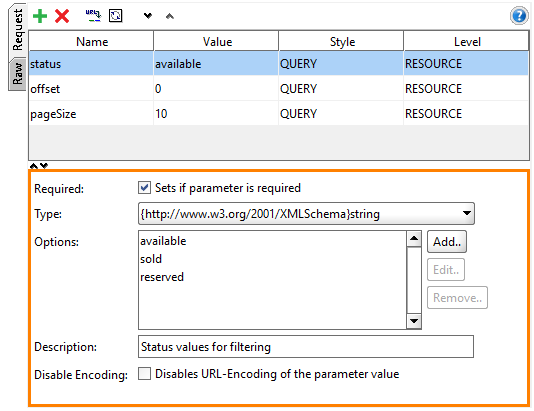
In the image above, we used the Options box to list available values:
HEADER Parameters Test
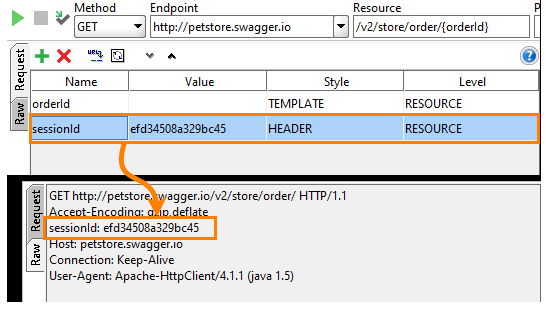
HEADER parameters pass in the headers of outgoing requests:
TEMPLATE Parameters
These parameters appear in resource paths. They give API developers a flexible way of parameterizing resources:
http://myserver.com/some-path/parameter/path-continued/parameter2
For instance, the FreeGeoIP REST API expects the data format and IP address in a resource URL:
http://freegeoip.net/json/10.70.12.8
You define these parameters in SoapUI in the following way:
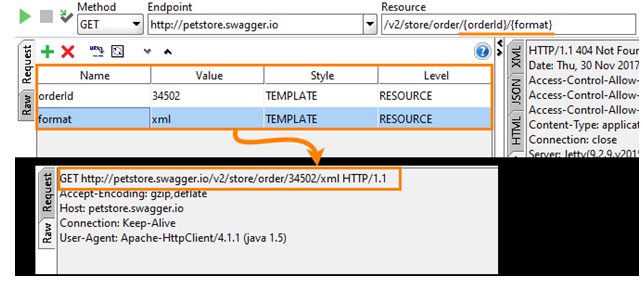
It creates TEMPLATE parameters at the RESOURCE level. MATRIX Parameters Test
These parameters also go in the request URL. They reside between the resource path and QUERY parameters. Further, these separate from the resource path by a semicolon (;):
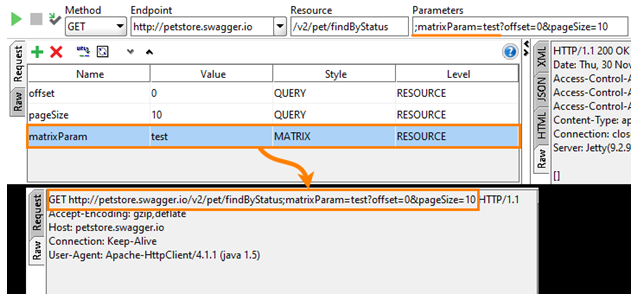
Parameters of this type are not as common as TEMPLATE or QUERY parameters. However, SoapUI supports them because they are in WADL.
PLAIN Parameters
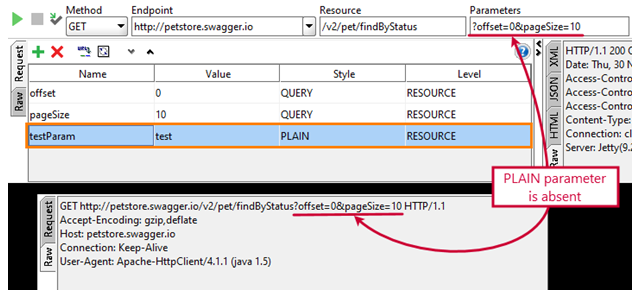
SoapUI also uses PLAIN parameters. These parameters are present in the request editor, but SoapUI does not include them into simulated requests. You can change the parameter type back if needed (this will free you from creating the parameter and entering its value later):
Testing Parameter Level: RESOURCE and METHOD
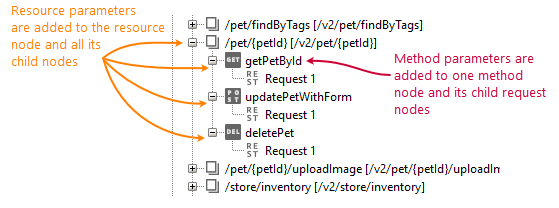
In SoapUI editors, you can define parameters at the RESOURCE or METHOD level.
The RESOURCE level means that the parameter you create will add to all method and request items under the resource item. The METHOD level means the parameter will add to the request items below the method item only, It will not affect the resource and other method items.
Parameter Properties
You can create and delete parameters in the request editors that you called for the resource > method > request items in the Navigator panel.
Adding REST Services, Resources and Methods
A REST Service contains any number of resources available on their corresponding path. Resources themselves can have as many levels of child resources as desired; a child resources path will be the concatenation of all its parents’ path with its own.
Before digging into the REST Request editor we need to back up a bit and look at the objects generated when you add the REST service. Let’s start by double-clicking the created Search resource and a window opens.
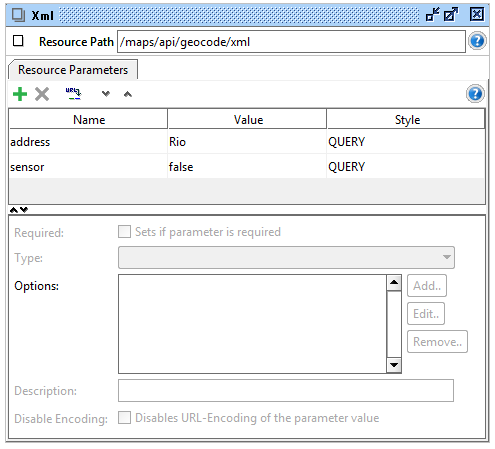
In the toolbar, you can see and change the path of the resource. Under it is a “Resource Parameters” tab in which we can see the “address” and “sensor” parameters extracted during the resource-creation process.
This data can be specified for several purposes:
- First of all, for correct parameter definitions in the generated WADL
- Subsequently, for presenting a nicer input Form in the Form editor for REST Requests
- Lastly, for custom encoding handling when setting a parameter value (the “Disable Encoding” setting)
Specific for the Method window is the “Representations” tab:
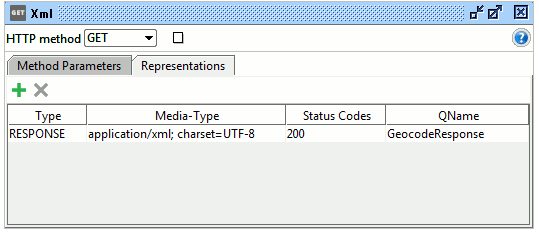
Here you can see the representations defined for the method.
REST API Testing: REST Functional Testing
Add the Request TestStep in several ways:
- First thing first, by pressing the “Add to TestCase” button on the top left of the message editor or the “Add to TestCase” action from the Request Popup Menu. This will prompt for which TestSuite/TestCase to add to (or create new ones) and then open a dialog box.
- Secondly, by pressing the REST Request button or selecting the corresponding “REST Test Request” option from the Insert/Append TestStep popup menu options in the TestCase editor. This will first prompt for a name and which REST Method to test.
- Moreover, in either ways, pressing OK generates the REST Request TestStep as specified into the target TestCase.
- Last but not least, double-click it to open the editor which is similar to the standard REST request editor but has the Assertion and Log tabs added at the bottom.
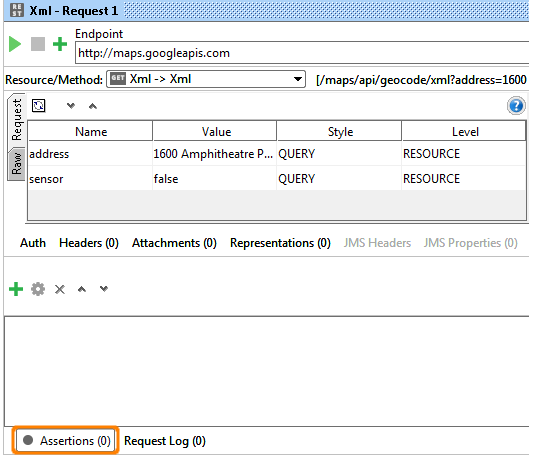
Make your resume stand out and become a Certified SoapUI Testing Professional. Try free practice tests here!
A great career is just a certification away. So, practice and validate your skills to become Certified SoapUI Testing Professional

