Creating a Purchase Invoice
To create purchase invoice for purchase of taxable goods,
Go to Gateway of Tally > Accounting Vouchers > F9: Purchases
Press F12: Configure and set Use Common Ledger Account for Item Allocation to No.
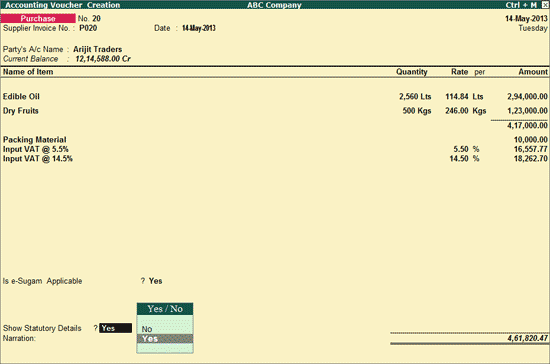
- Select theParty’s A/c Name from the List of Ledger Accounts.
- Select the stock items from theList of Items
- Enter theQuantity and Rate. The amount is automatically displayed in the Amount field.
- In theAccounting Details screen, select the purchase ledger with the required VAT/tax class.
- On selecting the purchase ledger predefined with VAT/Tax class, the same will be displayed inAccounting Details Else, the VAT/Tax class has to be selected if it is not predefined in the purchase ledger master. On selecting Not Applicable in VAT/Tax class field, the error message is displayed as – VAT/Tax Classification not Selected.
- Select an expense ledger grouped underDirect Expenses by setting the option Use for Assessable Value Calculation to Yes with the Method of Apportioning to be made, Based on Value. Enter the expense amount.
- Select the appropriateInput VAT ledgers from the List of Ledger Accounts. The amount of Input VAT gets calculated on the aggregate of assessable value and the amount apportioned for the expense ledger.
- SetIs e-Sugam Applicable to Yes.

- The e-Sugam sub-screen will be displayed for entering the details pertaining to:
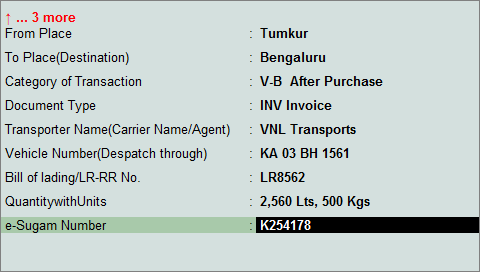
- Invoice Delivery Date: The invoice date will be captured here.
- From Place: Enter the place from where the goods are despatched.
- To Place (Destination): Enter the name of place where the goods are to be delivered.
- Category of Transactions: The category of transactions as listed in the e-Sugam entry form in the Department website gets displayed as list of VAT Category Type. Select the required category based on the nature of transaction.
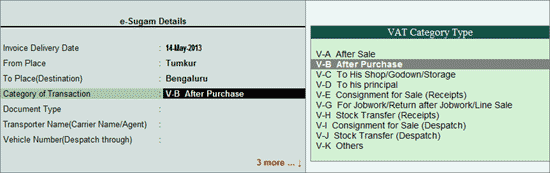
Document Type: Based on the Category of transaction selected the Document Type gets displayed in this field. On selecting the following category, two document types get displayed for selection. The required document needs to be selected here:
- For the category – V-G For Jobwork/Return After Jobwork/Line Sale, the Document types – LJV Consignment for Sale (Receipts) and OTH Others get listed.
- For the category – V-K Others, the Document types – LJV Consignment for Sale (Receipts) and OTH Others get listed.
- Transporter Name (Carries Name / Agent): Enter the name of transport service used by seller to despatch goods.
- Vehicle Number (Despatch through): Enter the Vehicle Number here.
- Bill of lading/LR-RR No.: Enter the bill of lading/LR-RR number
- Quantity with Units: The quantity entered for each stock item will be captured along with the respective unit of measurement.
- e-Sugam Number: The unique number displayed in the e-Sugam acknowledgement obtained on uploading dealer TIN with the transportation details before despatch of these goods needs to be entered here. The seller of goods will inform the number to the purchaser.
- Press Enter to return to purchase invoice creation screen.
- Set Show Statutory Details field to Yes if you want to view the purchase details with the tax break-up.
- Press Enter to view the Statutory Details screen
- Press Alt+F1 to view purchase value and tax break-up in detailed mode. The value of expense ledger is apportioned to the item value. The input VAT is calculated on the apportioned amount.
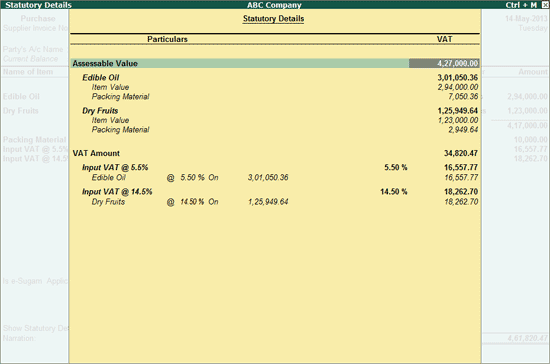
- Accept the Statutory Details screen and the purchase invoice.
Setting Invoice Configuration
This allows you to configure invoice, delivery notes and sales & purchase orders. The Invoice entry and Order entry screens can be configured for additional information such as export details, shipping details, etc.
Go to Gateway of Tally > F12: Configure > Invoice/Orders Entry
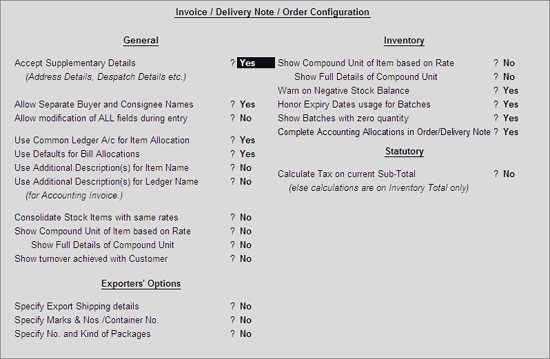
General Options
Accept Supplementary Details
By default, this option is set to YES.
Tally.ERP 9 displays an additional screen to feed in the delivery note details, order details, Terms of payment, party address details, etc., after selecting the required Party ledger account.
Print Default Name & Address of Party
By default, Print Default Name & Address of Party is not visible in the Invoice Entry configuration Screen. This option is available only if Accept Supplementary Details in F12 Configure is set to No.
On setting this option to Yes, Tally.ERP 9 Prints the Party Ledger’s Mailing Name and address details given in the Ledger master – in the Invoice. On setting this option to No – the invoice printout will display only the Party Ledger’s Name without address details.
Allow separate Buyer and Consignee Names
By default, this option is set to No.
If set to Yes – Tally.ERP 9 provides an option to enter consignee Name and address in the Supplementary details screen.
Allow modification of ALL fields during entry
Default order/delivery note entries appearing in the invoice can be changed during invoice entry. Set this to Yes to permit modification of all fields.
Use Common Ledger A/c for Item Allocation
By default, this option is set to Yes.
This automates the updation process of the Sales and Purchase accounts for all the items selected in the invoice. In case this option is Set to No – Tally.ERP 9 prompts for sales or purchase accounting allocations after every item.
Use Defaults for Bill Allocations
By default, this option is set to Yes. In this case, Tally.ERP 9 automatically takes the invoice number as the bill reference name and the credit period given in the Party ledger master as the credit period – both as part of the bill-wise details. This enables faster data entry.
Configuring Invoice Printing
The printing option allows you to configure the printing parameters of a Voucher, Invoice and Statement layouts before final printing.
Go to Gateway of Tally > F12: Configure > Printing
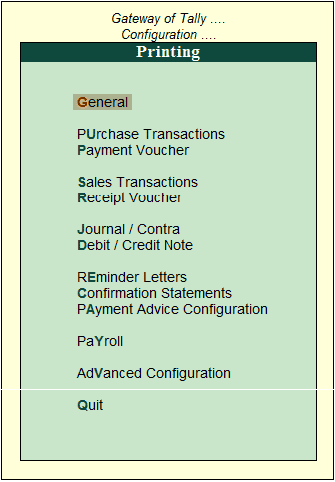
Printing Vouchers
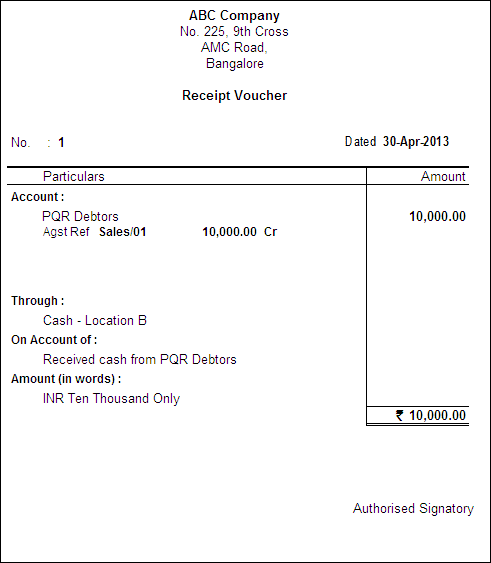
Printing Receipt Vouchers
To print the Receipt voucher,
Go to Gateway of Tally > Accounts Info > Voucher Types > Alter
- Select the Voucher TypeReceipt.
- Set the optionPrint after saving voucher to Yes.
- Enter a receipt voucher and Tally.ERP 9 prompts to print the Formal Receipt (to be issued) and then the Receipt Voucher (for the company’s records).
- InF12: Configure, Receipt Printing Configuration, set the options Print Bank Details and Print All Details to Yes
The Receipt voucher for the same information is printed as shown:
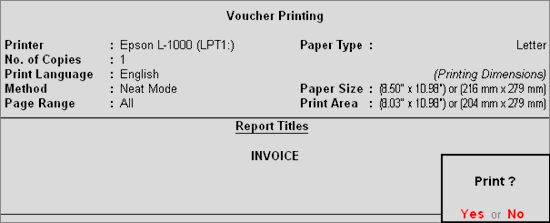
Printing a Sales Invoice
To print any Invoice/voucher, press ALT+P or click on the button Print. You can configure the voucher type to print automatically after saving the voucher for which, the option Print after saving Voucher must be set to Yes.