Text editing enables you to delete, move, and copy or paste text in your document. For the purpose of editing in Word we make use of Mouse or the Keyboard to select the text and perform the required task of deleting, moving or copying the text.
Copying and Pasting of Text
The Clipboard is a piece of memory that temporarily holds anything you copy to it and Word has capability to hold multiple items on the Clipboard. So when you copy text an actual copy of the selected text is placed on the Windows Clipboard. In order to copy any text to the Clipboard, select the subject then click the Edit menu and choose Copy, or simply press Ctrl + C together. Place the cursor in the document where you want to paste the copied text, thereafter Select Edit menu and choose the Paste option, or together press Ctrl + V, the text will be inserted at the point of insertion.
Move or copy by drag and drop
Following steps have to be taken
- Turn on drag-and-drop editing by On the Tools menu, click Options, and then click the Edit tab.
- Select or clear the Drag-and-drop text editing check box.
- Select the item we want to move or copy.
- If we want to move the item, drag the selection to the location we want, else if we want to copy the item, hold down CTRL as we drag the selection.
We can also move or copy items by holding down the right mouse button and dragging the selection. When we release the mouse button, a shortcut menu shows the available options for moving and copying.
Move or copy by toolbar
Following steps are to be taken –
- Select the item we want to move or copy.
- If we want to move the item, click Cut on the Standard toolbar else, if we want to copy the item, click Copy on the Standard toolbar.
- If we want to move or copy the item to another document, switch to the document.
- Click where we want the item to appear.
- Click Paste on the Standard toolbar.
Using smart cut and paste
When we delete or insert text, Word can automatically adjust the spacing around the text. For example, Word can remove an extra space before a period or add a space between two words.
- On the Tools menu, click Options, and then click the Edit tab.
- Select the Use smart cut and paste check box
Office Clipboard
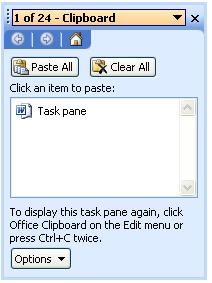
Clipboard manager is a special tool that records everything that you copy to the clipboard. So you get full clipboard history and can easily reuse its items.
It remembers 24 last copied items. It allows you to copy multiple items and then paste them into the document you’re working on or into a new document. Further, you can view the clipboard in the task pane, allowing you to select what you’re going to paste – you are not limited to the last item you copied.
There are several ways to display the expanded clipboard, and some are easier than others
- Hold down the Ctrl key and press C twice – the task pane will open and the clipboard will be displayed
- From the Task pane, select Clipboard from the drop down menu
- From the Edit menu, select Office Clipboard
- From the Options menu on the Clipboard Task pane, select Show Office Clipboard Automatically and deselect Collect Without Showing Office Clipboard – when you copy more than one item, the Clipboard will appear.

Clipboard task pane
Deleting Text
The easiest way to remove text is with the help of Backspace or Delete keys. The Delete key is used to delete the character to the right of the point of insertion and the Backspace key is used to delete the character to the left of the point of insertion. Also one can delete text and replace it with new by selecting the text you want to delete text and thereby type the new text. This simply replaces the existing text
Undo and Redo Text
Any recent change made to the document can be undone either by the undo button on standard toolbar or by pressing “Control + Z” keyboard shortcut. Similarly to repeat a recent action click on redo button or by using “Control + Y” key combination.
Insert Mode
In insert mode new characters are inserted into the existing text by moving the existing text to the right to make space for the new characters. When we use Overtype mode, new text replaces existing text as we type. To switch to this mode and change the word double click OVR in the status bar and type. As each character was typed, the selected characters (or space) were replaced with the character being typed. Also notice the OVR status indicator button letters are now bold, indicating the Overtype mode is on. To turn it off again double click OVR.
Finding and Replacing Text
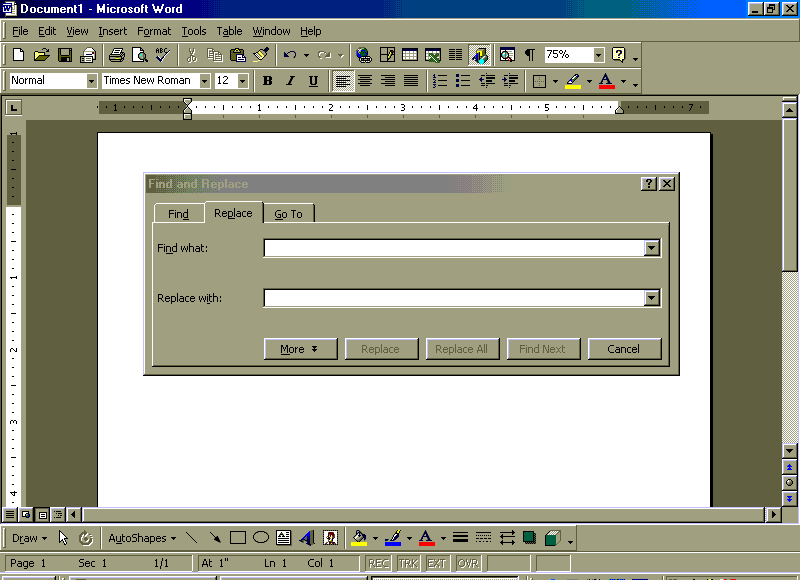
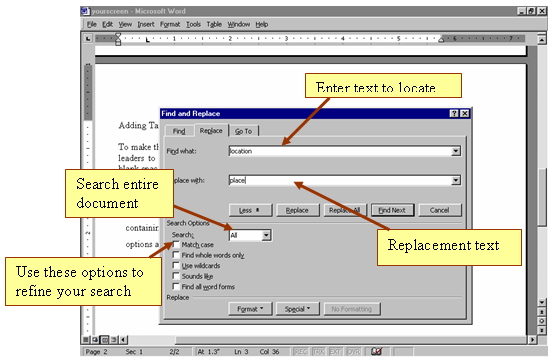
After having completed the document we may need to find and replace certain text from the document that may appear again and again in the document. To go to the find and replace option click Edit option on the menu bar, Click on Find option if we have to only find the text or click on Replace option if we have to click and then replace some text in the document. To find and replace text first type the text that has to be replaced in the first text box then type the below this is another text box, here type the text which will replace the text in the above box. Shortcut for find is “Control + F” and for replace is “Control+H”

Find and Replace dialog box
If we decided to change “sneakers” to “athletic shoes”. Instead of deleting every occurrence of “sneakers” and typing “athletic shoes”, we can use the Find and Replace feature to perform the task automatically. We can also find replace occurrences of special formatting, such as replacing bold text with italicized text, and formatting marks. This feature is fast and accurate; however, use care when replacing so that we do not replace unintended matches.

Replacing – One by one
Specific occurrences of text can be replaced by first finding it, if it has to be replaced than clicking the replace button or click the Find Next button.
Replacing in One shot
All occurrences of text can be replaced by clicking the Replace All button.
Find and Replace formatting
As text specific text can be found, similarly occurrences of specific formatting can be found and replaced with another type of formatting. For example replacing all bold characters with Normal characters.

