Formatting Forms
Few formatting techniques are illustrated for formatting forms.
Tab Order and Keyboard Shortcuts
As illustrated earlier, for changing the tab order and adding keyboard shortcuts for links is accomplished using the tabindex and accesskey attributes. Even input controls can be formatted by these attributes in a form.
Grouping Controls
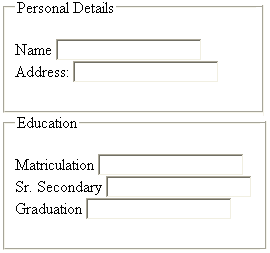
The <fieldset> tag groups sets of labels and controls by enclosing the controls in its opening and closing tags. In most browsers the <fieldset> tag adds boxes around each such controls which are enclosed in it and place the caption with the <legend> tag in the outline of the box as a headline as shown
|
HTML code |
Browser output |
| <form action=“/process.php” method=“get”>
<fieldset> <legend>Personal Details</legend> <p>Name <input type=”text” name=”HighSchool” /><br /> Address: <input type=”text” name=”College” /></p> </fieldset> <fieldset> <legend>Education</legend> <p>Matriculation <input type=”text” name=”CurrentJob” /><br /> Sr. Secondary <input type=”text” name=”PreviousJob1″ /><br /> Graduation <input type=”text” name=”PreviousJob2″ /></p> </fieldset> </form> |
 |
Tables
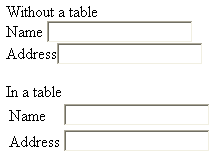
Usually the text fields are scattered in the web page. All the text fields and controls can be lined up in a column by putting them in a table where in each individual element is place in its own cell in the table. Label for each control is placed in a cell before it.
Thus, getting a uniform looking form by using a table as all the controls line up vertically irrespective of their text length as shown in the example, with and without a table
|
HTML code <form action=“/process.php” method=“get”> Without a table<br /> Name <input type=”text” name=”FirstName” /><br /> Address<input type=”text” name=”AddressLine1″ /> </form> <form action=“/process.php” method=“get”> <table> In a table <tr><td>Name</td> <td><input type=”text” name=”FirstName” /></td> </tr><tr><td>Address</td> <td><input type=”text” name=”AddressLine1″ /></td> </tr></table></form> |
Browser output
|
Disable Form Elements
Controls can be disabled for any input from the user by using two attributes which are
readonly – As per its name it makes the input control as read only and value assigned to the input control cannot be changed. If user try to edit the content then an alert is displayed and no change is accepted. Its usage is shown
<input type=”text” value=”VS-1027″ name=”HTML” readonly=”readonly” />
disabled – It is similar to readonly as it disables the input control but input controls appear in gray or faded text. They cannot be clicked and their usage is shown
<input type=”text” value=”ww1234″ name=”UserName” disabled=”disabled” />
Apply for HTML5 Certification Now!!
http://www.vskills.in/certification/Certified-HTML5-Developer


