A solar kiln is a cross between kiln drying and air drying. These kilns are generally a greenhouse with a high-temperature fan and either vents or a condensing system. Solar kilns are slower and variable due to the weather, but are low cost.
Building a Solar Kiln
Constructing a solar kiln is relatively straightforward and inexpensive. The plans given here have been used to construct over 300 kilns nationwide. The success of this design is in its simplicity and adaptability to any size. The dimensions given are only a suggestion; build a kiln to suit your drying needs.
A kiln constructed to these specifications (Figure 1) will dry 450 board feet of one-inch-thick hardwood lumber in 6 weeks or less of good weather, or 600 board feet of two-inch hardwood lumber in 15 weeks. Softwoods will typically take half the time of hardwoods. Drying times vary with sun intensity, moisture content of lumber and relative humidity.
When deciding on kiln size, consider the maximum capacity of the kiln in board feet to be 10 times the roof area in square feet. For maximum year-round performance, the roof angle of the kiln should be equal to its latitude in degrees north of the equator. Wisconsin’s latitude ranges from 42.5 degrees to 47 degrees (Oregon’s is about the same), so a roof angle of 45 degrees is ideal. Increasing the roof angle to 55 degrees would improve the kiln’s winter performance.
Frame the kiln floor with 2 x 6-inch joists; cover with 5/8-inch plywood top and bottom. For durability, use pressure treated lumber and “exterior” plywood. Space floor joists 16 or 24 inches apart and mount with joist hangers. Insulate the floor with blanket-type or solid foam insulation. Avoid insulations with a foil vapor barrier, as they may trap moisture inside the floor. Do not use poured-in or blown-in insulation. Apply two coats of aluminum- or oil-based paint to the top sheet of plywood (the kiln floor) to prevent moisture from seeping into the floor. Cover with flat black paint for maximum, solar absorption.
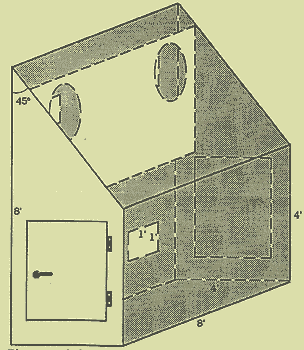
Figure 1. Solar kiln Design.
Construct the walls of 2 x 4-inch studs and 3/4-inch plywood. Be sure the studs on the side walls frame openings for doors at least as large as the end dimensions of the wood pile. The back wall studs should frame four 1-foot square vent openings, two on top and two on the bottom. Paint the interior walls in the same manner as the floor. Cover vents with screen, to keep birds and rodents out, and simple doors.
Fasten a 3/4-inch plywood fan baffle to the side walls. The fan baffle ensures that air flows through the wood pile rather than over the top of it (Figure 2). Cut holes for mounting two electric fans as close to the roof as possible to eliminate dead hot air pockets in the upper corner. The baffle should extend from the roof to within 6 inches of the lumber pile. A sheet of plastic or canvas can be used to close the gap between the baffle and the lumber pile.
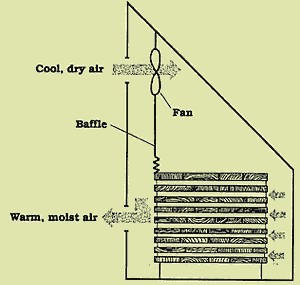
Figure 2. The baffle forces air drawn in by the fans
to flow through the lumber pile before exiting the kiln.
Mount electric fans to the baffle. Temperature can exceed 150 degrees F inside the kiln, so avoid fans with plastic parts that could melt; typically, multispeed, metal window fans are used. Fans should blow towards the front of the kiln (away from top vents).
Raise the kiln off the ground with cinder blocks or railroad ties, or construct a cement foundation. The kiln floor structure will deteriorate rapidly if resting directly on the ground. Align the kiln so the angled roof faces south. Stain the exterior of the kiln with a dark-colored stain. Do not use any covering that is impervious to water and may trap moisture in the insulation, such as oil-based paints.
Cover the kiln roof with one or two layers of translucent fiberglass, plastic film or glass. Two layers will decrease drying times. Fiberglass is inexpensive, resistant to breaking and the easiest to work with. Apply a non-hardening, silicone caulk to the outer surface of the frame to provide a seal between the plastic and the wood. Secure the fiberglass to the frame with 1 x 4-inch treated wood strips.
