Certify and Increase Opportunity.
Be
Govt. Certified Linux Administrator
The control of users and groups is a core element of Linux system administration. The user of the system is either a human being or an account used by specific applications identified by a unique numerical identification number called user ID (UID). Users within a group can have read permissions, write permissions, execute permissions or any combination of read/write/execute permissions for files owned by that group. A user who creates a file is also the owner and primary group owner of that file.
A group is an organization unit tying users together for a common purpose, which can be reading permissions, writing permission, or executing permission for files owned by that group. Similar to UID, each group is associated with a group ID (GID).
Normally Linux computers have two user accounts—your own user account, and the root account, which is the super user that can access everything on the PC, make system changes, and administer other users. Ubuntu works a little differently, though—you can’t login directly as root by default, and you use the sudo command to switch to root-level access when you need to make a change.
Linux stores a list of all users in the ‘/etc/groups’ file. You can run this command in the Terminal to view and edit the groups and users in your system:
sudo vigr /etc/groups
User Logins
Logins via terminals – First, init makes sure there is a getty program for the terminal connection (or console). getty listens at the terminal and waits for the user to notify that he is ready to login in (this usually means that the user must type something). When it notices a user, getty outputs a welcome message (stored in /etc/issue), and prompts for the username, and finally runs the login program. login gets the username as a parameter, and prompts the user for the password. If these match, login starts the shell configured for the user; else it just exits and terminates the process (perhaps after giving the user another chance at entering the username and password). init notices that the process terminated, and starts a new getty for the terminal.
Logins via the network – Two computers in the same network are usually linked via a single physical cable. When they communicate over the network, the programs in each computer that take part in the communication are linked via a virtual connection, a sort of imaginary cable. As far as the programs at either end of the virtual connection are concerned, they have a monopoly on their own cable. However, since the cable is not real, only imaginary, the operating systems of both computers can have several virtual connections share the same physical cable.
The virtual connections are established when there are two programs on different computers that wish to communicate. Since it is in principle possible to login from any computer in a network to any other computer, there is a huge number of potential virtual communications. Because of this, it is not practical to start a getty for each potential login.
There is a single process inetd (corresponding to getty) that handles all network logins. When it notices an incoming network login (i.e., it notices that it gets a new virtual connection to some other computer), it starts a new process to handle that single login. The original process remains and continues to listen for new logins. To make things a bit more complicated, there is more than one communication protocol for network logins.
The two most important ones are telnet and rlogin. In addition to logins, there are many other virtual connections that may be made (for FTP, Gopher, HTTP, and other network services). It would be ineffective to have a separate process listening for a particular type of connection, so instead there is only one listener that can recognize the type of the connection and can start the correct type of program to provide the service. This single listener is called inetd
The login program takes care of authenticating the user (making sure that the username and password match), and of setting up an initial environment for the user by setting permissions for the serial line and starting the shell. Part of the initial setup is outputting the contents of the file /etc/motd (short for message of the day) and checking for electronic mail. These can be disabled by creating a file called .hushlogin in the user’s home directory.
If the file /etc/nologin exists, logins are disabled. That file is typically created by shutdown and relatives. login checks for this file, and will refuse to accept a login if it exists. If it does exist, login outputs its contents to the terminal before it quits. login logs all failed login attempts in a system log file (via syslog). It also logs all logins by root. Both of these can be useful when tracking down intruders.
User Management
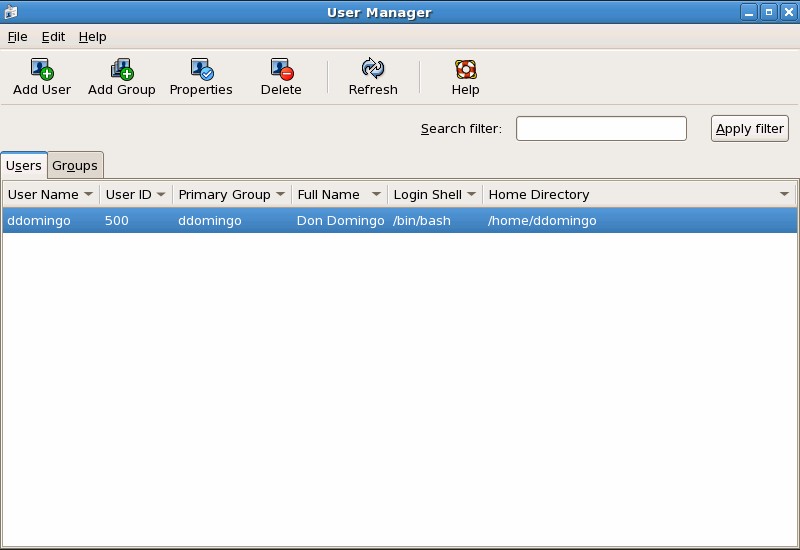
The easiest way to manage users and groups is through the graphical application, User Manager (system-config-users). The User Manager allows you to view, modify, add, and delete local users and groups.
To use the User Manager, you must be running the X Window System, have root privileges, and have the system-config-users RPM package installed. To start the User Manager from the desktop, go to System (on the panel) => Administration => Users & Groups. You can also type the command system-config-users at a shell prompt (for example, in an XTerm or a GNOME terminal).
The following command line tools can also be used to manage users and groups
- useradd, usermod, and userdel — Industry-standard methods of adding, deleting and modifying user accounts
- groupadd, groupmod, and groupdel — Industry-standard methods of adding, deleting, and modifying user groups
- gpasswd — Industry-standard method of administering the /etc/group file
- pwck, grpck — Tools used for the verification of the password, group, and associated shadow files
- pwconv, pwunconv — Tools used for the conversion of passwords to shadow passwords and back to standard passwords
Adding a User – To add a user to the system:
- Issue the useradd command to create a locked user account – useradd <username>
- Unlock the account by issuing the passwd command to assign a password and set password aging guidelines – passwd <username>
Command line options for useradd are
| Option | Description |
| -c ‘<comment>’ | <comment> can be replaced with any string. This option is generally used to specify the full name of a user. |
| -d <home-dir> | Home directory to be used instead of default /home/<username>/ |
| -e <date> | Date for the account to be disabled in the format YYYY-MM-DD |
| -f <days> | Number of days after the password expires until the account is disabled. If 0 is specified, the account is disabled immediately after the password expires. If -1 is specified, the account is not be disabled after the password expires. |
| -g <group-name> | Group name or group number for the user’s default group. The group must exist prior to being specified here. |
| -G <group-list> | List of additional (other than default) group names or group numbers, separated by commas, of which the user is a member. The groups must exist prior to being specified here. |
| -m | Create the home directory if it does not exist. |
| -M | Do not create the home directory. |
| -n | Do not create a user private group for the user. |
| -r | Create a system account with a UID less than 500 and without a home directory |
| -p <password> | The password encrypted with crypt |
| -s | User’s login shell, which defaults to /bin/bash |
| -u <uid> | User ID for the user, which must be unique and greater than 499 |
Adding a Group – To add a group to the system, use the command groupadd – groupadd <group-name>. Command line options for groupadd are
| Option | Description |
| -g <gid> | Group ID for the group, which must be unique and greater than 499 |
| -r | Create a system group with a GID less than 500 |
| -f | When used with -g<gid> and <gid> already exists, groupadd will choose another unique <gid> for the group. |
Password Aging – For security reasons, it is advisable to require users to change their passwords periodically. To configure password expiration for a user from a shell prompt, use the chage command, followed by an option from the below table, followed by the username of the user.
| Option | Description |
| -m <days> | Specifies the minimum number of days between which the user must change passwords. If the value is 0, the password does not expire. |
| -M <days> | Specifies the maximum number of days for which the password is valid. When the number of days specified by this option plus the number of days specified with the -d option is less than the current day, the user must change passwords before using the account. |
| -d <days> | Specifies the number of days since January 1, 1970 the password was changed |
| -I <days> | Specifies the number of inactive days after the password expiration before locking the account. If the value is 0, the account is not locked after the password expires. |
| -E <date> | Specifies the date on which the account is locked, in the format YYYY-MM-DD. Instead of the date, the number of days since January 1, 1970 can also be used. |
| -W <days> | Specifies the number of days before the password expiration date to warn the user. |
Shadow passwords must be enabled to use the chage command. If the chage command is followed directly by a username (with no options), it displays the current password aging values and allows them to be changed. You can configure a password to expire the first time a user logs in. This forces users to change passwords the first time they log in.
Lock the user password — If the user does not exist, use the useradd command to create the user account, but do not give it a password so that it remains locked. If the password is already enabled, lock it with the command – usermod -L username.
Force immediate password expiration — Type the following command – chage -d 0 username. This command sets the value for the date the password was last changed to the epoch (January 1, 1970). This value forces immediate password expiration no matter what password aging policy, if any, is in place.
Unlock the account — There are two common approaches to this step. The administrator can assign an initial password or assign a null password.
Apply for Linux Administration Certification Now!!
http://www.vskills.in/certification/Certified-Linux-Administrator
