Certify and Increase Opportunity.
Be
Govt. Certified Linux Administrator
Few common utilities helps in managing security in Linux.
SetUID
Three special types of permissions are available for executable files and public directories. When these permissions are set, any user who runs that executable file assumes the user ID of the owner (or group) of the executable file.
You must be extremely careful when you set special permissions, because special permissions constitute a security risk. For example, a user can gain superuser privileges by executing a program that sets the user ID (UID) to root. Also, all users can set special permissions for files they own, which constitutes another security concern.
setuid and setgid (short for “set user ID upon execution” and “set group ID upon execution”, respectively)[1] are Unix access rights flags that allow users to run an executable with the permissions of the executable’s owner or group respectively and to change behaviour in directories. They are often used to allow users on a computer system to run programs with temporarily elevated privileges in order to perform a specific task. While the assumed user id or group id privileges provided are not always elevated, at a minimum they are specific.
setuid and setgid are needed for tasks that require higher privileges than those which common users have, such as changing their login password.
When set-user identification (setuid) permission is set on an executable file, a process that runs this file is granted access based on the owner of the file (usually root), rather than the user who is running the executable file. This special permission allows a user to access files and directories that are normally only available to the owner. For example, the setuid permission on the passwd command makes it possible for a user to change passwords, assuming the permissions of the root ID:
-r-sr-sr-x 3 root sys 104580 Sep 16 12:02 /usr/bin/passwd
This special permission presents a security risk, because some determined users can find a way to maintain the permissions that are granted to them by the setuid process even after the process has finished executing.
The use of setuid permissions with the reserved UIDs (0–100) from a program might not set the effective UID correctly. Use a shell script instead or avoid using the reserved UIDs with setuid permissions.
ps
ps displays information about a selection of the active processes. It will “capture” the system condition at a single time. If you want to have a repetitive updates in a real time, we can use top command. PS support three type of usage syntax style.
- UNIX style, which may be grouped and must be preceded by a dash
- BSD style, which may be grouped and must not be used with a dash
- GNU long options, which are preceded by two dash
By default, ps selects all processes with the same effective user ID (EUID) as the current user and associated with the same terminal as the invoker. It displays the process ID (PID), the terminal associated with the process (TTY), the cumulated CPU time in [dd-]hh:mm:ss format (TIME), and the executable name (CMD). Output is unsorted by default.
Options
- -A Select all processes. Identical to -e.
- -N Select all processes except those that fulfill the specified conditions. (negates the selection) Identical to –deselect.
- T Select all processes associated with this terminal. Identical to the t option without any argument.
- -a Select all processes except session leaders and processes not associated with a terminal.
- -d Select all processes except session leaders.
- -e Select all processes. Identical to -A.
- -f does full-format listing.
- g Really all, even session leaders. This flag is obsolete and may be discontinued in a future release. It is normally implied by the a flag, and is only useful when operating in the sunos4 personality.
- -p pidlist Select by PID. This selects the processes whose process ID numbers appear in pidlist. Identical to p and –pid.
- r Restrict the selection to only running processes.
- U userlist Select by effective user ID (EUID) or name. This selects the processes whose effective user name or ID is in userlist. The effective user ID describes the user whose file access permissions are used by the process. Identical to -u and –user.
- x Lift the BSD-style “must have a tty” restriction, which is imposed upon the set of all processes when some BSD-style (without “-“) options are used or when the ps personality setting is BSD-like. The set of processes selected in this manner is in addition to the set of processes selected by other means. An alternate description is that this option causes ps to list all processes owned by you (same EUID as ps), or to list all processes when used together with the a option.
- –deselect Select all processes except those that fulfill the specified conditions. (negates the selection) Identical to -N.
A common use would be to list all processes currently running. To do this you would use the ps −ef command. (Screen output from this command is too large to include, the following is only a partial output.)
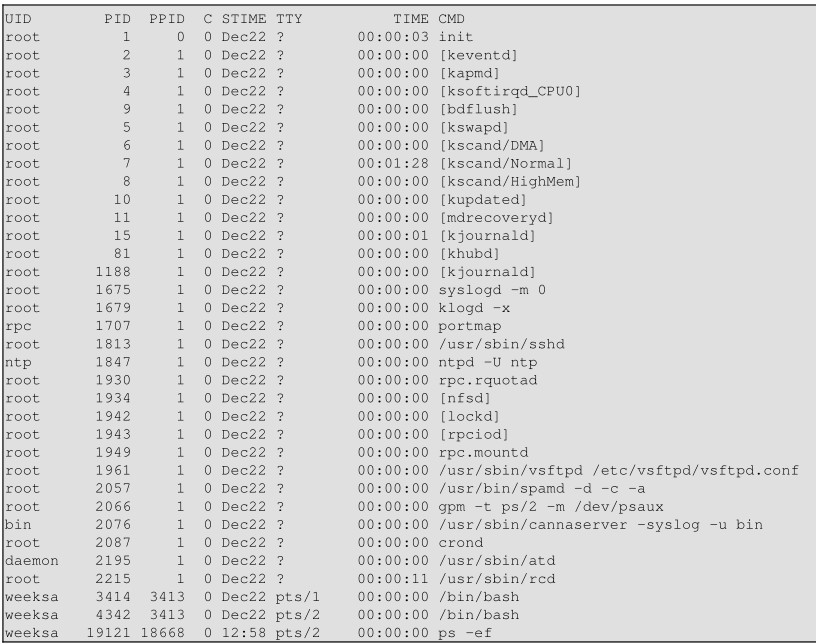
The first column shows who owns the process. The second column is the process ID. The Third column is the parent process ID. This is the process that generated, or started, the process. The forth column is the CPU usage (in percent). The fifth column is the start time, of date if the process has been running long enough. The sixth column is the tty associated with the process, if applicable. The seventh column is the cumulative CPU usage (total amount of CPU time is has used while running). The eighth column is the command itself.
Examples
Display all processes – The following command will give a full list of processes
$ ps ax
$ ps -ef
Display process by user – To filter the processes by the owning user use the “-u” option followed by the username. Multiple usernames can be provided separated by a comma.
$ ps -f -u www-data
Show process by name or process id – To search the processes by their name or command use the “-C” option followed by the search term.
$ ps -C apache2
Sort process by cpu or memory usage – System administrators often want to find out processes that are consuming lots of memory or CPU. The sort option will sort the process list based on a particular field or parameter.
Multiple fields can be specified with the “–sort” option separated by a comma. Additionally the fields can be prefixed with a “-” or “+” symbol indicating descending or ascending sort respectively. There are lots of parameters on which the process list can be sorted. Check the man page for the complete list.
$ ps aux –sort=-pcpu,+pmem
Display process hierarchy in a tree style – Many processes are actually forked out of some parent process, and knowing this parent child relationship is often helpful. The ‘–forest’ option will construct an ASCII art style tree view of the process hierarchy.
ps -f –forest -C apache2
Display child processes of a parent process – Here is an example of finding all forked apache processes.
$ ps -o pid,uname,comm -C apache2
Display threads of a process – The “-L” option will display the threads along with the processes. It can be used to display all threads of a particular process or all processes. The following command shall display all the threads owned by the process with id 3150.
$ ps -p 3150 -L
Change the columns to display – The ps command can be configured to show a selected list of columns only. There are a large number of columns to show and the full list is available in the man pages. The following command shows only the pid, username, cpu, memory and command columns.
$ ps -e -o pid,uname,pcpu,pmem,comm
Display elapsed time of processes – The elapsed time indicates, how long the process has been running for. The column for elapsed time is not shown by default, and has to be brought in using the “-o” option
$ ps -e -o pid,comm,etime
Turn ps into an real-time process viewer – As usual, the watch command can be used to turn ps into a real-time process reporter. Simple example is like this
$ watch -n 1 ‘ps -e -o pid,uname,cmd,pmem,pcpu –sort=-pmem,-pcpu | head -15’
df
df (abbreviation for disk free) is used to display the amount of available disk space for file systems on which the invoking user has appropriate read access. df is implemented using the statfs or statvfs system calls. If an argument is the absolute file name of a disk device node containing a mounted file system, df shows the space available on that file system rather than on the file system containing the device node (which is always the root file system). This version of df cannot show the space available on unmounted file systems, because on most kinds of systems doing so requires very nonportable intimate knowledge of file system structures.
The specifications for df are:
df [-k] [-P|-t] [-del] [file…]
| Options | Description |
| -a, –all | include dummy file systems |
| -B, –block-size=SIZE | use SIZE-byte blocks |
| -h, –human-readable | print sizes in human readable format (e.g., 1K 234M 2G) or display in KB, MB, or GB |
| -H, –si | likewise, but use powers of 1000 not 1024 |
| -i, –inodes | list inode information instead of block usage |
| -k | like –block-size=1K. Use 1024-byte units, instead of the default 512-byte units, when writing space figures. |
| -l, –local | limit listing to local file systems |
| –no-sync | do not invoke sync before getting usage info (default) |
| -P, –portability | use the POSIX output format or Use a standard, portable, output format |
| –sync | invoke sync before getting usage info |
| -t, –type=TYPE | limit listing to file systems of type TYPE |
| -T, –print-type | print file system type |
| -x, –exclude-type=TYPE | limit listing to file systems not of type TYPE |
| –help | display this help and exit |
| –version | output version information and exit |
| file | Write the amount of free space of the file system containing the specified file |
Most Unix and Unix-like operating systems add extra options. The BSD and GNU coreutils versions include -h, where free space is listed in human readable format, adding units with the appropriate SI prefix (e.g. 10MB), -i, listing inode usage, and -l, restricting display to only local filesystems. GNU df includes -T as well, listing filesystem type information, but the GNU df shows the sizes in 1K blocks by default.
The Single Unix Specification (SUS) specifies by default space is reported in blocks of 512 bytes, and that at a minimum, the file system names and the amount of free space.
The use of 512-byte units is historical practice and maintains compatibility with ls and other utilities. This does not mandate that the file system itself be based on 512-byte blocks. The -k option was added as a compromise measure. It was agreed by the standard developers that 512 bytes was the best default unit because of its complete historical consistency on System V (versus the mixed 512/1024-byte usage on BSD systems), and that a -k option to switch to 1024-byte units was a good compromise. Users who prefer the more logical 1024-byte quantity can easily alias df to df -k without breaking many historical scripts relying on the 512-byte units.
The output with -P shall consist of one line of information for each specified file system. These lines shall be formatted as follows:
<fs name> <total space> <space used> <space free> <percentage used> <fs root>
Examples
df – Display all file systems and their disk usage, as in the following output:
Filesystem 1K-blocks Used Available Use% Mounted on
/dev/loop0 18761008 15246876 2554440 86% /
none 4 0 4 0% /sys/fs/cgroup
udev 493812 4 493808 1% /dev
tmpfs 100672 1364 99308 2% /run
none 5120 0 5120 0% /run/lock
none 503352 1764 501588 1% /run/shm
none 102400 20 102380 1% /run/user
/dev/sda3 174766076 164417964 10348112 95% /host
df -h – Same as above, but use “human readable” formatting, as in the following example:
Filesystem Size Used Avail Use% Mounted on
/dev/loop0 18G 15G 2.5G 86% /
none 4.0K 0 4.0K 0% /sys/fs/cgroup
udev 483M 4.0K 483M 1% /dev
tmpfs 99M 1.4M 97M 2% /run
none 5.0M 0 5.0M 0% /run/lock
none 492M 1.8M 490M 1% /run/shm
none 100M 20K 100M 1% /run/user
/dev/sda3 167G 157G 9.9G 95% /host
df public_html – Display the amount of free space in the public_html directory, as in the following output:
Filesystem 1K-blocks Used Available Use% Mounted on
/dev/loop0 18761008 15246924 2554392 86% /
ulimit
The ulimit and sysctl programs allow to limit system-wide resource use. This can help a lot in system administration, e.g. when a user starts too many processes and therefore makes the system unresponsive for other users.
Syntax
ulimit [-acdfHlmnpsStuv] [limit]
Options
| Option | Details |
| -S | Change and report the soft limit associated with a resource. |
| -H | Change and report the hard limit associated with a resource. |
| -a | All current limits are reported. |
| -c | The maximum size of core files created. |
| -d | The maximum size of a process’s data segment. |
| -f | The maximum size of files created by the shell(default option) |
| -l | The maximum size that can be locked into memory. |
| -m | The maximum resident set size. |
| -n | The maximum number of open file descriptors. |
| -p | The pipe buffer size. |
| -s | The maximum stack size. |
| -t | The maximum amount of cpu time in seconds. |
| -u | The maximum number of processes available to a single user. |
| -v | The maximum amount of virtual memory available to the process. |
ulimit provides control over the resources available to the shell and to processes started by it, on systems that allow such control. The soft limit is the value that the kernel enforces for the corresponding resource. The hard limit acts as a ceiling for the soft limit.
An unprivileged process may only set its soft limit to a value in the range from 0 up to the hard limit, and (irreversibly) lower its hard limit. A privileged process can make arbitrary changes to either limit value. If limit is given, it is the new value of the specified resource. Otherwise, the current value of the soft limit for the specified resource is printed, unless the `-H’ option is supplied.
When setting new limits, if neither `-H’ nor `-S’ is supplied, both the hard and soft limits are set. Values are in 1024-byte increments, except for `-t’, which is in seconds, `-p’, which is in units of 512-byte blocks, and `-n’ and `-u’, which are unscaled values. The return status is zero unless an invalid option is supplied, a non-numeric argument other than unlimited is supplied as a limit, or an error occurs while setting a new limit.
To see the limits associate with your login, use the command ulimit -a. If you’re using a regular user account, you will likely see something like this:
$ ulimit -a
core file size (blocks, -c) 0
data seg size (kbytes, -d) unlimited
scheduling priority (-e) 0
file size (blocks, -f) unlimited
pending signals (-i) 32767
max locked memory (kbytes, -l) 32
max memory size (kbytes, -m) unlimited
open files (-n) 1024
pipe size (512 bytes, -p) 8
POSIX message queues (bytes, -q) 819200
real-time priority (-r) 0
stack size (kbytes, -s) 10240
cpu time (seconds, -t) unlimited
max user processes (-u) 50
virtual memory (kbytes, -v) unlimited
file locks (-x) unlimited
In above output, you can’t create core dumps — because your max core file size is 0. If a process that you are running aborts, no core file is going to be dropped into your home directory. As long as the core file size is set to zero, core dumps are not allowed. This makes sense for most users since they probably wouldn’t do anything more with a core dump other than erase it, but if you need a core dump to debug problems you are running into with an application, you might want to set your core file size to unlimited — and maybe you can.
$ ulimit -c ulimited
$ ulimit -c
unlimited
If you are managing a server and want to turn on the ability to generate core dumps for all of your users — perhaps they’re developers are really need to be able to analyze these core dumps, you have to switch user to root and edit your /etc/security/limits.conf (Linux) or make changes in your /etc/system (Solaris) file.
If, on the other hand, you are managing a server and don’t want any of your users able to generate core dumps regardless of how much they’d like to sink their teeth into one, you can set a limit of 0 in your limits.conf.
Example
Limiting the number of processes that an individual can run
$ ulimit -u
50
Limits can also be set up by group so that you can, say, give developers the ability to run more processes than managers. Lines like these in your limits.conf file would do that:
@managers hard nproc 50
@developers hard nproc 200
If you want to limit the number of open files, you just use a different setting.
@managers hard nofile 2048
@developers hard nofile 8192
sbob hard nofile 8192
Here we’ve given two groups and one individual increases in their open files limits. These all set hard limits. If you set soft limits as well, the users will get warnings when they reach the lower limit.
@developers soft nofile 2048
@developers hard nofile 8192
chroot
Chroot is an operation that changes the apparent root directory for the current running process and their children. A program that is run in such a modified environment cannot access files and commands outside that environmental directory tree. This modified environment is called a chroot jail.
A chroot is basically a special directory on your computer which prevents applications, if run from inside that directory, from accessing files outside the directory. In many ways, a chroot is like installing another operating system inside your existing operating system.
Technically-speaking, chroot temporarily changes the root directory (which is normally /) to the chroot directory (for example, /var/chroot). As the root directory is the top of the filesystem hierarchy, applications are unable to access directories higher up than the root directory, and so are isolated from the rest of the system. This prevents applications inside the chroot from interfering with files elsewhere on your computer.
chroot runs a command or an interactive shell from another directory, and treats that directory as root. This process is called changing root and the new root directory is referred to as chroot jail.
Need – Changing root is commonly done for performing system maintenance on systems where booting and/or logging in is no longer possible. Common examples are:
- Reinstalling the bootloader.
- Rebuilding the initramfs image.
- Upgrading or downgrading packages.
- Resetting a forgotten password.
- Isolating insecure and unstable applications
- Running 32-bit applications on 64-bit systems
- Testing new packages before installing them on the production system
- Running older versions of applications on more modern versions of Ubuntu
- Building new packages, allowing careful control over the dependency packages which are installed
Requirements
- Root privilege.
- Another Linux environment, e.g. a LiveCD or USB flash media, or from another existing Linux distribution.
- Matching architecture environments; i.e. the chroot from and chroot to. The architecture of the current environment can be discovered with: uname -m (e.g. i686 or x86_64).
- Kernel modules loaded that are needed in the chroot environment.
- Swap enabled if needed – # swapon /dev/sdxY
- Internet connection established if needed.
Syntax
chroot [OPTION] NEWROOT [COMMAND [ARG]…]
chroot runs COMMAND with the root directory set to NEWROOT.
Options
OPTION may be one of the following:
| Option | Details |
| –userspec=USER:GROUP | specify the user and group to use. USER and GROUP may be specified by name or numeric ID. |
| –groups=G_LIST | specify supplementary groups as g1,g2,..,gN |
| –help | display a help message, and exit. |
| –version | output version information, and exit. |
If no command is specified, chroot executes the command ‘${SHELL} -i’. By default, this is ‘/bin/sh -i’. This will drop you into a sh shell as root in the NEWROOT directory.
Apply for Linux Administration Certification Now!!
http://www.vskills.in/certification/Certified-Linux-Administrator
