Certify and Increase Opportunity.
Be
Govt. Certified Linux Administrator
Samba
Samba is software that can be run on a platform other than Microsoft Windows, for example, UNIX, Linux, IBM System 390, OpenVMS, and other operating systems. Samba uses the TCP/IP protocol that is installed on the host server. When correctly configured, it allows that host to interact with a Microsoft Windows client or server as if it is a Windows file and print server.
By supporting this protocol, Samba enables computers running Unix to get in on the action, communicating with the same networking protocol as Microsoft Windows and appearing as another Windows system on the network from the perspective of a Windows client. A Samba server offers the following services:
- Share one or more directory trees
- Share one or more Distributed filesystem (Dfs) trees
- Share printers installed on the server among Windows clients on the network
- Assist clients with network browsing
- Authenticate clients logging onto a Windows domain
- Provide or assist with Windows Internet Name Service (WINS) name-server resolution
The Samba suite also includes client tools that allow users on a Unix system to access folders and printers that Windows systems and Samba servers offer on the network. Today, the Samba suite revolves around a pair of Unix daemons that provide shared resources—called shares or services—to SMB clients on the network. These are:
- smbd – A daemon that handles file and printer sharing and provides authentication and authorization for SMB clients.
- nmbd – A daemon that supports NetBIOS Name Service and WINS, which is Microsoft’s implementation of a NetBIOS Name Server (NBNS). It also assists with network browsing.
Assume that we have the following basic network configuration: a Samba-enabled Unix system, to which we will assign the name toltec, and a pair of Windows clients, to which we will assign the names maya and aztec, all connected via a local area network (LAN). Let’s also assume that toltec also has a local inkjet printer connected to it, lp, and a disk share named spirit—both of which it can offer to the other two computers. A graphic of this network is shown in Figure 1-1.
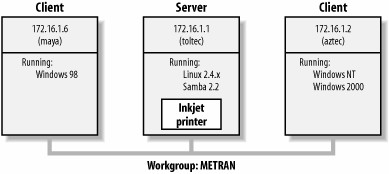
Figure 1-1. A simple network set up with a Samba server
In this network, each computer listed shares the same workgroup. A workgroup is a group name tag that identifies an arbitrary collection of computers and their resources on an SMB network. Several workgroups can be on the network at any time, but for our basic network example, we’ll have only one: the METRAN workgroup.
Sharing a Disk Service – If everything is properly configured, we should be able to see the Samba server, toltec, through the Network Neighborhood of the maya Windows desktop. In fact, Figure 1-2 shows the Network Neighborhood of the maya computer, including toltec and each computer that resides in the METRAN workgroup. Note the Entire Network icon at the top of the list. As we just mentioned, more than one workgroup can be on an SMB network at any given time. If a user clicks the Entire Network icon, she will see a list of all the workgroups that currently exist on the network.
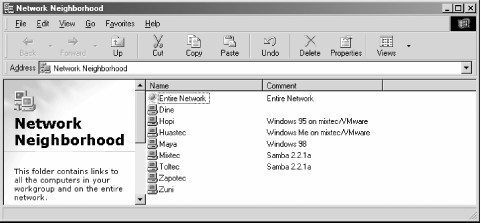
Figure 1-2. The Network Neighborhood directory
We can take a closer look at the toltec server by double-clicking its icon. This contacts toltec itself and requests a list of its shares—the file and printer resources—that the computer provides. In this case, a printer named lp, a home directory named jay, and a disk share named spirit are on the server, as shown in Figure 1-3. Note that the Windows display shows hostnames in mixed case (Toltec). Case is irrelevant in hostnames, so you might see toltec, Toltec, and TOLTEC in various displays or command output, but they all refer to a single system. Thanks to Samba, Windows 98 sees the Unix server as a valid SMB server and can access the spirit folder as if it were just another system folder.
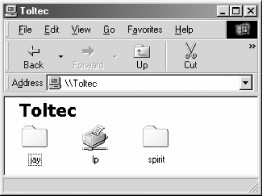
Figure 1-3. Shares available on the Toltec server as viewed from maya
One popular Windows feature is the ability to map a drive letter (such as E:, F:, or Z:) to a shared directory on the network using the Map Network Drive option in Windows Explorer.[1] Once you do so, your applications can access the folder across the network using the drive letter. You can store data on it, install and run programs from it, and even password-protect it against unwanted visitors.
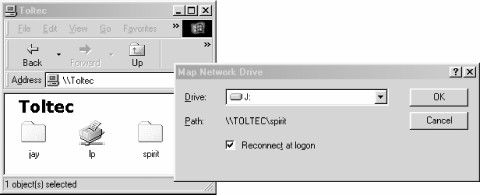
Figure 1-4. Mapping a network drive to a Windows drive letter
Take a look at the Path: entry in the dialog box of Figure 1-4. An equivalent way to represent a directory on a network computer is by using two backslashes, followed by the name of the networked computer, another backslash, and the networked directory of the computer, as shown here:
\\network-computer\directory
This is known as the Universal Naming Convention (UNC) in the Windows world. For example, the dialog box in Figure 1-4 represents the network directory on the toltec server as:
\\toltec\spirit
If this looks somewhat familiar to you, you’re probably thinking of uniform resource locators (URLs), which are addresses that web browsers such as Netscape Navigator and Internet Explorer use to resolve systems across the Internet. Be sure not to confuse the two: URLs such as http://www.oreilly.com use forward slashes instead of backslashes, and they precede the initial slashes with the data transfer protocol (i.e., ftp, http) and a colon (:). In reality, URLs and UNCs are two completely separate things, although sometimes you can specify an SMB share using a URL rather than a UNC. As a URL, the \\toltec\spirit share would be specified as smb://toltec/spirit.
Once the network drive is set up, Windows and its programs behave as if the networked directory were a local disk. If you have any applications that support multiuser functionality on a network, you can install those programs on the network drive.[2] Figure 1-5 shows the resulting network drive as it would appear with other storage devices in the Windows 98 client. Note the pipeline attachment in the icon for the J: drive; this indicates that it is a network drive rather than a fixed drive.
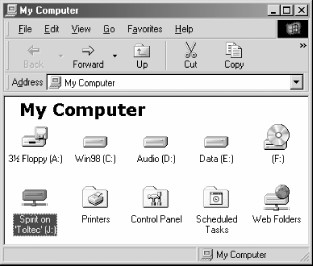
Figure 1-5. The Network directory mapped to the client drive letter J
My Network Places, found in Windows Me, 2000, and XP, works differently from Network Neighborhood. It is necessary to click a few more icons, but eventually we can get to the view of the toltec server as shown in Figure 1-6. This is from a Windows 2000 system. Setting up the network drive using the Map Network Drive option in Windows 2000 works similarly to other Windows versions.

Figure 1-6. Shares available on Toltec (viewed from dine)
Sharing a Printer – You probably noticed that the printer lp appeared under the available shares for toltec in Figure 1-3. This indicates that the Unix server has a printer that can be shared by the various SMB clients in the workgroup. Data sent to the printer from any of the clients will be spooled on the Unix server and printed in the order in which it is received.
Setting up a Samba-enabled printer on the Windows side is even easier than setting up a disk share. By double-clicking the printer and identifying the manufacturer and model, you can install a driver for this printer on the Windows client. Windows can then properly format any information sent to the network printer and access it as if it were a local printer. On Windows 98, double-clicking the Printers icon in the Control Panel opens the Printers window shown in Figure 1-7. Again, note the pipeline attachment below the printer, which identifies it as being on a network.
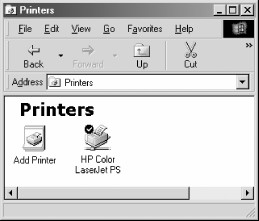
Figure 1-7. A network printer available on Toltec
The Unix side – As mentioned earlier, Samba appears in Unix as a set of daemon programs. You can view them with the Unix ps command; you can read any messages they generate through custom debug files or the Unix syslog (depending on how Samba is set up); and you can configure them from a single Samba configuration file: smb.conf. In addition, if you want to get an idea of what the daemons are doing, Samba has a program called smbstatus that will lay it all on the line. Here is how it works:
# smbstatus
Processing section “[homes]”
Processing section “[printers]”
Processing section “[spirit]”
Samba version 2.2.6
Service uid gid pid machine
—————————————–
spirit jay jay 7735 maya (172.16.1.6) Sun Aug 12 12:17:14 2002
spirit jay jay 7779 aztec (172.16.1.2) Sun Aug 12 12:49:11 2002
jay jay jay 7735 maya (172.16.1.6) Sun Aug 12 12:56:19 2002
Locked files:
Pid DenyMode R/W Oplock Name
————————————————–
7735 DENY_WRITE RDONLY NONE /u/RegClean.exe Sun Aug 12 13:01:22 2002
Share mode memory usage (bytes):
1048368(99%) free + 136(0%) used + 72(0%) overhead = 1048576(100%) total
The Samba status from this output provides three sets of data, each divided into separate sections. The first section tells which systems have connected to the Samba server, identifying each client by its machine name (maya and aztec) and IP (Internet Protocol) address. The second section reports the name and status of the files that are currently in use on a share on the server, including the read/write status and any locks on the files. Finally, Samba reports the amount of memory it has currently allocated to the shares that it administers, including the amount actively used by the shares plus additional overhead. (Note that this is not the same as the total amount of memory that the smbd or nmbd processes are using.)
Creating Samba Test Directory and Files – For this part of the procedure, you’ll use the su – (switch user) command to work as root. Although it’s not best practice to do this regularly, there are times where it’s much more practical to work directly as root instead of trying to use sudo to do everything. You’re going to create a new directory containing three empty files which you’ll share using Samba.
- While logged on as root, create the new directory /smbdemo with the following command – mkdir /smbdemo
- Change the permissions on the new directory to 770 with the following command – chmod 770 /smbdemo
- Navigate to the new directory with the following command – cd /smbdemo
- Add three empty files to the directory with the following command – touch file1 file2 file3
- Adding the Samba User – You must add users to the Samba database in order for them to have access to their home directory and other Samba shares. Use the following command to add a new Samba user (the new Samba user must be an existing Linux user or the command will fail): smbpasswd -a <username>. For example, to add the user don, use the command smbpasswd -a don.
- Creating the Samba Group – Perform the following steps to create a smbusers group, change ownership of the /smbdemo directory, and add a user to the smbusers group:
groupadd smbusers
chown :smbusers /smbdemo
usermod -G smbusers don
Configuring Samba – Samba configuration is done in the file /etc/samba/smb.conf. There are two parts to /etc/samba/smb.conf:
- Global Settings: This is where you configure the server. You’ll find things like authentication method, listening ports, interfaces, workgroup names, server names, log file settings, and similar parameters.
- Share Definitions: This is where you configure each of the shares for the users. By default, there’s a printer share already configured.
Configuring smb.conf – In the Global Settings section, change the workgroup name to your workgroup name. Now, confirm that the authentication type is set to user by going to the authentication section, still in Global Settings. Make sure there is no hash mark at the beginning of the line to enable user security. This change allows users on your Red Hat/CentOS server to log in to shares on the Samba server.
Next, add a section for /smbdemo. You can just add it to the very bottom of /etc/samba/smb.conf with the following lines:

Be sure to save your changes with a :wq. You can use the command testparm to test the configuration. In order for the server to re-read the configuration file and make the changes, you must restart the Samba service with the commands service smb restart and service nmb restart. When properly configured, you should be able to connect from a computer running the Windows operating system and see both the general share and the user’s home directory.
LDAP
LDAP (Lightweight Directory Access Protocol) is a set of open protocols used to access centrally stored information over a network. It is based on the X.500 standard for directory sharing, but is less complex and resource-intensive. For this reason, LDAP is sometimes referred to as “X.500 Lite”.
Like X.500, LDAP organizes information in a hierarchical manner using directories. These directories can store a variety of information such as names, addresses, or phone numbers, and can even be used in a manner similar to the Network Information Service (NIS), enabling anyone to access their account from any machine on the LDAP enabled network.
LDAP is commonly used for centrally managed users and groups, user authentication, or system configuration. It can also serve as a virtual phone directory, allowing users to easily access contact information for other users. Additionally, it can refer a user to other LDAP servers throughout the world, and thus provide an ad-hoc global repository of information. However, it is most frequently used within individual organizations such as universities, government departments, and private companies.
Using a client/server architecture, LDAP provides reliable means to create a central information directory accessible from the network. When a client attempts to modify information within this directory, the server verifies the user has permission to make the change, and then adds or updates the entry as requested. To ensure the communication is secure, the Secure Sockets Layer (SSL) or Transport Layer Security (TLS) cryptographic protocols can be used to prevent an attacker from intercepting the transmission.
The following is a list of LDAP-specific terms that are used
entry – A single unit within an LDAP directory. Each entry is identified by its unique Distinguished Name (DN).
attribute – Information directly associated with an entry. For example, if an organization is represented as an LDAP entry, attributes associated with this organization might include an address, a fax number, etc. Similarly, people can be represented as entries with common attributes such as personal telephone number or email address.
An attribute can either have a single value, or an unordered space-separated list of values. While certain attributes are optional, other are required. Required attributes are specified using the objectClass definition, and can be found in schema files located in the /etc/openldap/slapd.d/cn=config/cn=schema/ directory.
The assertion of an attribute and its corresponding value is also referred to as a Relative Distinguished Name (RDN). Unlike distinguished names that are unique globally, a relative distinguished name is only unique per entry.
LDIF – The LDAP Data Interchange Format (LDIF) is a plain text representation of an LDAP entry. It takes the following form:
[id] dn: distinguished_nameattribute_type: attribute_value…
attribute_type: attribute_value…
…
The optional id is a number determined by the application that is used to edit the entry. Each entry can contain as many attribute_type and attribute_value pairs as needed, as long as they are all defined in a corresponding schema file. A blank line indicates the end of an entry.
The typical steps to set up an LDAP server on Fedora are as
- Install the OpenLDAP suite.
- Customize the configuration
- Start the slapd service
- Use the ldapadd utility to add entries to the LDAP directory.
- Use the ldapsearch utility to verify that the slapd service is accessing the information correctly.
Installing the OpenLDAP Suite
The suite of OpenLDAP libraries and tools is provided by the following packages:
| Package | Description |
| openldap | A package containing the libraries necessary to run the OpenLDAP server and client applications. |
| openldap-clients | A package containing the command line utilities for viewing and modifying directories on an LDAP server. |
| openldap-servers | A package containing both the services and utilities to configure and run an LDAP server. This includes the Standalone LDAP Daemon, slapd. |
| openldap-servers-sql | A package containing the SQL support module. |
OpenLDAP Server Utilities – To perform administrative tasks, the openldap-servers package installs the following utilities along with the slapd service:
| Command | Description |
| slapacl | Allows you to check the access to a list of attributes. |
| slapadd | Allows you to add entries from an LDIF file to an LDAP directory. |
| slapauth | Allows you to check a list of IDs for authentication and authorization permissions. |
| slapcat | Allows you to pull entries from an LDAP directory in the default format and save them in an LDIF file. |
| slapdn | Allows you to check a list of Distinguished Names (DNs) based on available schema syntax. |
| slapindex | Allows you to re-index the slapd directory based on the current content. Run this utility whenever you change indexing options in the configuration file. |
| slappasswd | Allows you to create an encrypted user password to be used with the ldapmodify utility, or in the slapd configuration file. |
| slapschema | Allows you to check the compliance of a database with the corresponding schema. |
| slaptest | Allows you to check the LDAP server configuration. |
OpenLDAP Client Utilities – The openldap-clients package installs the following utilities which can be used to add, modify, and delete entries in an LDAP directory:
| Command | Description |
| ldapadd | Allows you to add entries to an LDAP directory, either from a file, or from standard input. It is a symbolic link to ldapmodify -a. ldapcompare Allows you to compare given attribute with an LDAP directory entry. |
| ldapdelete | Allows you to delete entries from an LDAP directory. |
| ldapexop | Allows you to perform extended LDAP operations. |
| ldapmodify | Allows you to modify entries in an LDAP directory, either from a file, or from standard input. |
| ldapmodrdn | Allows you to modify the RDN value of an LDAP directory entry. |
| ldappasswd | Allows you to set or change the password for an LDAP user. |
| ldapsearch | Allows you to search LDAP directory entries. |
| ldapurl | Allows you to compose or decompose LDAP URLs. |
| ldapwhoami | Allows you to perform a whoami operation on an LDAP server. |
Configuring an OpenLDAP Server – By default, the OpenLDAP configuration is stored in the /etc/openldap/ directory. The following table highlights the most important directories and files within this directory:
| Path | Description |
| /etc/openldap/ldap.conf | The configuration file for client applications that use the OpenLDAP libraries. This includes ldapadd, ldapsearch, Evolution, etc. |
| /etc/openldap/slapd.d/ | The directory containing the slapd configuration. |
OpenLDAP no longer reads its configuration from the /etc/openldap/slapd.conf file. Instead, it uses a configuration database located in the /etc/openldap/slapd.d/ directory. If you have an existing slapd.conf file from a previous installation, you can convert it to the new format by running the following command as root:
slaptest -f /etc/openldap/slapd.conf -F /etc/openldap/slapd.d/
The slapd configuration consists of LDIF entries organized in a hierarchical directory structure, and the recommended way to edit these entries is to use the server utilities.
The steps to qualify
- Start the service
- Create LDAP root user password
New password:
Re-enter new password:
{SSHA}cWB1VzxDXZLf6F4pwvyNvApBQ8G/DltW
[root@ldap ~]#- Update /etc/openldap/slapd.conf for the root password
#68 database bdb
#69 suffix “dc=adminmart,dc=com”
#70 rootdn “cn=Manager,dc=adminmart,dc=com”
#71 rootpw {SSHA}cWB1VzxDXZLf6F4pwvyNvApBQ8G/DltW
- Apply Changes
- Create test users
Changing password for user test1.
New UNIX password:
Retype new UNIX password:
passwd: all authentication tokens updated successfully.
[root@ldap ~]# useradd test2 [root@ldap ~]# passwd test2Changing password for user test2.
New UNIX password:
Retype new UNIX password:
passwd: all authentication tokens updated successfully.
[root@ldap ~]#Repeat the same for the rest of users
- Migrate local users to LDAP
Repeat the same for the rest of users
- Update default settings on file /usr/share/openldap/migration/migrate_common.ph
#71 $DEFAULT_MAIL_DOMAIN = “adminmart.com”;
#74 $DEFAULT_BASE = “dc=adminmart,dc=com”;
- Convert passwd.file to ldif (LDAP Data Interchange Format) file
Repeat the same for the rest of users
- Update root.ldif file for the “Manager” of LDAP Server
#1 dn: uid=root,ou=People,dc=adminmart,dc=com
#2 uid: root
#3 cn: Manager
#4 objectClass: account
- Create a domain ldif file (/etc/openldap/adminmart.com.ldif)
dn: dc=adminmart,dc=com
dc: adminmart
description: LDAP Admin
objectClass: dcObject
objectClass: organizationalUnit
ou: rootobject
dn: ou=People, dc=adminmart,dc=com
ou: People
description: Users of adminmart
objectClass: organizationalUnit
- Import all users in to the LDAP
Add the Domain ldif file
[root@ldap ~]# ldapadd -x -D “cn=Manager,dc=adminmart,dc=com” -W -f /etc/openldap/adminmart.com.ldifEnter LDAP Password:
adding new entry “dc=adminmart,dc=com”
adding new entry “ou=People, dc=adminmart,dc=com”
[root@ldap ~]#Add the users:
[root@ldap ~]# ldapadd -x -D “cn=Manager,dc=adminmart,dc=com” -W -f /etc/openldap/root.ldifEnter LDAP Password:
adding new entry “uid=root,ou=People,dc=adminmart,dc=com”
adding new entry “uid=operator,ou=People,dc=adminmart,dc=com”
[root@ldap ~]# [root@ldap ~]# ldapadd -x -D “cn=Manager,dc=adminmart,dc=com” -W -f /etc/openldap/test1.ldifEnter LDAP Password:
adding new entry “uid=test1,ou=People,dc=adminmart,dc=com”
[root@ldap ~]# [root@ldap ~]# ldapadd -x -D “cn=Manager,dc=adminmart,dc=com” -W -f /etc/openldap/test2.ldifEnter LDAP Password:
adding new entry “uid=test2,ou=People,dc=adminmart,dc=com”
[root@ldap ~]#Repeat the same for the rest of users
Apply Changes
[root@ldap ~]# service ldap restartTest LDAP Server
It prints all the user information:
[root@ldap ~]# ldapsearch -x -b ‘dc=adminmart,dc=com’ ‘(objectclass=*)’LDAP Client Configuration
- Run the command
- Settings
Both should be checked
Click “Next”.
[ ] Use TLSServer: ldap.adminmart.com
Base DN: dc=adminmart,dc=com
Click “Ok” to confirm.
Use your domain name instead of adminmart.
Apply for Linux Administration Certification Now!!
http://www.vskills.in/certification/Certified-Linux-Administrator
