Compiling Basics
A computer program is a list of instructions given to a computer to make it perform a specific task or series of tasks. Computers do not understand English, so programmers must communicate these instructions to the computer in a language the computer understands. Computers, however, can only operate on numbers.
The solution to this problem is to create an intermediate language that both humans and computers can understand. These are called programming languages. Programmers create a list of instructions for the computer in a programming language such as C, Pascal, or Fortran. This list of instructions is known as source code. It is textual in nature, and readable to humans (who speak the language). Programmers do all their work in this source code, changing the instructions to fix bugs, add features, or alter the appearance of a program.
Compiler translates the human readable text instructions into computer readable numbers that correspond to the same instructions. The resulting file is usable by computers but incomprehensible to humans. This is called object code. The resulting executable file is often called binary, after the number system used by the computer. This translation from source code into binary object code is a one-way process. It is impossible to translate a binary executable back into the original source code.
The binary executable is what you need if you want to run and use a program. The source code is what you need if you want to understand how a program works internally, or if you want to change, add to, or improve a program. If you have the source code and an appropriate compiler, you can produce the binary executable, but the reverse is not true.
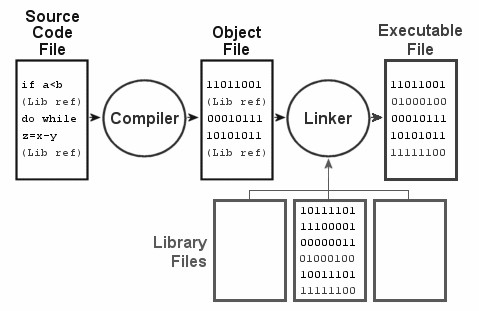
There’s actually two steps involved in generating an executable binary from a source file, compiling and linking. Most programs make “calls” to the operating system for specific “services” like “Give me the current date” or “Tell me which user is running this program”. It would be a pain if programmers had to write the same code over and over again in every program they wrote to handle these common functions. To address this there are things called “libraries” that contain the code for tons of these routine tasks. Instead of writing the actual code to do a task, programmers simply add references to these library routines (often referred to as “function calls”) in the source code of their program. Each of these routines (or “functions”) has a unique name, and the programmer uses this name in their reference.
During compiling, the compiler program reads the text source code file as input and spits out a binary file called an “object” file. It’s merely a binary (machine-readable) version of the programmer’s source code file, complete with those references to library routines. The next step is called “linking” and it’s where those library references are taken care of. The linker is also just another program. It reads in several files, the object file that was generated by the compiler and one or more library files. Every time the linker finds a reference to a library routine in the object file, it reads the library files and finds that routine. It then replaces the programmer’s reference with the code for the routine from the library file. After it has replaced all the references with code from the library files the linker then spits out the executable binary file.
In Linux, the make utility handles compiling and linking. When you run the make utility you’ll see lines that start with gcc which stands for GNU C Compiler. You may also see error messages with the words – “unresolved symbols”. This means that the during the linking process a library routine that is referenced in the object file couldn’t be found in any of the library files. This may indicate that your library files are out of date or you’re missing a library file. Later in this page you’ll use the apt utility to add a package which contains a library file because a routine in it is referenced by the source code we use.
Program Source Compile
Linux distributions have extensive package repositories to save you the trouble of compiling anything yourself. Still, sometimes you’ll find an obscure application or a new version of a program that you’ll have to compile from source.
Once the software source code is downloaded and extracted, the very first thing that one should do is to go through the documentation. The documentation provides information about the software, changes since last version, links to more documentation, information regrading the author of the software, steps for compilation and installation of software etc.
This whole information is broadly divided into two files : ‘Readme’ and ‘Install’. While ‘Install’ covers all the information required for compilation and installation, all the other information is covered in the ‘Readme’ file. Please note that the name of file and it case may vary.
Once the above step is over then we configure the environment for compiling and installing the software. Most of the packages come along with a configuration script that can be used for configuring the environment. The file name for configuration file is mostly ‘configure’. This script usually accepts parameters that can be used to control some features of this software. Also this script makes sure that all the tools required for compilation are present in the system.
To learn about the options provided by a specific configuration file, run the following command:
$ configure –help
To start configuring the build environment, execute the following command :
$ ./configure
The above command will check and/or create the build environment and if everything goes fine then it produces a file called ‘makefile’. The file ‘makefile’ is used in the compilation of the software. Once the makefile is generated, then in the same directory just run the following command:
$ make
The above command will compile all the source code related to the software. If compilation encounters some problem then error is thrown on the console.
Once the compilation is done successfully then all the required binaries are created. Now is the time to install these binaries in the standard paths so that they can be invoked from anywhere in the system. To do this run the following command :
$ make install
Some times installing the software may require root privileges, so one may gain the rights and then proceed with the above command.
The above 5 steps show how to fetch, unpack, configure, compile and install the software from source. Additionally one could do some cleanup by removing the directory created while unpacking the software tarball.
Apply for Linux Administration Certification Now!!
http://www.vskills.in/certification/Certified-Linux-Administrator
