Certify and Increase Opportunity.
Be
Govt. Certified Linux Administrator
Linux, recognizes two different kinds of device: random−access block devices (such as disks), and character devices (such as tapes and serial lines) , some of which may be serial, and some random−access. Each supported device is represented in the filesystem as a device file. When you read or write a device file, the data comes from or goes to the device it represents. This way no special programs (and no special application programming methodology, such as catching interrupts or polling a serial port) are necessary to access devices; for example, to send a file to the printer, one could just say
$ cat filename > /dev/lp1
and the contents of the file are printed (the file must, of course, be in a form that the printer understands). However, since it is not a good idea to have several people cat their files to the printer at the same time, one usually uses a special program to send the files to be printed (usually lpr ). This program makes sure that only one file is being printed at a time, and will automatically send files to the printer as soon as it finishes with the previous file. Something similar is needed for most devices. In fact, one seldom needs to worry about device files at all.
Since devices show up as files in the filesystem (in the /dev directory), it is easy to see just what device files exist, using ls or another suitable command. In the output of ls −l, the first column contains the type of the file and its permissions. For example, inspecting a serial device might give
$ ls −l /dev/ttyS0
crw−rw−r−− 1 root dialout 4, 64 Aug 19 18:56 /dev/ttyS0
The first character in the first column, i.e., `c’ in crw−rw−rw− above, tells an informed user the type of the file, in this case a character device. For ordinary files, the first character is `−’, for directories it is `d’, and for block devices `b’.
Note that usually all device files exist even though the device itself might be not be installed. So just because you have a file /dev/sda, it doesn’t mean that you really do have an SCSI hard disk. Having all the device files makes the installation programs simpler, and makes it easier to add new hardware (there is no need to find out the correct parameters for and create the device files for the new device).
Hard Disks
The surfaces are usually divided into concentric rings, called tracks, and these in turn are divided into sectors. This division is used to specify locations on the hard disk and to allocate disk space to files. To find a given place on the hard disk, one might say “surface 3, track 5, sector 7”. Usually the number of sectors is the same for all tracks, but some hard disks put more sectors in outer tracks (all sectors are of the same physical size, so more of them fit in the longer outer tracks). Typically, a sector will hold 512 bytes of data. The disk itself can’t handle smaller amounts of data than one sector.
Each surface is divided into tracks (and sectors) in the same way. This means that when the head for one surface is on a track, the heads for the other surfaces are also on the corresponding tracks. All the corresponding tracks taken together are called a cylinder. It takes time to move the heads from one track (cylinder) to another, so by placing the data that is often accessed together (say, a file) so that it is within one cylinder, it is not necessary to move the heads to read all of it. This improves performance. It is not always possible to place files like this; files that are stored in several places on the disk are called fragmented.

The number of surfaces (or heads, which is the same thing), cylinders, and sectors vary a lot; the specification of the number of each is called the geometry of a hard disk. The geometry is usually stored in a special, battery−powered memory location called the CMOS RAM , from where the operating system can fetch it during bootup or driver initialization.
Unfortunately, the BIOS has a design limitation, which makes it impossible to specify a track number that is larger than 1024 in the CMOS RAM, which is too little for a large hard disk. To overcome this, the hard disk controller lies about the geometry, and translates the addresses given by the computer into something that fits reality. For example, a hard disk might have 8 heads, 2048 tracks, and 35 sectors per track. Its controller could lie to the computer and claim that it has 16 heads, 1024 tracks, and 35 sectors per track, thus not exceeding the limit on tracks, and translates the address that the computer gives it by halving the head number, and doubling the track number. The mathematics can be more complicated in reality, because the numbers are not as nice as here (but again, the details are not relevant for understanding the principle). This translation distorts the operating system’s view of how the disk is organized, thus making it impractical to use the all−data−on−one−cylinder trick to boost performance.
The translation is only a problem for IDE disks. SCSI disks use a sequential sector number (i.e., the controller translates a sequential sector number to a head, cylinder, and sector triplet), and a completely different method for the CPU to talk with the controller, so they are insulated from the problem. Note, however, that the computer might not know the real geometry of an SCSI disk either.
Since Linux often will not know the real geometry of a disk, its filesystems don’t even try to keep files within a single cylinder. Instead, it tries to assign sequentially numbered sectors to files, which almost always gives similar performance. The issue is further complicated by on−controller caches, and automatic prefetches done by the controller.
Each hard disk is represented by a separate device file. There can (usually) be only two or four IDE hard disks. These are known as /dev/hda, /dev/hdb, /dev/hdc, and /dev/hdd, respectively. SCSI hard disks are known as /dev/sda, /dev/sdb, and so on. Similar naming conventions exist for other hard disk types. Note that the device files for the hard disks give access to the entire disk, with no regard to partitions (which will be discussed below), and it’s easy to mess up the partitions or the data in them if you aren’t careful. The disks’ device files are usually used only to get access to the master boot record
Formatting Hard Disk
Disk partitioning is dividing a hard disk drive into multiple logical storage units called as partitions, to treat one physical disk drive as if it were multiple disks. Partition editor software is used to create, resize, delete, and manipulate partitions. Every hard disk needs to be partitioned before usage but few terms needs to be explained
Partition table – It has the details, location, and size of all partitions on drive.
Master boot program – It is in first 446 bytes of drive, to jump and load the boot program of operating system present in a partition’s boot sector.
Boot program is in the boot record of a partition and is used to load the operating system.
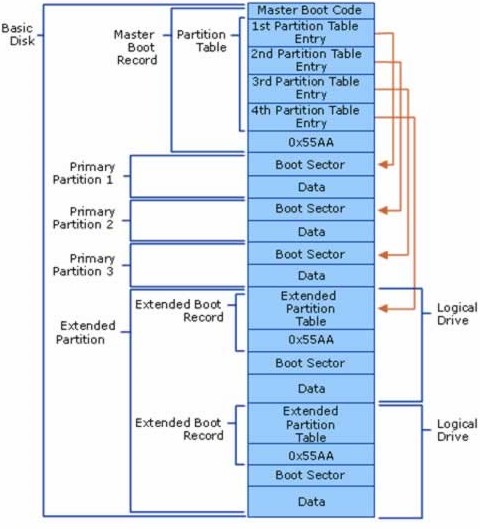
Master Boot Record (MBR) – It is the first sector at the beginning of a hard drive (512 bytes) having master boot program or master boot code and the partition table.
Active partition – It is the bootable primary partition of HDD and is a single partition on disk.
File System – It is a method of naming, storing and organizing files by operating system. It is different for different operating system or a file system may be supported by different operating system like FAT and NTFS for windows and ext, ext2,ext3 and ext4 for Linux. File system divides the disk space into packets called sector to store a file and cluster can have one or more sectors.
In Windows PC, MBR has space only for four partitions (three primary and one extended) on the drive and for each partition it stores the start and end location of partition, the number of sectors in the partition, and if it is bootable or not. Diagram illustrates the concepts
High-level formatting or formatting by operating system involves two steps
Giving count and size of partitions – It involves dividing drive into primary partitions and if needed then, also extended partition which can be subdivided into logical drives
Formatting each partition for specific file system – It involves specifying the type of file system for a partition and formatting the partition for the chosen file system.
High-level formatting is done during OS installation, or when a partition is corrupted. Disk Management tool in windows helps in viewing and managing partitions on a drive. Before operating system use a partition, it needs to be formatted in a file system. FAT was first used by MS-DOS and FAT32 is default file system for Windows XP also New Technology file system (NTFS) is default for Windows NT,2000,2003 and 2008 and for Linux ext, ext2,ext3 and ext4 file system, during operating system installation.
Linux Formatting
Formatting is the process of writing marks on the magnetic media that are used to mark tracks and sectors. Before a disk is formatted, its magnetic surface is a complete mess of magnetic signals. When it is formatted, some order is brought into the chaos by essentially drawing lines where the tracks go, and where they are divided into sectors. The actual details are not quite exactly like this, but that is irrelevant. What is important is that a disk cannot be used unless it has been formatted.
The terminology is a bit confusing here: in MS−DOS and MS Windows, the word formatting is used to cover also the process of creating a filesystem (which will be discussed below). There, the two processes are often combined, especially for floppies. When the distinction needs to be made, the real formatting is called low−level formatting, while making the filesystem is called high−level formatting . In UNIX circles, the two are called formatting and making a filesystem.
For IDE and some SCSI disks the formatting is actually done at the factory and doesn’t need to be repeated; hence most people rarely need to worry about it. In fact, formatting a hard disk can cause it to work less well, for example because a disk might need to be formatted in some very special way to allow automatic bad sector replacement to work.
Disks that need to be or can be formatted often require a special program anyway, because the interface to the formatting logic inside the drive is different from drive to drive. The formatting program is often either on the controller BIOS, or is supplied as an MS−DOS program; neither of these can easily be used from within Linux.
During formatting one might encounter bad spots on the disk, called bad blocks or bad sectors. These are sometimes handled by the drive itself, but even then, if more of them develop, something needs to be done to avoid using those parts of the disk. The logic to do this is built into the filesystem; how to add the information into the filesystem is described below. Alternatively, one might create a small partition that covers just the bad part of the disk; this approach might be a good idea if the bad spot is very large, since filesystems can sometimes have trouble with very large bad areas.
Floppies are formatted with fdformat . The floppy device file to use is given as the parameter. For example, the following command would format a high density, 3.5 inch floppy in the first floppy drive:
$ fdformat /dev/fd0H1440
Double−sided, 80 tracks, 18 sec/track. Total capacity
1440 kB.
Formatting … done
Verifying … done
$
Note that if you want to use an autodetecting device (e.g., /dev/fd0), you must set the parameters of the device with setfdprm first. To achieve the same effect as above, one would have to do the following
$ setfdprm /dev/fd0 1440/1440
$ fdformat /dev/fd0
Double−sided, 80 tracks, 18 sec/track. Total capacity
1440 KB.
Formatting … done
Verifying … done
It is usually more convenient to choose the correct device file that matches the type of the floppy. Note that it is unwise to format floppies to contain more information than what they are designed for.
fdformat also validate the floppy, i.e., check it for bad blocks. It will try a bad block several times (you can usually hear this, the drive noise changes dramatically). If the floppy is only marginally bad (due to dirt on the read/write head, some errors are false signals), fdformat won’t complain, but a real error will abort the validation process. The kernel will print log messages for each I/O error it finds; these will go to the console or, if syslog is being used, to the file /var/log/messages. fdformat itself won’t tell where the error is (one usually doesn’t care, floppies are cheap enough that a bad one is automatically thrown away).
$ fdformat /dev/fd0H1440
Double−sided, 80 tracks, 18 sec/track. Total capacity
1440 KB.
Formatting … done
Verifying … read: Unknown error
The badblocks command can be used to search any disk or partition for bad blocks (including a floppy). It does not format the disk, so it can be used to check even existing filesystems. The example below checks a 3.5 inch floppy with two bad blocks.
$ badblocks /dev/fd0H1440 1440
718
719
badblocks outputs the block numbers of the bad blocks it finds. Most filesystems can avoid such bad blocks. They maintain a list of known bad blocks, which is initialized when the filesystem is made, and can be modified later. The initial search for bad blocks can be done by the mkfs command (which initializes the filesystem), but later checks should be done with badblocks and the new blocks should be added with fsck.
Many modern disks automatically notice bad blocks, and attempt to fix them by using a special, reserved good block instead. This is invisible to the operating system. This feature should be documented in the disk’s manual, if you’re curious if it is happening. Even such disks can fail, if the number of bad blocks grows too large, although chances are that by then the disk will be so rotten as to be unusable.
Partitions
A hard disk can be divided into several partitions. Each partition functions as if it were a separate hard disk. The idea is that if you have one hard disk, and want to have, say, two operating systems on it, you can divide the disk into two partitions. Each operating system uses its partition as it wishes and doesn’t touch the other ones. This way the two operating systems can co−exist peacefully on the same hard disk. Without partitions one would have to buy a hard disk for each operating system.
Floppies are not usually partitioned. There is no technical reason against this, but since they’re so small, partitions would be useful only very rarely. CD−ROMs are usually also not partitioned, since it’s easier to use them as one big disk, and there is seldom a need to have several operating systems on one.
Partition types
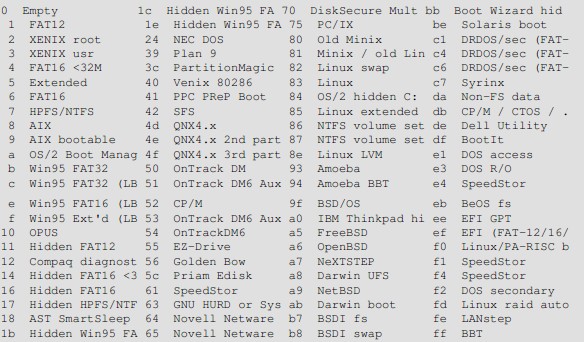
The partition tables (the one in the MBR, and the ones for extended partitions) contain one byte per partition that identifies the type of that partition. This attempts to identify the operating system that uses the partition, or what it uses it for. The purpose is to make it possible to avoid having two operating systems accidentally using the same partition. However, in reality, operating systems do not really care about the partition type byte; e.g., Linux doesn’t care at all what it is. Worse, some of them use it incorrectly; e.g., at least some versions of DR−DOS ignore the most significant bit of the byte, while others don’t. There is no standardization agency to specify what each byte value means, but as far as Linux is concerned, here is a list of partition types as per the fdisk program.
There are many programs for creating and removing partitions. Most operating systems have their own. Many of the programs are called fdisk, including the Linux one, or variations thereof. Details on using the Linux fdisk given on its man page. The cfdisk command is similar to fdisk, but has a nicer (full screen) user interface.
When using IDE disks, the boot partition (the partition with the bootable kernel image files) must be completely within the first 1024 cylinders. This is because the disk is used via the BIOS during boot (before the system goes into protected mode), and BIOS can’t handle more than 1024 cylinders. It is sometimes possible to use a boot partition that is only partly within the first 1024 cylinders. This works as long as all the files that are read with the BIOS are within the first 1024 cylinders. Since this is difficult to arrange, it is a very bad idea to do it; you never know when a kernel update or disk defragmentation will result in an unbootable system. Therefore, make sure your boot partition is completely within the first 1024 cylinders. However, this may no longer be true with newer versions of LILO that support LBA (Logical Block Addressing). Consult the documentation for your distribution to see if it has a version of LILO where LBA is supported.
Some newer versions of the BIOS and IDE disks can, in fact, handle disks with more than 1024 cylinders. If you have such a system, you can forget about the problem; if you aren’t quite sure of it, put it within the first 1024 cylinders.
Each partition should have an even number of sectors, since the Linux filesystems use a 1 kilobyte block size i.e., two sectors. An odd number of sectors will result in the last sector being unused. This won’t result in any problems, but it is ugly, and some versions of fdisk will warn about it.
Changing a partition’s size usually requires first backing up everything you want to save from that partition (preferably the whole disk, just in case), deleting the partition, creating new partition, then restoring everything to the new partition. If the partition is growing, you may need to adjust the sizes (and backup and restore) of the adjoining partitions as well.
Since changing partition sizes is painful, it is preferable to get the partitions right the first time, or have an effective and easy to use backup system. If you’re installing from a media that does not require much human intervention (say, from CD−ROM, as opposed to floppies), it is often easy to play with different configuration at first. Since you don’t already have data to back up, it is not so painful to modify partition sizes several times.
There is a program for MS−DOS, called fips , which resizes an MS−DOS partition without requiring the backup and restore, but for other filesystems it is still necessary.
Filesystems
Most UNIX filesystem types have a similar general structure, although the exact details vary quite a bit. The central concepts are superblock, inode , data block, directory block , and indirection block. The superblock contains information about the filesystem as a whole, such as its size (the exact information here depends on the filesystem). An inode contains all information about a file, except its name. The name is stored in the directory, together with the number of the inode. A directory entry consists of a filename and the number of the inode which represents the file. The inode contains the numbers of several data blocks, which are used to store the data in the file. There is space only for a few data block numbers in the inode, however, and if more are needed, more space for pointers to the data blocks is allocated dynamically. These dynamically allocated blocks are indirect blocks; the name indicates that in order to find the data block, one has to find its number in the indirect block first.
UNIX filesystems usually allow one to create a hole in a file (this is done with the lseek() system call; check the manual page), which means that the filesystem just pretends that at a particular place in the file there is just zero bytes, but no actual disk sectors are reserved for that place in the file (this means that the file will use a bit less disk space). This happens especially often for small binaries, Linux shared libraries, some databases, and a few other special cases. (Holes are implemented by storing a special value as the address of the data block in the indirect block or inode. This special address means that no data block is allocated for that part of the file, ergo, there is a hole in the file.)
Linux supports several types of filesystems. As of this writing the most important ones are
- minix – The oldest, presumed to be the most reliable, but quite limited in features (some time stamps are missing, at most 30 character filenames) and restricted in capabilities (at most 64 MB per filesystem).
- xia – A modified version of the minix filesystem that lifts the limits on the filenames and filesystem sizes, but does not otherwise introduce new features. It is not very popular, but is reported to work very well.
- ext3 – The ext3 filesystem has all the features of the ext2 filesystem. The difference is, journaling has been added. This improves performance and recovery time in case of a system crash. This has become more popular than ext2.
- ext2 – The most featureful of the native Linux filesystems. It is designed to be easily upwards compatible, so that new versions of the filesystem code do not require re−making the existing filesystems.
- ext – An older version of ext2 that wasn’t upwards compatible. It is hardly ever used in new installations any more, and most people have converted to ext2.
- reiserfs – A more robust filesystem. Journaling is used which makes data loss less likely. Journaling is a mechanism whereby a record is kept of transaction which are to be performed, or which have been performed. This allows the filesystem to reconstruct itself fairly easily after damage caused by, for example, improper shutdowns.
- jfs – JFS is a journaled filesystem designed by IBM to work in high performance environments>
- xfs – XFS was originally designed by Silicon Graphics to work as a 64−bit journaled filesy XFS was also designed to maintain high performance with large files and filesystems.
In addition, support for several foreign filesystems exists, to make it easier to exchange files with other operating systems. These foreign filesystems work just like native ones, except that they may be lacking in some usual UNIX features, or have curious limitations, or other oddities.
- msdos – Compatibility with MS−DOS (and OS/2 and Windows NT) FAT filesystems.
- umsdos – Extends the msdos filesystem driver under Linux to get long filenames, owners, permissions, links, and device files. This allows a normal msdos filesystem to be used as if it were a Linux one, thus removing the need for a separate partition for Linux.
- vfat – This is an extension of the FAT filesystem known as FAT32. It supports larger disk sizes than FAT. Most MS Windows disks are vfat.
- iso9660 – The standard CD−ROM filesystem; the popular Rock Ridge extension to the CD−ROM standard that allows longer file names is supported automatically.
- nfs – A networked filesystem that allows sharing a filesystem between many computers to allow easy access to the files from all of them.
- smbfs – A networks filesystem which allows sharing of a filesystem with an MS Windows computer. It is compatible with the Windows file sharing protocols.
- hpfs – The OS/2 filesystem.
- sysv – SystemV/386, Coherent, and Xenix filesystems.
- NTFS – The most advanced Microsoft journaled filesystem providing faster file access and stability over previous Microsoft filesystems.
The choice of filesystem to use depends on the situation. If compatibility or other reasons make one of the non−native filesystems necessary, then that one must be used. If one can choose freely, then it is probably wisest to use ext3, since it has all the features of ext2, and is a journaled filesystem.
Filesystems are created, i.e., initialized, with the mkfs command. There is actually a separate program for each filesystem type. mkfs is just a front end that runs the appropriate program depending on the desired filesystem type. The type is selected with the −t fstype option.
The programs called by mkfs have slightly different command line interfaces. The common and most important options are summarized below.
- −t fstype – Select the type of the filesystem.
- −c – Search for bad blocks and initialize the bad block list accordingly.
- −l filename – Read the initial bad block list from the name file.
The block size specifies size that the filesystem will use to read and write data. Larger block sizes will help improve disk I/O performance when using large files, such as databases. This happens because the disk can read or write data for a longer period of time before having to search for the next block.
On the downside, if you are going to have a lot of smaller files on that filesystem, like the /etc, there the potential for a lot of wasted disk space.
For example, if you set your block size to 4096, or 4K, and you create a file that is 256 bytes in size, it will still consume 4K of space on your harddrive. For one file that may seem trivial, but when your filesystem contains hundreds or thousands of files, this can add up.
Block size can also effect the maximum supported file size on some filesystems. This is because many modern filesystem are limited not by block size or file size, but by the number of blocks. Therefore you would be using a “block size * max # of blocks = max block size” formula.
Mounting and unmounting
Before one can use a filesystem, it has to be mounted. The operating system then does various bookkeeping things to make sure that everything works. Since all files in UNIX are in a single directory tree, the mount operation will make it look like the contents of the new filesystem are the contents of an existing subdirectory in some already mounted filesystem.
The mounts could be done as in the following example:
$ mount /dev/hda2 /home
$ mount /dev/hda3 /usr
The mount command takes two arguments. The first one is the device file corresponding to the disk or partition containing the filesystem. The second one is the directory below which it will be mounted. After these commands the contents of the two filesystems look just like the contents of the /home and /usr directories, respectively. One would then say that /dev/hda2 is mounted on /home”, and similarly for /usr. To look at either filesystem, one would look at the contents of the directory on which it has been mounted, just as if it were any other directory. Note the difference between the device file, /dev/hda2, and the mounted−on directory, /home. The device file gives access to the raw contents of the disk, the mounted−on directory gives access to the files on the disk. The mounted−on directory is called the mount point.
Linux supports many filesystem types. mount tries to guess the type of the filesystem. You can also use the −t fstype option to specify the type directly; this is sometimes necessary, since the heuristics mount uses do not always work. For example, to mount an MS−DOS floppy, you could use the following command
$ mount −t msdos /dev/fd0
/floppy
The mounted−on directory need not be empty, although it must exist. Any files in it, however, will be inaccessible by name while the filesystem is mounted. (Any files that have already been opened will still be accessible. Files that have hard links from other directories can be accessed using those names.) There is no harm done with this, and it can even be useful. For instance, some people like to have /tmp and /var/tmp synonymous, and make /tmp be a symbolic link to /var/tmp. When the system is booted, before the /var filesystem is mounted, a /var/tmp directory residing on the root filesystem is used instead. When /var is mounted, it will make the /var/tmp directory on the root filesystem inaccessible. If /var/tmp didn’t exist on the root filesystem, it would be impossible to use temporary files before mounting /var.
If you don’t intend to write anything to the filesystem, use the −r switch for mount to do a read−only mount. This will make the kernel stop any attempts at writing to the filesystem, and will also stop the kernel from updating file access times in the inodes. Read−only mounts are necessary for unwritable media, e.g., CD−ROMs.
The root filesystem is magically mounted at boot time, and one can rely on it to always be mounted. If the root filesystem can’t be mounted, the system does not boot. The name of the filesystem that is magically mounted as root is either compiled into the kernel, or set using LILO or rdev.
The root filesystem is usually first mounted read−only. The startup scripts will then run fsck to verify its validity, and if there are no problems, they will re−mount it so that writes will also be allowed. fsck must not be run on a mounted filesystem, since any changes to the filesystem while fsck is running will cause trouble. Since the root filesystem is mounted read−only while it is being checked, fsck can fix any problems without worry, since the remount operation will flush any metadata that the filesystem keeps in memory.
On many systems there are other filesystems that should also be mounted automatically at boot time. These are specified in the /etc/fstab file. The details of exactly when the extra filesystems are mounted depend on many factors, and can be configured by each administrator if need be
When a filesystem no longer needs to be mounted, it can be unmounted with umount. umount takes one argument: either the device file or the mount point. For example, to unmount the directories of the previous example, one could use the commands
$ umount /dev/hda2
$ umount /usr
It is imperative that you always unmount a mounted floppy. Don’t just pop the floppy out of the drive! Because of disk caching, the data is not necessarily written to the floppy until you unmount it, so removing the floppy from the drive too early might
cause the contents to become garbled. If you only read from the floppy, this is not very likely, but if you write, even accidentally, the result may be catastrophic.
Mounting and unmounting requires super user privileges, i.e., only root can do it. The reason for this is that if any user can mount a floppy on any directory, then it is rather easy to create a floppy with, say, a Trojan horse disguised as /bin/sh, or any other often used program. However, it is often necessary to allow users to use floppies, and there are several ways to do this, as
Give the users the root password. This is obviously bad security, but is the easiest solution. It works well if there is no need for security anyway, which is the case on many non−networked, personal systems.
Use a program such as sudo to allow users to use mount. This is still bad security, but doesn’t directly give super user privileges to everyone. It requires several seconds of hard thinking on the users’ behalf. Furthermore sudo can be configured to only allow users to execute certain commands.
Make the users use mtools, a package for manipulating MS−DOS filesystems, without mounting them. This works well if MS−DOS floppies are all that is needed, but is rather awkward otherwise.
List the floppy devices and their allowable mount points together with the suitable options in /etc/fstab.
fsck
Filesystems are complex creatures, and as such, they tend to be somewhat error−prone. A filesystem’s correctness and validity can be checked using the fsck command. It can be instructed to repair any minor problems it finds, and to alert the user if there any unrepairable problems. Fortunately, the code to implement filesystems is debugged quite effectively, so there are seldom any problems at all, and they are usually caused by power failures, failing hardware, or operator errors; for example, by not shutting down the system properly. Most systems are setup to run fsck automatically at boot time, so that any errors are detected (and hopefully corrected) before the system is used. Use of a corrupted filesystem tends to make things worse: if the data structures are messed up, using the filesystem will probably mess them up even more, resulting in more data loss. However, fsck can take a while to run on big filesystems, and since errors almost never occur if the system has been shut down properly, a couple of tricks are used to avoid doing the checks in such cases. The first is that if the file /etc/fastboot exists, no checks are made. The second is that the ext2 filesystem has a special marker in its superblock that tells whether the filesystem was unmounted properly after the previous mount. This allows e2fsck (the version of fsck for the ext2 filesystem) to avoid checking the filesystem if the flag indicates that the unmount was done (the assumption being that a proper unmount indicates no problems). Whether the /etc/fastboot trick works on your system depends on your startup scripts, but the ext2 trick works every time you use e2fsck. It has to be explicitly bypassed with an option to e2fsck to be avoided.
The automatic checking only works for the filesystems that are mounted automatically at boot time. Use fsck manually to check other filesystems, e.g., floppies.
If fsck finds unrepairable problems, you need either in−depth knowledge of how filesystems work in general, and the type of the corrupt filesystem in particular, or good backups. The latter is easy (although sometimes tedious) to arrange, the former can sometimes be arranged via a friend, the Linux newsgroups and mailing lists, or some other source of support, if you don’t have the know−how yourself. I’d like to tell you more about it, but my lack of education and experience in this regard hinders me. The debugfs program by Theodore Ts’o should be useful.
It can be a good idea to periodically check for bad blocks. This is done with the badblocks command. It outputs a list of the numbers of all bad blocks it can find. This list can be fed to fsck to be recorded in the filesystem data structures so that the operating system won’t try to use the bad blocks for storing data. The following example will show how this could be done.
$ badblocks /dev/fd0H1440 1440 >
bad−blocks
$ fsck −t ext2 −l bad−blocks
/dev/fd0H1440
Parallelizing fsck version 0.5a (5−Apr−94)
e2fsck 0.5a, 5−Apr−94 for EXT2 FS 0.5, 94/03/10
Pass 1: Checking inodes, blocks, and sizes
Pass 2: Checking directory structure
Pass 3: Checking directory connectivity
Pass 4: Check reference counts.
Pass 5: Checking group summary information.
/dev/fd0H1440: ***** FILE SYSTEM WAS MODIFIED *****
/dev/fd0H1440: 11/360 files, 63/1440 blocks
If badblocks reports a block that was already used, e2fsck will try to move the block to another place. If the block was really bad, not just marginal, the contents of the file may be corrupted.
Modern Linux filesystem keep fragmentation at a minimum by keeping all blocks in a file close together, even if they can’t be stored in consecutive sectors. Some filesystems, like ext3, effectively allocate the free block that is nearest to other blocks in a file. Therefore it is not necessary to worry about fragmentation in a Linux system.
Some other tools are also useful for managing filesystems. df shows the free disk space on one or more filesystems; du shows how much disk space a directory and all its files contain. These can be used to hunt down disk space wasters. Both have manual pages which detail the (many) options which can be used.
sync forces all unwritten blocks in the buffer cache to be written to disk. It is seldom necessary to do this by hand; the daemon process update does this automatically. It can be useful in catastrophes, for example if update or its helper process bdflush dies, or if you must turn off power now and can’t wait for update to run. Again, there are manual pages. The man is your very best friend in Linux. Its cousin apropos is also very useful when you don’t know what the name of the command you want is.
Disks without filesystems
Not all disks or partitions are used as filesystems. A swap partition, for example, will not have a filesystem on it. Many floppies are used in a tape−drive emulating fashion, so that a tar (tape archive) or other file is written directly on the raw disk, without a filesystem. Linux boot floppies don’t contain a filesystem, only the raw kernel.
Avoiding a filesystem has the advantage of making more of the disk usable, since a filesystem always has some bookkeeping overhead. It also makes the disks more easily compatible with other systems: for example, the tar file format is the same on all systems, while filesystems are different on most systems. You will quickly get used to disks without filesystems if you need them. Bootable Linux floppies also do not necessarily have a filesystem, although they may.
One reason to use raw disks is to make image copies of them. For instance, if the disk contains a partially damaged filesystem, it is a good idea to make an exact copy of it before trying to fix it, since then you can start again if your fixing breaks things even more. One way to do this is to use dd
$ dd if=/dev/fd0H1440
of=floppy−image
2880+0 records in
2880+0 records out
$ dd if=floppy−image
of=/dev/fd0H1440
2880+0 records in
2880+0 records out
The first dd makes an exact image of the floppy to the file floppy−image, the second one writes the image to the floppy. (The user has presumably switched the floppy before the second command. Otherwise the command pair is of doubtful usefulness.)
Logical Volume Manager (LVM)
Using LVM allows administrators the flexibility to create logical disks that can be expanded dynamically as more disk space is required.
This is done first by creating partitions with as an 0x8e Linux LVM partition type. Then the Physical Partitions are added to a Volume Group and broken up into chunks, or Physical Extents Volume Group. These extends can then be grouped into Logical Volumes. These Logical Volumes then can be formatted just like a physical partition. The big difference is that they can be expanded by adding more extents to them.
With LVM, a hard drive or set of hard drives is allocated to one or more physical volumes. LVM physical volumes can be placed on other block devices which might span two or more disks.
The physical volumes are combined into logical volumes, with the exception of the /boot/ partition. The /boot/ partition cannot be on a logical volume group because the boot loader cannot read it. If the root (/) partition is on a logical volume, create a separate /boot/ partition which is not a part of a volume group.
Since a physical volume cannot span over multiple drives, to span over more than one drive, create one or more physical volumes per drive.
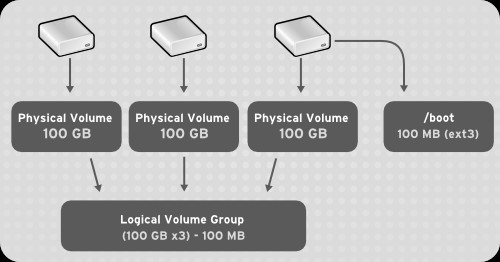
The volume groups can be divided into logical volumes, which are assigned mount points, such as /home and / and file system types, such as ext2 or ext3. When “partitions” reach their full capacity, free space from the volume group can be added to the logical volume to increase the size of the partition. When a new hard drive is added to the system, it can be added to the volume group, and partitions that are logical volumes can be increased in size.
With LVM, a hard drive or set of hard drives is allocated to one or more physical volumes. LVM physical volumes can be placed on other block devices which might span two or more disks.
The physical volumes are combined into logical volumes, with the exception of the /boot/ partition. The /boot/ partition cannot be on a logical volume group because the boot loader cannot read it. If the root (/) partition is on a logical volume, create a separate /boot/ partition which is not a part of a volume group.
Since a physical volume cannot span over multiple drives, to span over more than one drive, create one or more physical volumes per drive.
The volume groups can be divided into logical volumes, which are assigned mount points, such as /home and / and file system types, such as ext2 or ext3. When “partitions” reach their full capacity, free space from the volume group can be added to the logical volume to increase the size of the partition. When a new hard drive is added to the system, it can be added to the volume group, and partitions that are logical volumes can be increased in size.
An overview of the steps required to configure LVM include:
- Creating physical volumes from the hard drives.
- Creating volume groups from the physical volumes.
- Creating logical volumes from the volume groups and assign the logical volumes mount points.
Logical Volume Manager allows for a layer of abstraction between your operating system and the disks/partitions it uses. In traditional disk management your operating system looks for what disks are available (/dev/sda, /dev/sdb, etc.) and then looks at what partitions are available on those disks (/dev/sda1, /dev/sda2, etc.).
With LVM, disks and partitions can be abstracted to contain multiple disks and partitions into one device. Your operating systems will never know the difference because LVM will only show the OS the volume groups (disks) and logical volumes (partitions) that you have set up.
Because volume groups and logical volumes aren’t physically tied to a hard drive, it makes it easy to dynamically resize and create new disks and partitions. In addition, LVM can give you features that your file system is not capable of doing. For example, Ext3 does not have support for live snapshots, but if you’re using LVM you have the ability to take a snapshot of your logical volumes without unmounting the disk.
Basic building blocks of LVM:
- Physical volume (PV): Partition on hard disk (or even the disk itself or loopback file) on which you can have volume groups. It has a special header and is divided into physical extents. Think of physical volumes as big building blocks used to build your hard drive.
- Volume group (VG): Group of physical volumes used as a storage volume (as one disk). They contain logical volumes. Think of volume groups as hard drives.
- Logical volume (LV): A “virtual/logical partition” that resides in a volume group and is composed of physical extents. Think of logical volumes as normal partitions.
- Physical extent (PE): The smallest size in the physical volume that can be assigned to a logical volume (default 4MiB). Think of physical extents as parts of disks that can be allocated to any partition.
Advantages – LVM gives you more flexibility than just using normal hard drive partitions:
- Use any number of disks as one big disk.
- Have logical volumes stretched over several disks.
- Create small logical volumes and resize them “dynamically” as they get filled up.
- Resize logical volumes regardless of their order on disk. It does not depend on the position of the LV within VG, there is no need to ensure surrounding available space.
- Resize/create/delete logical and physical volumes online. File systems on them still need to be resized, but some (such as ext4) support online resizing.
- Online/live migration of LV being used by services to different disks without having to restart services.
- Snapshots allow you to backup a frozen copy of the file system, while keeping service downtime to a minimum.
- Support for various device-mapper targets, including transparent filesystem encryption and caching of frequently used data.
Disadvantages
- Additional steps in setting up the system, more complicated.
Create partitions – If LVM has to be set on the entire disk, there is no need to create any partitions. Otherwise, partition the device as required before configuring LVM.
Create physical volumes – To list all your devices capable of being used as a physical volume:
# lvmdiskscan
Create a physical volume on them:
# pvcreate DEVICE
This command creates a header on each device so it can be used for LVM. As defined in #LVM Building Blocks, DEVICE can be a disk (e.g. /dev/sda), a partition (e.g. /dev/sda2) or a loop back device. For example – # pvcreate /dev/sda2
You can track created physical volumes with – # pvdisplay
Create volume group – The next step is to create a volume group on this physical volume. First you need to create a volume group on one of the physical volumes:
# vgcreate <volume_group> <physical_volume>
For example:
# vgcreate VolGroup00 /dev/sda2
Then add to it all other physical volumes you want to have in it:
# vgextend <volume_group> <physical_volume>
# vgextend <volume_group> <another_physical_volume>
# …
For example:
# vgextend VolGroup00 /dev/sdb1
# vgextend VolGroup00 /dev/sdc
Create logical volumes – Now we need to create logical volumes on this volume group. You create a logical volume with the next command by giving the name of a new logical volume, its size, and the volume group it will live on:
# lvcreate -L <size> <volume_group> -n <logical_volume>
For example:
# lvcreate -L 10G VolGroup00 -n lvolhome
This will create a logical volume that you can access later with /dev/mapper/Volgroup00-lvolhome or /dev/VolGroup00/lvolhome. Same as with the volume groups, you can use any name you want for your logical volume when creating it.
You can also specify one or more physical volumes to restrict where LVM allocates the data. For example, you may wish to create a logical volume for the root filesystem on your small SSD, and your home volume on a slower mechanical drive. Simply add the physical volume devices to the command line, for example:
# lvcreate -L 10G VolGroup00 -n lvolhome /dev/sdc1
If you want to fill all the free space left on a volume group, use the next command:
# lvcreate -l 100%FREE <volume_group> -n <logical_volume>
You can track created logical volumes with:
# lvdisplay
Create file systems and mount logical volumes – Your logical volumes should now be located in /dev/mapper/ and /dev/YourVolumeGroupName. If you cannot find them, use the next commands to bring up the module for creating device nodes and to make volume groups available:
# modprobe dm_mod
# vgscan
# vgchange -ay
Now you can create file systems on logical volumes and mount them as normal partitions (if you are installing Arch linux, refer to mounting the partitions for additional details):
# mkfs.<fstype> /dev/mapper/<volume_group>-<logical_volume>
# mount /dev/mapper/<volume_group>-<logical_volume> /<mountpoint>
For example:
# mkfs.ext4 /dev/mapper/VolGroup00-lvolhome
# mount /dev/mapper/VolGroup00-lvolhome /home
Apply for Linux Administration Certification Now!!
http://www.vskills.in/certification/Certified-Linux-Administrator
