Certify and Increase Opportunity.
Be
Govt. Certified Linux Administrator
The act of turning on a computer system and causing its operating system to be loaded is called booting. The name comes from an image of the computer pulling itself up from its bootstraps, but the act itself slightly more realistic.
During bootstrapping, the computer first loads a small piece of code called the bootstrap loader, which in turn loads and starts the operating system. The bootstrap loader is usually stored in a fixed location on a hard disk or a floppy. The reason for this two step process is that the operating system is big and complicated, but the first piece of code that the computer loads must be very small (a few hundred bytes), to avoid making the firmware unnecessarily complicated.
Different computers do the bootstrapping differently. For PCs, the computer (its BIOS) reads in the first sector (called the boot sector) of a floppy or hard disk. The bootstrap loader is contained within this sector. It loads the operating system from elsewhere on the disk (or from some other place).
After Linux has been loaded, it initializes the hardware and device drivers, and then runs init. init starts other processes to allow users to log in, and do things. The details of this part will be discussed below.
In order to shut down a Linux system, first all processes are told to terminate (this makes them close any files and do other necessary things to keep things tidy), then filesystems and swap areas are unmounted, and finally a message is printed to the console that the power can be turned off. If the proper procedure is not followed, terrible things can and will happen; most importantly, the filesystem buffer cache might not be flushed, which means that all data in it is lost and the filesystem on disk is inconsistent, and therefore possibly unusable.
The boot process
When a PC is booted, the BIOS will do various tests to check that everything looks all right, and will then start the actual booting. This process is called the power on self test , or POST for short. It will choose a disk drive (typically the first floppy drive, if there is a floppy inserted, otherwise the first hard disk, if one is installed in the computer; the order might be configurable, however) and will then read its very first sector. This is called the boot sector; for a hard disk, it is also called the master boot record, since a hard disk can contain several partitions, each with their own boot sectors.
The boot sector contains a small program (small enough to fit into one sector) whose responsibility is to read the actual operating system from the disk and start it. When booting Linux from a floppy disk, the boot sector contains code that just reads the first few hundred blocks (depending on the actual kernel size, of course) to a predetermined place in memory. On a Linux boot floppy, there is no filesystem, the kernel is just stored in consecutive sectors, since this simplifies the boot process. It is possible, however, to boot from a floppy with a filesystem, by using LILO, the LInux LOader, or GRUB, the GRand Unifying Bootloader.
When booting from the hard disk, the code in the master boot record will examine the partition table (also in the master boot record), identify the active partition (the partition that is marked to be bootable), read the boot sector from that partition, and then start the code in that boot sector. The code in the partition’s boot sector does what a floppy disk’s boot sector does: it will read in the kernel from the partition and start it. The details vary, however, since it is generally not useful to have a separate partition for just the kernel image, so the code in the partition’s boot sector can’t just read the disk in sequential order, it has to find the sectors wherever the filesystem has put them. There are several ways around this problem, but the most common way is to use a boot loader like LILO or GRUB.
When booting, the bootloader will normally go right ahead and read in and boot the default kernel. It is also possible to configure the boot loader to be able to boot one of several kernels, or even other operating systems than Linux, and it is possible for the user to choose which kernel or operating system is to be booted at boot time. LILO, for example, can be configured so that if one holds down the alt, shift, or ctrl key at boot time (when LILO is loaded), LILO will ask what is to be booted and not boot the default right away. Alternatively, the bootloader can be configured so that it will always ask, with an optional timeout that will cause the default kernel to be booted. It is also possible to give a kernel command line argument, after the name of the kernel or operating system.
Booting from floppy and from hard disk have both their advantages, but generally booting from the hard disk is nicer, since it avoids the hassle of playing around with floppies. It is also faster. Most Linux distributions will setup the bootloader for you during the install process.
After the Linux kernel has been read into the memory, by whatever means, and is started for real, roughly the following things happen:
- The Linux kernel is installed compressed, so it will first uncompress itself. The beginning of the kernel image contains a small program that does this.
- If you have a super−VGA card that Linux recognizes and that has some special text modes (such as 100 columns by 40 rows), Linux asks you which mode you want to use. During the kernel compilation, it is possible to preset a video mode, so that this is never asked. This can also be done with LILO, GRUB or rdev.
- After this, the kernel checks what other hardware there is (hard disks, floppies, network adapters, etc), and configures some of its device drivers appropriately; while it does this, it outputs messages about its findings. For example, when I boot, I it looks like this:
LILO boot:
Loading linux.
Console: colour EGA+ 80×25, 8 virtual consoles
Serial driver version 3.94 with no serial options enabled
tty00 at 0x03f8 (irq = 4) is a 16450
tty01 at 0x02f8 (irq = 3) is a 16450
lp_init: lp1 exists (0), using polling driver
Memory: 7332k/8192k available (300k kernel code, 384k reserved, 176k
data)
Floppy drive(s): fd0 is 1.44M, fd1 is 1.2M
Loopback device init
Warning WD8013 board not found at i/o = 280.
Math coprocessor using irq13 error reporting.
Partition check:
hda: hda1 hda2 hda3
VFS: Mounted root (ext filesystem).
Linux version 0.99.pl9−1 (root@haven) 05/01/93 14:12:20
The exact texts are different on different systems, depending on the hardware, the version of Linux being used, and how it has been configured.
- Then the kernel will try to mount the root filesystem. The place is configurable at compilation time, or any time with rdev or the bootloader. The filesystem type is detected automatically. If the mounting of the root filesystem fails, for example because you didn’t remember to include the corresponding filesystem driver in the kernel, the kernel panics and halts the system (there isn’t much it can do, anyway). The root filesystem is usually mounted read−only (this can be set in the same way as the place). This makes it possible to check the filesystem while it is mounted; it is not a good idea to check a filesystem that is mounted read−
- After this, the kernel starts the program init (located in /sbin/init) in the background (this will always become process number 1). init does various startup chores. The exact things it does depends on how it is configured. It will at least start some essential background daemons.
- init then switches to multi−user mode, and starts a getty for virtual consoles and serial lines. getty is the program which lets people log in via virtual consoles and serial terminals. init may also start some other programs, depending on how it is configured.
- After this, the boot is complete, and the system is up and running normally.
Shutdown
The command for properly shutting down a Linux system is shutdown. It is usually used in one of two ways. If you are running a system where you are the only user, the usual way of using shutdown is to quit all running programs, log out on all virtual consoles, log in as root on one of them (or stay logged in as root if you already are, but you should change to root’s home directory or the root directory, to avoid problems with unmounting), then give the command shutdown −h now (substitute now with a plus sign and a number in minutes if you want a delay, though you usually don’t on a single user system).
Alternatively, if your system has many users, use the command shutdown −h +time message, where time is the time in minutes until the system is halted, and message is a short explanation of why the system is shutting down.
# shutdown −h +10 ‘We will install a new
disk. System should
> be back on−line in three hours.’
#
This will warn everybody that the system will shut down in ten minutes, and that they’d better get lost or lose data. The warning is printed to every terminal on which someone is logged in, including all xterms:
Broadcast message from root (ttyp0) Wed Aug 2 01:03:25 1995…
We will install a new disk. System should
be back on−line in three hours.
The system is going DOWN for system halt in 10 minutes !!
The warning is automatically repeated a few times before the boot, with shorter and shorter intervals as the time runs out.
When the real shutting down starts after any delays, all filesystems (except the root one) are unmounted, user processes (if anybody is still logged in) are killed, daemons are shut down, all filesystem are unmounted, and generally everything settles down. When that is done, init prints out a message that you can power down the machine. Then, and only then, should you move your fingers towards the power switch.
Rebooting
Rebooting means booting the system again. This can be accomplished by first shutting it down completely, turning power off, and then turning it back on. A simpler way is to ask shutdown to reboot the system, instead of merely halting it. This is accomplished by using the −r option to shutdown, for example, by giving the command shutdown −r now.
Most Linux systems run shutdown −r now when ctrl−alt−del is pressed on the keyboard. This reboots the system. The action on ctrl−alt−del is configurable, however, and it might be better to allow for some delay before the reboot on a multiuser machine. Systems that are physically accessible to anyone might even be configured to do nothing when ctrl−alt−del is pressed.
init
init is one of those programs that are absolutely essential to the operation of a Linux system, but that you still can mostly ignore. A good Linux distribution will come with a configuration for init that will work for most systems, and on these systems there is nothing you need to do about init. Usually, you only need to worry about init if you hook up serial terminals, dial−in (not dial−out) modems, or if you want to change the default run level.
When the kernel has started itself (has been loaded into memory, has started running, and has initialized all device drivers and data structures and such), it finishes its own part of the boot process by starting a user level program, init. Thus, init is always the first process (its process number is always 1).
The kernel looks for init in a few locations that have been historically used for it, but the proper location for it (on a Linux system) is /sbin/init. If the kernel can’t find init, it tries to run /bin/sh, and if that also fails, the startup of the system fails.
When init starts, it finishes the boot process by doing a number of administrative tasks, such as checking filesystems, cleaning up /tmp, starting various services, and starting a getty for each terminal and virtual console where users should be able to log in.
After the system is properly up, init restarts getty for each terminal after a user has logged out (so that the next user can log in). init also adopts orphan processes: when a process starts a child process and dies before its child, the child immediately becomes a child of init. This is important for various technical reasons, but it is good to know it, since it makes it easier to understand process lists and process tree graphs. There are a few variants of init available. Most Linux distributions use sysvinit (written by Miquel van Smoorenburg), which is based on the System V init design. The BSD versions of Unix have a different init. The primary difference is run levels: System V has them, BSD does not (at least traditionally). This difference is not essential.
the /etc/inittab file
When it starts up, init reads the /etc/inittab configuration file. While the system is running, it will re−read it, if sent the HUP signal (kill −HUP 1); this feature makes it unnecessary to boot the system to make changes to the init configuration take effect.
The /etc/inittab file is a bit complicated. We’ll start with the simple case of configuring getty lines. Lines in /etc/inittab consist of four colon−delimited fields:
id:runlevels:action:process
The fields are described below. In addition, /etc/inittab can contain empty lines, and lines that begin with a number sign (`#’); these are both ignored.
- id – This identifies the line in the file. For getty lines, it specifies the terminal it runs on (the characters after /dev/tty in the device file name). For other lines, it doesn’t matter (except for length restrictions), but it should be unique.
- runlevels – The run levels the line should be considered for. The run levels are given as single digits, without delimiters. (Run levels are described in the next section.)
- action – What action should be taken by the line, e.g., respawn to run the command in the next field again, when it exits, or once to run it just once.
- process – The command to run.
To start a getty on the first virtual terminal (/dev/tty1), in all the normal multi−user run levels (2−5), one would write the following line:
1:2345:respawn:/sbin/getty 9600 tty1
The first field says that this is the line for /dev/tty1. The second field says that it applies to run levels 2, 3, 4, and 5. The third field means that the command should be run again, after it exits (so that one can log in, log out, and then log in again). The last field is the command that runs getty on the first virtual terminal. Different versions of getty are run differently. If you wanted to add terminals or dial−in modem lines to a system, you’d add more lines to /etc/inittab, one for each terminal or dial−in line.
If a command fails when it starts, and init is configured to restart it, it will use a lot of system resources: init starts it, it fails, init starts it, it fails, init starts it, it fails, and so on, ad infinitum. To prevent this, init will keep track of how often it restarts a command, and if the frequency grows to high, it will delay for five minutes before restarting again.
Services and rhosts file
A Linux service is an application (or set of applications) that runs in the background waiting to be used, or carrying out essential tasks. If you look in the file /etc/inittab you will see something like:
id:4:initdefault:l
0:0:wait:/etc/rc.d/rc.0l
6:6:wait:/etc/rc.d/rc.6x
1:4:wait:/etc/rc.d/rc.4
The boot process uses these parameters to identify the default runlevel and the files that will be used by that runlevel. In this example, runlevel 4 is the default and the scripts that define runlevel 4 can be found in /etc/rc.d/rc.4.
A run level is a state of init and the whole system that defines what system services are operating. Run levels are identified by numbers. Some system administrators use run levels to define which subsystems are working, e.g., whether X is running, whether the network is operational, and so on. Others have all subsystems always running or start and stop them individually, without changing run levels, since run levels are too coarse for controlling their systems. You need to decide for yourself, but it might be easiest to follow the way your Linux distribution does things.
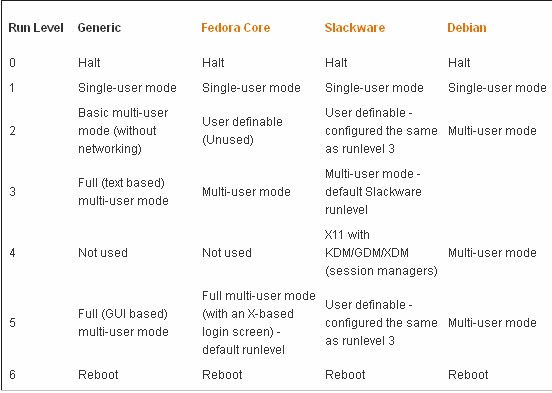
Runlevel refers to different levels that the system goes through during a boot up. Instead, think of the runlevel as the point at which the system is entered. Runlevel 1 is the most basic configuration (simple single user access using an text interface), while runlevel 5 is the most advanced (multi-user, networking, and a GUI front end). Runlevels 0 and 6 are used for halting and rebooting the system.
There are, however, differences between Linux distributions. For instance, Fedora uses runlevel 5 for X-based logins, whereas Slackware uses runlevel 4 to do the same job. Therefore, you should check your documentation before making any changes. This table shows a generic list of configurations
There are slight (but important) differences between Linux distributions. One thing is common between them — if you want to change the default level, you must edit /etc/initab. You will need to be root or use sudo to edit this file. Runlevels 0 and 6 should never be used as a default (for obvious reasons — you don’t want the system to shutdown or reboot as soon as you turn it on). You can, of course, change mode whilst the system is running. Type init followed by the required runlevel e.g.
init 6
This will reboot the system. The init command, will decide the runlevel to select and from that will decide the rc.d script files to be run. In this case either the file /etc/rc.d/rc.4 or any files in the directory /etc/rc.d/rc4.d. Let’s look at an example rc.d script file. Here’s the default rc.4 file for Slackware 10.2:
# Try to use GNOME’s gdm session manager:
if [ -x /usr/bin/gdm ];
then exec /usr/bin/gdm -nodaemonfi
# Not there? OK, try to use KDE’s KDM session manager:
if [ -x /opt/kde/bin/kdm ];
then exec /opt/kde/bin/kdm -nodaemonfi
# If all you have is XDM, I guess it will have to do:
if [ -x /usr/X11R6/bin/xdm ];
then exec /usr/X11R6/bin/xdm -nodaemonfi
As you would expect, since runlevel 4 is the Slackware X11 mode, the commands are all concerned with the setting up of the graphical interface. In the other distros (such as Fedora and Debian) you’ll find that the scripts to be run are actually symbolic links to files in the directory /etc/init.d — the central repository for all startup scripts. So all you have to do is to write your startup script, place it in /etc/init.d, and then create a symbolic link to it from the appropriate runlevel directory (or runlevel file, if that’s what your system uses).
For example, runlevel 2 is the default runlevel for Debian in non-GUI mode. If you’re running Apache 2 on Debian, you’d find an init script for Apache 2 under /etc/init.d called apache2. A symlink, S91apache2, points to /etc/init.d/apache2 from /etc/rc2.d — this tells init to start Apache 2 in runlevel 2, but only after other services with lower S numbers.
When the system is shut down, there is another symlink in the /etc/rc0.d and /etc/rc6.d directories (halt and reboot, respectively) that starts with a K instead of an S, which tells init to shut down the process. Instead simply make use of the /etc/rc.d/rc.local file. This script file is run once, before all other scripts have run but before the logon prompt appears. By default it looks something like:
#!/bin/bash## /etc/rc.local – run once at boot time
# Put any local setup commands in here:
You can append your instructions onto the end of the file by defining another script to be run:
/root/bin/start_bb
An important run level is single user mode (run level 1), in which only the system administrator is using the machine and as few system services, including logins, as possible are running. Single user mode is necessary for a few administrative tasks, such as running fsck on a /usr partition, since this requires that the partition be unmounted, and that can’t happen, unless just about all system services are killed.
A running system can be taken to single user mode by using telinit to request run level 1. At bootup, it can be entered by giving the word single or emergency on the kernel command line: the kernel gives the command line to init as well, and init understands from that word that it shouldn’t use the default run level. (The kernel command line is entered in a way that depends on how you boot the system.)
Booting into single user mode is sometimes necessary so that one can run fsck by hand, before anything mounts or otherwise touches a broken /usr partition (any activity on a broken filesystem is likely to break it more, so fsck should be run as soon as possible).
The bootup scripts init runs will automatically enter single user mode, if the automatic fsck at bootup fails. This is an attempt to prevent the system from using a filesystem that is so broken that fsck can’t fix it automatically. Such breakage is relatively rare, and usually involves a broken hard disk or an experimental kernel release, but it’s good to be prepared.
As a security measure, a properly configured system will ask for the root password before starting the shell in single user mode. Otherwise, it would be simple to just enter a suitable line to LILO to get in as root. (This will break if /etc/passwd has been broken by filesystem problems, of course, and in that case you’d better have a boot floppy handy.)
rc Scripts
Because of the number of services that need to be managed, rc scripts are used. The main one, /etc/rc.d/rc , is responsible for calling the appropriate scripts in the correct order for each runlevel. As you can imagine, such a script could easily become extremely uncontrollable! To keep this from happening, a slightly more elaborate system is used.
For each runlevel, a subdirectory exists in the /etc/rc.d directory. These runlevel sub-directories follow the naming scheme of rc X .d, where X is the runlevel. For example, all the scripts for runlevel 3 are in /etc/rc.d/rc3.d.
In the runlevel directories, symbolic links are made to scripts in the /etc/rc.d/init.d directory. Instead of using the name of the script as it exists in the /etc/rc.d/init.d directory, however, the symbolic links are prefixed with an S, if the script is to start a service, or with a K, if the script is to stop (or kill) a service. Note that these two letters are case-sensitive. You must use uppercase letters, or the startup scripts will not recognize them.
In many cases, the order in which these scripts are run makes a difference. (For example, you can’t start services that rely on a configured network interface without first enabling and configuring the network interface!) To enforce order, a two-digit number is suffixed to the S or K. Lower numbers execute before higher numbers; for example, /etc/rc.d/rc3.d/ S10network runs before /etc/rc.d/rc3.d/S55sshd ( S10network configures the network settings, and S55sshd starts the Secure Shell [SSH] server).
The scripts pointed to in the /etc/rc.d/init.d directory are the workhorses; they perform the actual process of starting and stopping services. When /etc/rc.d/rc runs through a specific runlevel’s directory, it invokes each script in numerical order. It first runs the scripts that begin with a K and then the scripts that begin with an S . For scripts starting with K , a parameter of stop is passed. Likewise, for scripts starting with S , the parameter start is passed.
If your change is to take effect at boot time only and the change is small, you may want to simply edit the /etc/rc.d/rc.local script. This script gets run at the end of the boot process.
On the other hand, if your addition is more elaborate and/or requires that the shutdown process explicitly stop, you should add a script to the /etc/rc.d/init.d directory. This script should take the parameters start and stop, and act accordingly.
Of course, the first option, editing the /etc/rc.d/rc.local script, is the easier of the two. To make additions to this script, simply open it in your editor of choice and append the commands you want run at the end. This is good for simple one- or two-line changes.
Enabling and disabling services
Many Linux distributions including Ubuntu bundle with them a GUI front end to accomplish the task which makes it easier to enable and disable the system services.
But there is no standard GUI utility common across all Linux distributions. And this makes it worth while to learn how to enable and disable the services via the command line.
Most Linux distributions have one thing in common. That being, all the start-up scripts are stored in the /etc/init.d/ directory.
Enable a Service – Red Hat, Fedora, and Red Hat based Linux distributions such as CentOS make use of the script called chkconfig to enable and disable the system services running in Linux. As an example, lets enable the Apache web server to start in run levels 2, 3, and 5. This is how it is done. We first add the service using chkconfig script. Then turn on the service at the desired run levels.
# chkconfig httpd –add
# chkconfig httpd on –level 2,3,5
This will enable the Apache web server to automatically start in the run levels 2, 3 and 5. You can check this by running the command –
# chkconfig –list httpd
Disable a service
# chkconfig httpd off
# chkconfig httpd –del
Red Hat/Fedora also have a useful script called service which can be used to start or stop any service. For example, to start Apache web server using the service script, the command is as follows –
# service httpd start
and to stop the service…
# service httpd stop
The options being start, stop and restart which are self explanatory.
To Enable and disable services across runlevels in Debian, Ubuntu, and other Debian based Linux distributions we use a script called update-rc.d.
Enable a service – As an example, to enable Apache web server in Debian, do the following –
# update-rc.d apache2 defaults
… this will enable the Apache web server to start in the default run levels of 2,3,4 and 5. Of course, you can do it explicitly by giving the run levels instead of the defaults keyword as follows:
# update-rc.d apache2 start 20 2 3 4 5 . stop 80 0 1 6 .
The above command modifies the sym-links in the respective /etc/rcX.d directories to start or stop the service in the destined runlevels. Here X stands for a value of 0 to 6 depending on the runlevel. One thing to note here is the dot (.) which is used to terminate the set which is important. Also 20 and 80 are the sequence codes which decides in what order of precedence the scripts in the /etc/init.d/ directory should be started or stopped.
To enable the service only in runlevel 5, you do this instead –
# update-rc.d apache2 start 20 5 . stop 80 0 1 2 3 4 6 .
Disable a service – To disable the service in all the run levels, you execute the command:
# update-rc.d -f apache2 remove
Here -f option which stands for force is mandatory.
Manually enable/ disable – I remember the first time I started using Linux, there were no such scripts to aid the user in enabling or disabling the services during start-up. You did it the old fashioned way which was creating or deleting symbolic links in the respective /etc/rcX.d/ directories. Here X in rcX.d is a number which stands for the runlevel. As an example, here is a listing of all the services started in runlevel 5 in my PC running Ubuntu.
ls -l /etc/rc5.d
And the output is …
lrwxrwxrwx 1 root root 26 2012-03-18 21:10 S20apache2 -> ../init.d/apache2
lrwxrwxrwx 1 root root 20 2011-10-27 12:46 S20kerneloops -> ../init.d/kerneloops
lrwxrwxrwx 1 root root 17 2012-03-19 13:09 S20postfix -> ../init.d/postfix
lrwxrwxrwx 1 root root 27 2011-10-27 12:46 S20speech-dispatcher -> ../init.d/speech-dispatcher
… Shortened for brevity …
lrwxrwxrwx 1 root root 22 2011-10-27 12:46 S99acpi-support -> ../init.d/acpi-support
lrwxrwxrwx 1 root root 21 2011-10-27 12:46 S99grub-common -> ../init.d/grub-common
lrwxrwxrwx 1 root root 18 2011-10-27 12:46 S99ondemand -> ../init.d/ondemand
lrwxrwxrwx 1 root root 18 2011-10-27 12:46 S99rc.local -> ../init.d/rc.local
As you can see, all the content in the /etc/rc5.d directory are symbolic links pointing to the corresponding script in the /etc/init.d directory. There can be two kinds of symbolic links in the /etc/rcX.d/ directories. One starts with the character ‘S’ followed by a number between 0 and 99 to denote the priority, followed by the name of the service you want to enable. The second kind of symlink has a name which starts with a ‘K’ followed by a number and then the name of the service you want to disable. So in any /etc/rcX.d directory, at any given time, for each service, there should be only one symlink of the ‘S’ OR ‘K’ variety but not both. So coming back to our Apache example, suppose I want to enable Apache web server in the run level 5 but want to disable it in all other run levels, I do the following:
First to enable the service for run level 5, I move into /etc/rc5.d/ directory and create a symlink to the apache service script residing in the /etc/init.d/ directory as follows:
# cd /etc/rc5.d/
# ln -s /etc/init.d/apache2 S20apache2
This creates a symbolic link in the /etc/rc5.d/ directory which the system interprets as – start (S) the apache service before all the services which have a priority number greater than 20. If you do a long listing of the directory /etc/rc5.d in your system, you can find a lot of symlinks similar to the one below.
# ls -l /etc/rc5.d |grep apache2
lrwxrwxrwx 1 root root 26 2012-03-18 21:10 S20apache2 -> ../init.d/apache2
Now if I start a service, I will want to stop the service while rebooting or while moving to single user mode and so on. So in those run levels I have to create the symlinks starting with character ‘K’. So going back to the apache2 service example, if I want to automatically stop the service when the system goes into run level 0, 1 or 6, I will have to create the symlinks in the /etc/rc0.d, /etc/rc1.d/, /etc/rc6.d/ directories as follows –
# cd /etc/rc0.d
# ln -s /etc/init.d/apache2 K80apache2
One interesting aspect here is the priority. Lower the number, the higher is the priority. So since the starting priority of apache2 is 20 – that is apache starts way ahead of other services during startup, we give it a stopping priority of 80. There is no hard and fast rule for this but usually, you follow the formula as – If you have ‘N’ as the priority number for starting a service, you use the number (100-N) for the stopping priority number and vice versa.
Apply for Linux Administration Certification Now!!
http://www.vskills.in/certification/Certified-Linux-Administrator
