Certify and Increase Opportunity.
Be
Govt. Certified Linux Administrator
A kernel is a central component of an operating system. It acts as an interface between the user applications and the hardware. The sole aim of the kernel is to manage the communication between the software (user level applications) and the hardware (CPU, disk memory etc). The main tasks of the kernel are – Process management, Device management, Memory management, Interrupt handling, I/O communication, File system…etc..
The critical code of the kernel is usually loaded into a protected area of memory, which prevents it from being overwritten by other, less frequently used parts of the operating system or by applications. The kernel performs its tasks, such as executing processes and handling interrupts, in kernel space, whereas everything a user normally does, such as writing text in a text editor or running programs in a GUI (graphical user interface), is done in user space. This separation prevents user data and kernel data from interfering with each other and thereby diminishing performance or causing the system to become unstable (and possibly crashing).
When a process makes requests of the kernel, the request is called a system call. Various kernel designs differ in how they manage system calls and resources. For example, a monolithic kernel executes all the operating system instructions in the same address space in order to improve the performance of the system. A microkernel runs most of the operating system’s background processes in user space, to make the operating system more modular and, therefore, easier to maintain.
User program or applications runs in a memory area called “user space”. The kernel program runs in another memory area called “kernel space”. Kernel program always runs in a supper access mode. So from programming point of view, kernel programming means power to access anything and everything in a system.
Kernels may be classified mainly in two categories
- Monolithic Kernels – Earlier in this type of kernel architecture, all the basic system services like process and memory management, interrupt handling etc were packaged into a single module in kernel space. This type of architecture led to some serious drawbacks like 1) Size of kernel, which was huge. 2)Poor maintainability, which means bug fixing or addition of new features resulted in recompilation of the whole kernel which could consume hours. In a modern day approach to monolithic architecture, the kernel consists of different modules which can be dynamically loaded and un-loaded. This modular approach allows easy extension of OS’s capabilities. With this approach, maintainability of kernel became very easy as only the concerned module needs to be loaded and unloaded every time there is a change or bug fix in a particular module. So, there is no need to bring down and recompile the whole kernel for a smallest bit of change. Also, stripping of kernel for various platforms (say for embedded devices etc) became very easy as we can easily unload the module that we do not want. Linux follows the monolithic modular approach
- Microkernels – This architecture majorly caters to the problem of ever growing size of kernel code which we could not control in the monolithic approach. This architecture allows some basic services like device driver management, protocol stack, file system etc to run in user space. This reduces the kernel code size and also increases the security and stability of OS as we have the bare minimum code running in kernel. So, if suppose a basic service like network service crashes due to buffer overflow, then only the networking service’s memory would be corrupted, leaving the rest of the system still functional.
The Linux kernel is a monolithic kernel, supporting true preemptive multitasking (both in user mode and, since the 2.6 series, in kernel mode), virtual memory, shared libraries, demand loading, shared copy-on-write executables (via KSM), memory management, the Internet protocol suite, and threading.
Device drivers and kernel extensions run in kernel space (ring 0 in many CPU architectures), with full access to the hardware, although some exceptions run in user space, for example filesystems based on FUSE/CUSE, and parts of UIO. The graphics system most people use with Linux does not run within the kernel, in contrast to that found in Microsoft Windows. Unlike standard monolithic kernels, device drivers are easily configured as modules, and loaded or unloaded while the system is running. Also, unlike standard monolithic kernels, device drivers can be pre-empted under certain conditions; this feature was added to handle hardware interrupts correctly, and to better support symmetric multiprocessing. By choice, the Linux kernel has no binary kernel interface.
The hardware is also incorporated into the file hierarchy. Device drivers interface to user applications via an entry in the /dev or /sys directories. Process information as well is mapped to the file system through the /proc directory.
Building Kernel
For most part, you don’t need to compile the kernel, as it is installed by default when you install the OS. Also, when there is a critical update done to the kernel, you can use yum, or apt-get to update the kernel on your Linux system.
However you might encounter certain situation, where you may have to compile kernel from source. The following are few situation where you may have to compile Kernel on your Linux system.
- To enable experimental features that are not part of the default kernel.
- To enable support for a new hardware that is not currently supported by the default kernel.
- To debug the kernel
- Or, just to learn how kernel works, you might want to explore the kernel source code, and compile it on your own.
Also, please note that if you just want to compile a driver, you don’t need to compile the kernel. You need only the linux-headers package of the kernel.
Requirements – To build the Linux kernel from source, you need several tools: git, make, gcc, libssl-dev and (optionally) ctags and/or ncurses-dev. The tool packages may be called something else in your Linux distribution, so you may need to search for the package. The ncurses-dev tools are used if you “make menuconfig” or “make nconfig”.
On Ubuntu, you can get these tools by running:
sudo apt-get install libncurses5-dev gcc make git exuberant-ctags bc libssl-dev
On Red Hat based systems like Fedora, Scientific Linux, and CentOS you can run:
sudo yum install gcc make git ctags ncurses-devel openssl-devel
Get the kernel source – There are a few ways to obtain the kernel source:
- Use git – This is for users who always want to stay in sync with the latest Ubuntu kernel source. For your information, detailed instructions on it can be found in the Kernel Git Guide. The git repository does not include necessary control files.
- Download the source archive – Download the source archive – This is for users who want to rebuild the standard Ubuntu packages with additional patches. Note that this will almost always be out of date compared to the latest development source, so you should use git (option A) if you need the latest patches.
- Download the source package – Download the source package of the latest stable kernel from kernel.org as, –
# cd /usr/src/
# wget https://www.kernel.org/pub/linux/kernel/v3.x/linux-3.9.3.tar.xz
Untar the Kernel Source – The second step is to untar the kernel source file for compilation.
# tar -xvJf linux-3.9.3.tar.xz
Configure the Kernel – The kernel contains nearly 3000 configuration options. To make the kernel used by most people on most hardware, the Linux distro like Ubuntu, Fedora, Debian, RedHat, CentOS, etc, will generally include support for most common hardware. You can take any one of configuration from the distro, and on top of that you can add your own configuration, or you can configure the kernel from scratch, or you can use the default config provided by the kernel.
# cd linux-3.9.3
# make menuconfig
The make menuconfig, will launch a text-based user interface with default configuration options as shown in the figure. You should have installed “libncurses and libncurses-devel” packages for this command to work.
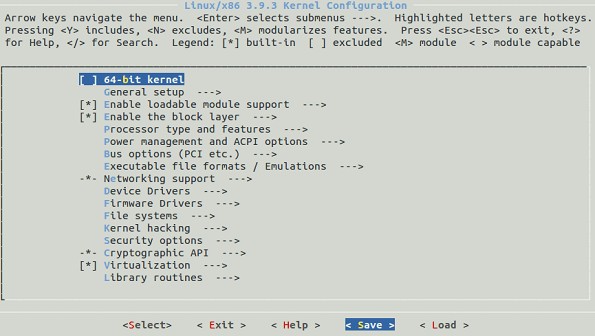
We will use the default config provided by the kernel. So select “Save” and save the config in the file name “.config”.
The following is a sample of the “.config” file:
CONFIG_MMU=y
CONFIG_NEED_DMA_MAP_STATE=y
CONFIG_NEED_SG_DMA_LENGTH=y
CONFIG_GENERIC_ISA_DMA=y
CONFIG_GENERIC_BUG=y
CONFIG_GENERIC_HWEIGHT=y
Compile the Linux Kernel – Compile the main kernel, as
# make
Compile the kernel modules, as
# make modules
Install the kernel modules, sa
# make modules_install
At this point, you should see a directory named /lib/modules/3.9.3/ in the system.
Install the New Kernel – Install the new kernel on the system:
# make install
The make install command will create the following files in the /boot directory.
- vmlinuz-3.9.3 – The actual kernel
- map-3.9.3 – The symbols exported by the kernel
- img-3.9.3 – initrd image is temporary root file system used during boot process
- config-3.9.3 – The kernel configuration file
The command “make install” will also update the grub.cfg by default. So we don’t need to manually edit the grub.cfg file.
Boot Linux to the new Kernel – To use the new kernel that you just compiled, reboot the system.
# reboot
Since, in grub.cfg, the new kernel is added as default boot, the system will boot from the new kernel. Just in case if you have problems with the new kernel, you can select the old kernel from the grub menu during boot and you can use your system as usual. Once the system is up, use uname command to verify that the new version of Linux kernel is installed.
Patching the Kernel
A patch is a small text document containing a delta of changes between two different versions of a source tree. Patches are created with the `diff’ program. To correctly apply a patch you need to know what base it was generated from and what new version the patch will change the source tree into. These should both be present in the patch file metadata or be possible to deduce from the filename.
To apply a patch with the `patch’ program. The patch program reads a diff (or patch) file and makes the changes to the source tree described in it. Patches for the Linux kernel are generated relative to the parent directory holding the kernel source dir. This means that paths to files inside the patch file contain the name of the kernel source directories it was generated against (or some other directory names like “a/” and “b/”).
Since this is unlikely to match the name of the kernel source dir on your local machine (but is often useful info to see what version an otherwise unlabeled patch was generated against) you should change into your kernel source directory and then strip the first element of the path from filenames in the patch file when applying it (the -p1 argument to `patch’ does this).
To revert a previously applied patch, use the -R argument to patch. So, if you applied a patch as
patch -p1 < ../patch-x.y.z
You can revert (undo) it like this:
patch -R -p1 < ../patch-x.y.z
There are several ways to apply a patch to your kernel. Usually the maintainer will send you a patch as attachment, or inline in the mail. You should either save the file, or copy and paste the patch into a new file. To apply the patch, go to the base kernel directory and run
git am patchfile
Where patchfile is the file you saved. If patch fails, you can run:
git am –abort
git reset –hard HEAD
git am -3 patchfile
This applies the patch, and attempts to run a three-way merge if the patch application fails. If all else fails, you can attempt to duplicate the patch changes by hand. Then you need to re-build your kernel and reboot.
the older way of manually patching the kernel with patch -p1 <patchfile does not create any git history, which makes it hard to revert and retry different patches. You will often have to go through several patches with a maintainer to find the right fix for a bug, so having the git history is useful.
Reverting a patch – If a maintainer wants you to revert a patch you have applied, and try a different patch, you can use git to reset the history to the point before the patch was applied. If git log shows the patch to be removed is the first log entry, you can run
git reset –hard HEAD^
If you need to revert several patches, you can use git log to find the commit ID of the first commit before those patches. For instance, say you have applied two patches to the stable tree 3.4.17, and you want to revert those patches. git log will look like this:
$ git log –pretty=oneline –abbrev-commit
8901234 Testing patch 2
1234567 Testing patch 1
5390967 Linux 3.4.17
1f94bd4 drm/i915: no lvds quirk for Zotac ZDBOX SD ID12/ID13
0187c24 x86, mm: Use memblock memory loop instead of e820_RAM
a0419ca staging: comedi: amplc_pc236: fix invalid register access during detach
To reset your tree to 3.4.17, you can run:
git reset –hard 5390967
If you look at the commits with gitk you will notice that the 3.4.17 commit is also tagged as v3.4.17. You can reset by tag as well:
git reset –hard v3.4.17
Apply for Linux Administration Certification Now!!
http://www.vskills.in/certification/Certified-Linux-Administrator
