Certify and Increase Opportunity.
Be
Govt. Certified Linux Administrator
Linux Installation Types
The following installation methods are usually available for Linux
- DVD/CD-ROM – If you have a DVD/CD-ROM drive and the Linux CD-ROMs or DVD you can use this method.
- Hard Drive – If you have copied the Linux ISO images to a local hard drive, you can use this method. You need a boot CD-ROM (use the linux askmethod boot option).
- NFS – If you are installing from an NFS server using ISO images or a mirror image of Linux, you can use this method. You need a boot CD-ROM (use the linux askmethod boot option). The distribution tree is shared/exported on an
- NFS server.
- FTP – If you are installing directly from an FTP server, use this method. You need a boot CD-ROM (use the linux askmethod boot option).
- HTTP – If you are installing directly from an HTTP (Web) server, use this method. You need a boot CD-ROM (use the linux askmethod boot option).
- SMB (Server Message Block) This method is relatively new, and not all distributions support it. The installation tree can be shared on a Samba server or shared from a Windows box.
- Live USB Drive or CD – One of the easiest ways to get started with Linux is by creating a live USB or CD drive. After you place Linux on the drive, you can insert your USB stick, CD, or DVD into any computer you come across and restart the computer. The computer will boot from the removable media you provided and you’ll be able to use Linux without making any changes to the computer’s hard drive. To create a Linux USB drive or CD, download the latest Linux disc image from Linux’s website. Use Unetbootin to put Linux on your USB flash drive or burn the downloaded ISO image to a disc. (On Windows 7, you can right-click an ISO file and select Burn disc image to burn the ISO file without installing any other software.) Restart your computer from the removable media you provided and select the Try Linux option.
- Virtual Machine – Like other operating systems, Ubuntu can be run in a virtual machine on your computer. The virtual machine runs Ubuntu in a window on your existing Windows or Mac desktop. You’ll be able to try Linux without even restarting your computer, although virtual machines are slower than running the operating system on your computer itself. The Ubuntu desktop’s 3D effects, in particular, won’t perform very well in a virtual machine, while they should perform smoothly on most computers.
The installation methods can also be categorizes into 4 major categories
- Clean: installation that does not write to current OS storage media
- Dual-boot: peaceful co-existence with current OS on same storage or VM environment
- Replacement: overwriting of current OS with Linux on platform storage media
- Upgrading/Recovery: enhancing or repairing current Linux OS installation
Linux Installation
We are listing below the installation for Fedora
- Once the bootable DVD/CD initialises and the installation process starts execution, you will be presented with the Fedora Core welcome page, and a “boot:” prompt will be located at the bottom of the screen. The boot prompt allows us to pass specific parameters about any hardware or configuration settings to the kernel. It also allows us to specify that we may have a driver disk for some type of hardware that is not yet supported by the kernel, like a network card or hard drive controller. You may also choose to upgrade an existing version of Fedora from the prompt.
boot: linux dd noprobe acpi=off
Example: The boot prompt with parameters being passed to the kernel.
If you are doing a clean installation of Fedora Core, you would most likely press the <ENTER> key at the “boot:” prompt to continue.
- If you chose to install a driver disk, you will now be prompted for the diskette. Insert the diskette and follow the directions on screen to install the extra drivers if applicable.
- You will now be presented with an option to check the integrity of the DVD/CD media you are using to conduct the installation. It is highly advisable to test the media at this point. If your media is scratched, or the integrity of the ISO image was corrupted during its download, then it is highly likely that the installation may stall or become unstable. If in doubt check your media, it only takes a few minutes, and may save you the anguish of having to conduct a second installation attempt. You will be advised of any failed media checks during this stage, at which point you will need to correct the media problem before continuing.
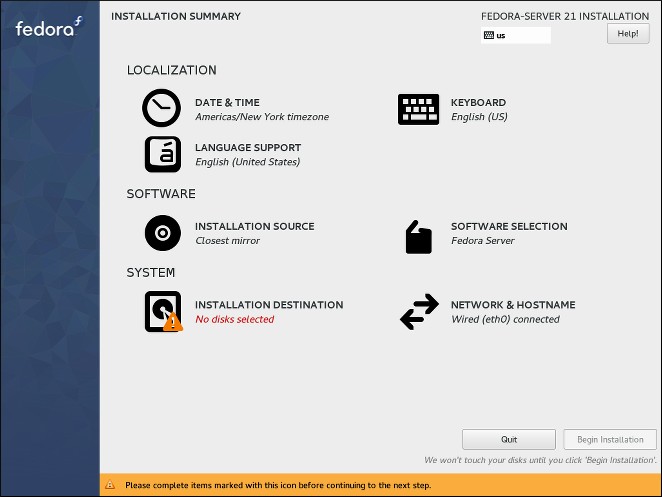
- Welcome to Fedora: The next stage in the installation is the loading of the Anaconda system installer, where you will be presented with installation options using an Xwindows frontend. We will continue to use the Anaconda interface throughout the entire installation process.
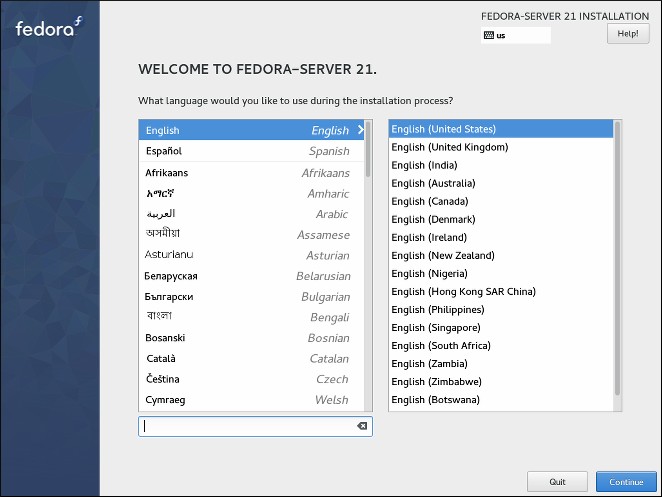
- Language Selection: You will now be asked to choose the language you would like during the installation, make your selection and press <NEXT> to continue.
- Keyboard Configuration: You are also presented with an option for keyboard, make your selection and press <NEXT> to continue.
- If you had any previous installations of Fedora Core on the server, Anaconda will detect them and ask you if you would like to conduct a fresh installation, or you would like to upgrade your existing version of Linux. Make your selection and press <NEXT> to continue. If you have an existing version of Fedora installed, choosing to install a fresh version will destroy the existing installation depending on your configuration choices.
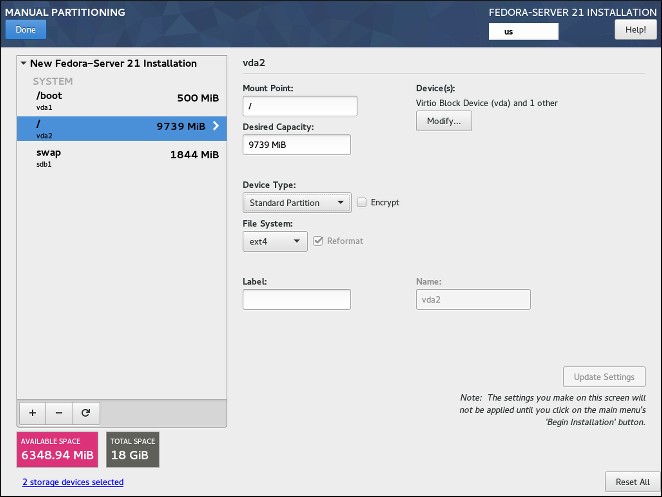
- Disk Partitioning Setup: As part of our server planning considerations we should consider how we are going to partition the filesystem. If you are an experienced installer or you are doing an upgrade of some type, you may choose to partition your system manually. Otherwise choose “Remove all partitions on the selected drives and create default layout” and press <NEXT>. This step will delete all partitions currently on your server. You can select the “Review and modify partitioning layout” checkbox if you would like to manually configure or review your server’s partitions; this is recommended.
- Disk Setup: This page allows you to review your new partitions and the filesystem types that have been automatically chosen by the installer. There are many options available here to fully customise your hard drives with your filesystem requirements, but if you are not familiar with partitioning, then the automatic configuration should be fine. Make any changes that you need and select <NEXT> to continue.
- Boot Loader Configuration: To boot your system when its turned on, a small application needs to be installed in the Master Boot Record to tell the computer’s BIOS where to continue loading the operating system files from, this is part of the bootstrap process. Fedora uses an application called GRUB (the GRand Unified Bootloader) for this process, and if you have a standard IDE hard drive configuration, the boot loader is normally installed on “/dev/VolGroup00/LogVol00”.
As with step 1, the boot loader can pass extra parameters to the kernel during the boot process. If you need to pass any parameters at boot time and you would like to automate the process, then select “Configure advanced boot loader options”. The GRUB configuration can be edited at a later time if needed.
- Network Configuration: This page allows us to configure the networking requirements of our server. Depending upon the network topology being implemented, we may either have one or two network devices to install. Remembering that eth0 is connected to the external “Internet” connection; the side where hackers and nasty people lurk.
- Time Zone Selection: Use the image of the world map to select the required timezone in your nearest location. You may also choose (optional) to operate your server using the Universal Time Clock, however most people will operate using the time in the current location.
- Set Root Password: It is important to select a secure password for the super user using a mixture of upper and lower case letters, numbers, and special keyboard characters. The stronger and more complex your root password is, the less chance your system will fall victim to a brute force type attack.
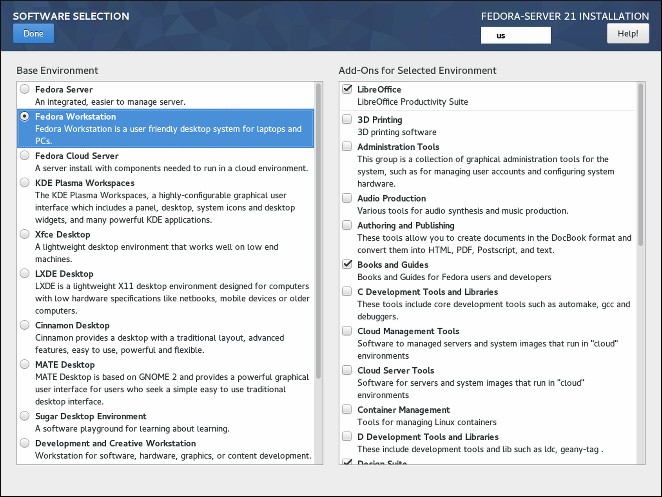
- Default Installation: We are now going to select what programs and applications (packages) are going to be installed on our server, remove all checkboxes and select “Customise Now” to select individual packages. Select <NEXT> to continue.
- Package Group Selection: This is the point where we can tailor the installation to our specific needs by adding or removing certain applications and packages. This HOWTO was written to cover specific applications and services that best suits a typical small network, and the installation requires the following additional customisations to meet the server’s package requirements. Once you are satisfied with your selections you may continue.
- About to Install: If you have selected any additional packages and have triggered a “dependency error”, select the option to install the required dependencies and continue the installation process.
- Installation Stage: The system will now go through the process of formatting your partitions and installing the selected packages. This stage may take a few minutes and is a good time for a break. If you are installing from the CD set, you will be required to change CD during the installation.
- Installation Complete: The DVD/CD will be automatically ejected from its drive once it has finished installing all the required packages, removed the media from the drive bay and select <REBOOT>. Congratulations, the majority of the installation has been completed and the server is almost ready for configuration.
Post Installation Tasks
Once the Fedora Core operating system has been installed and the system has been rebooted, there are some minor configurations required before you can log into and start using the system. The firstboot process will now guide you through the following steps.
- Welcome: Select <FORWARD> to start the post installation process.
- License Agreement: Read and accept the license agreement.
- Firewall: Accept the default firewall settings here, we will configure a more detailed firewall configuration.
- SELinux: Select the appropriate SELinux settings for your server. If you are unsure here, select “permissive” and click <FORWARD>.
- Date and Time: Select the appropriate date and time for your server system, depending upon your earlier selection of either local or universal timezones.
- Display: Configure the X Windows Server with the appropriate settings for your, monitor type, display resolution and colour depth. Being a dedicated server it does not need the latest video drivers for 3D graphics.
- System User: Enter the details of your generic user account. It is recommended (and good practice) that you use a generic user account at all times, and only switch to the super user account when the higher privileges are needed for administrative tasks.
- Sound Card: Make the required adjustments for your soundcard and continue. Being a dedicated server it does not need a sound card at all, however you may be able to configure some basic sound files to some of your administrative tasks or alerts to give you a warning when certain events occur.
- Finish Setup: The entire installation process has now been completed, press <NEXT> to continue to the login screen.
File Systems
- ext4 – The ext4 file system is based on the ext3 file system and features a number of improvements. These include support for larger file systems and larger files, faster and more efficient allocation of disk space, no limit on the number of subdirectories within a directory, faster file system checking, and more robust journaling. Ext4 is the default and recommended file system used by Fedora Workstation and Cloud. The maximum supported size of a single ext4 file system is 50 TB.
- ext3 – The ext3 file system is based on the ext2 file system and has one main advantage – journaling. Using a journaling file system reduces time spent recovering a file system after a crash, as there is no need to check the file system for metadata consistency by running the fsck utility every time a crash occurs.
- ext2 – An ext2 file system supports standard Unix file types, including regular files, directories, or symbolic links. It provides the ability to assign long file names, up to 255 characters.
- swap – Swap partitions are used to support virtual memory. In other words, data is written to a swap partition when there is not enough RAM to store the data your system is processing. A swap partition should always be created.
- xfs – XFS is a highly scalable, high-performance file system that supports file systems up to 16 exabytes (approximately 16 million terabytes), files up to 8 exabytes (approximately 8 million terabytes), and directory structures containing tens of millions of entries. XFS also supports metadata journaling, which facilitates quicker crash recovery. The maximum supported size of a single XFS file system is 500 TB. Starting with Fedora 22, XFS is the default and recommended file system on Fedora Server.
- vfat – The VFAT file system is a Linux file system that is compatible with Microsoft Windows long file names on the FAT file system.
- BIOS Boot – A very small partition required for booting from a device with a GUID partition table (GPT) on BIOS systems and UEFI systems in BIOS compatibility mode.
- EFI System Partition – A small partition required for booting a device with a GUID partition table (GPT) on a UEFI system.
Software RAID Types
- RAID0 (Performance) – Distributes data across multiple disks. Level 0 RAID offers increased performance over standard partitions and can be used to pool the storage of multiple disks into one large virtual device. Note that Level 0 RAIDs offer no redundancy and that the failure of one device in the array destroys data in the entire array. RAID 0 requires at least two disks.
- RAID1 (Redundancy) – Mirrors all data from one partition onto one or more other disks. Additional devices in the array provide increasing levels of redundancy. RAID 1 requires at least two disks.
- RAID4 (Error Checking) – Distributes data across multiple disks and uses one disk in the array to store parity information which safeguards the array in case any disk within the array fails. Because all parity information is stored on one disk, access to this disk creates a “bottleneck” in the array’s performance. Level 4 RAID requires at least three disks.
- RAID5 (Distributed Error Checking) – Distributes data and parity information across multiple disks. Level 5 RAIDs therefore offer the performance advantages of distributing data across multiple disks, but do not share the performance bottleneck of level 4 RAIDs because the parity information is also distributed through the array. RAID 5 requires at least three disks.
- RAID6 (Redundant Error Checking) – Level 6 RAIDs are similar to level 5 RAIDs, but instead of storing only one set of parity data, they store two sets. RAID 6 requires at least four disks.
- RAID10 (Performance, Redundancy) – Level 10 RAIDs are nested RAIDs or hybrid RAIDs. They are constructed by distributing data over mirrored sets of disks. For example, a level 10 RAID array constructed from four RAID partitions consists of two mirrored pairs of striped partitions. RAID 10 requires at least four disks.
Recommended Partitioning Scheme
In most cases, at least the following mount points should always be created:
/boot – 500 MB – This partition contains the operating system kernel, which allows Fedora to boot. It also contains other files used during the bootstrap process. Due to the limitations of most firmware, creating a separate, small standard partition for this directory is recommended. In most scenarios, a 500 MB /boot partition is adequate.
/ (root) – 10 GB – This is where the root directory is located. The root directory is the top level of the directory structure. By default, all files are written to this partition unless a different partition is mounted in the path being written to (for example, /boot or /home). If you follow the recommended scheme described in this section, this will be the partition where most software packages will be installed. For a minimal installation, a 5 GB root partition will be sufficient. However, for most common installations which include extra packages and a graphical user interface, the root partition should be at least 10 GB; with 20 GB being sufficient for most common use cases.
/home – at least 10 GB – To store user data separately from system data, create a dedicated mount point for the /home directory. This partition should be sized based on the amount of data that will be stored locally, number of users, and so on. This will allow you to upgrade or reinstall Fedora without erasing user data files. During the installation, a separate /home partition will be created if there are 50 GB or more free space for your Fedora installation.
When using Fedora as a workstation for normal use with a graphical environment, this mount point should have the most disk space assigned to it, as it will likely hold the most data (user settings, images, videos, etc).
swap – based on your system parameters – Swap partitions support virtual memory; data is written to them when there is not enough RAM to store the data your system is processing. This partition’s size is a function of system memory workload, not total system memory, and therefore is not equal to the total system memory size. Therefore, it is important to analyze what applications a system will be running and the load those applications will serve in order to determine the system memory workload. Application providers and developers should be able to provide some guidance.
When the system runs out of swap space, the kernel terminates processes as the system RAM memory is exhausted. Configuring too much swap space results in storage devices being allocated but idle and is a poor use of resources. Too much swap space can also hide memory leaks.
The table below provides the recommended size of a swap partition depending on the amount of RAM in your system and whether you want sufficient memory for your system to hibernate. If you let the installation program partition your system automatically, the swap partition size will be established using these guidelines. Automatic partitioning setup assumes hibernation is not in use, and the maximum size of the swap partition is limited to 10% of the total size of the hard drive. If you want to set up enough swap space to allow for hibernation, or if you want to set the swap partition size to more than 10% of the system’s storage space, you must edit the partitioning layout manually.
Recommended System Swap Space
| Amount of RAM in the system | Recommended swap space | Recommended swap space if allowing for hibernation |
| less than 2 GB | 2 times the amount of RAM | 3 times the amount of RAM |
| 2 GB – 8 GB | Equal to the amount of RAM | 2 times the amount of RAM |
| 8 GB – 64 GB | 0.5 times the amount of RAM | 1.5 times the amount of RAM |
| more than 64 GB | workload dependent | hibernation not recommended |
At the border between each range listed above (for example, a system with 2 GB, 8 GB, or 64 GB of system RAM), discretion can be exercised with regard to chosen swap space and hibernation support. If your system resources allow for it, increasing the swap space may lead to better performance.
Distributing swap space over multiple storage devices – particularly on systems with fast drives, controllers and interfaces – also improves swap space performance.
BIOS Boot (1 MB) or EFI System Partition (200 MB) – The GRUB2 boot loader can be installed either in the Master Boot Record (MBR) or the GUID Partition Table (GPT) of the boot device.
Guidelines
- Consider encrypting any partitions and volumes which might contain sensitive data. Encryption prevents unauthorized people from accessing the data on the partitions, even if they have access to the physical storage device. In most cases, you should at least encrypt the /home partition, which contains user data.
- In some cases, creating separate mount points for directories other than /, /boot and /home may be useful; for example, on a server running a MySQL database, having a separate mount point for /var/lib/mysql will allow you to preserve the database during a reinstallation without having to restore it from backup afterwards. However, having unnecessary separate mount points will make storage administration more difficult.
- Each kernel installed on your system requires approximately 20 MB on the /boot partition. The default partition size of 500 MB for /boot should suffice for most common uses; increase the size of this partition if you plan to keep many kernels installed at the same time.
- The /var directory holds content for a number of applications, including the Apache web server, and is used by the DNF package manager to temporarily store downloaded package updates. Make sure that the partition or volume containing /var has at least 3 GB.
- The contents of the /var directory usually change very often. This may cause problems with older solid state drives (SSDs), as they can handle a lower number of read/write cycles before becoming unusable. If your system root is on an SSD, consider creating a separate mount point for /var on a classic (platter) HDD.
- The /usr directory holds the majority of software on a typical Fedora installation. The partition or volume containing this directory should therefore be at least 5 GB for minimal installations, and at least 10 GB for installations with a graphical environment.
Apply for Linux Administration Certification Now!!
http://www.vskills.in/certification/Certified-Linux-Administrator
