Certify and Increase Opportunity.
Be
Govt. Certified Linux Administrator
Access Permissions
Permissions are the “rights” to act on a file or directory. The basic rights are read, write, and execute.
- Read – a readable permission allows the contents of the file to be viewed. A read permission on a directory allows you to list the contents of a directory.
- Write – a write permission on a file allows you to modify the contents of that file. For a directory, the write permission allows you to edit the contents of a directory (e.g. add/delete files).
- Execute – for a file, the executable permission allows you to run the file and execute a program or script. For a directory, the execute permission allows you to change to a different directory and make it your current working directory. Users usually have a default group, but they may belong to several additional groups.
To view the permissions on a file or directory, issue the command ls -l <directory/file>. Remember to replace the information in the < > with the actual file or directory name. Below is sample output for the ls command:
-rw-r–r– 1 root root 1031 Nov 18 09:22 /etc/passwd
The first ten characters show the access permissions. The first dash (-) indicates the type of file (d for directory, s for special file, and – for a regular file). The next three characters (rw-) define the owner’s permission to the file. In this example, the file owner has read and write permissions only. The next three characters (r–) are the permissions for the members of the same group as the file owner (which in this example is read only). The last three characters (r–) show the permissions for all other users and in this example it is read only.
Here is an example screenshot of what the output of ls -l might look like, with labels of each column of output
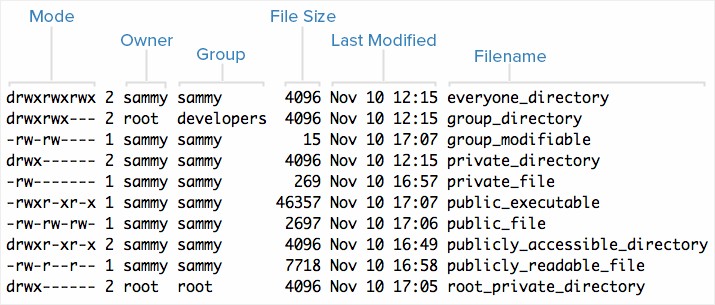
Mode – Each file’s mode (which contains permissions), owner, group, and name are listed. Aside from the Mode column, this listing is fairly easy to understand. To help explain what all of those letters and hyphens mean, let’s break down the Mode column into its components.
File Type – In Linux, there are two basic types of files: normal and special. The file type is indicated by the first character of the mode of a file–in this guide, we refer to this as the file type field.
Normal files can be identified by files with a hyphen (-) in their file type fields. Normal files are just plain files that can contain data. They are called normal, or regular, files to distinguish them from special files.
Special files can be identified by files that have a non-hyphen character, such as a letter, in their file type fields, and are handled by the OS differently than normal files. The character that appears in the file type field indicates the kind of special file a particular file is. For example, a directory, which is the most common kind of special file, is identified by the d character that appears in its file type field (like in the previous screenshot).
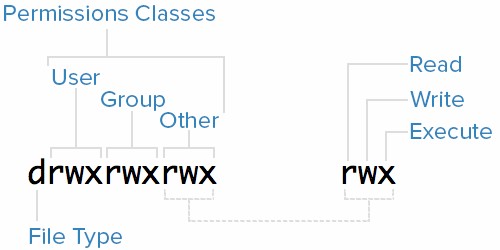
Permissions Classes – From the diagram, we know that Mode column indicates the file type, followed by three triads, or classes, of permissions: user (owner), group, and other. The order of the classes is consistent across all Linux distributions. Let’s look at which users belong to each permissions class
- User: The owner of a file belongs to this class
- Group: The members of the file’s group belong to this class
- Other: Any users that are not part of the user or group classes belong to this class.
The next thing to pay attention to are the sets of three characters, or triads, as they denote the permissions, in symbolic form, that each class has for a given file. In each triad, read, write, and execute permissions are represented in the following way:
- Read: Indicated by an r in the first position
- Write: Indicated by a w in the second position
- Execute: Indicated by an x in the third position. In some special cases, there may be a different character here
A hyphen (-) in the place of one of these characters indicates that the respective permission is not available for the respective class. For example, if the group triad for a file is r–, the file is “read-only” to the group that is associated with the file.
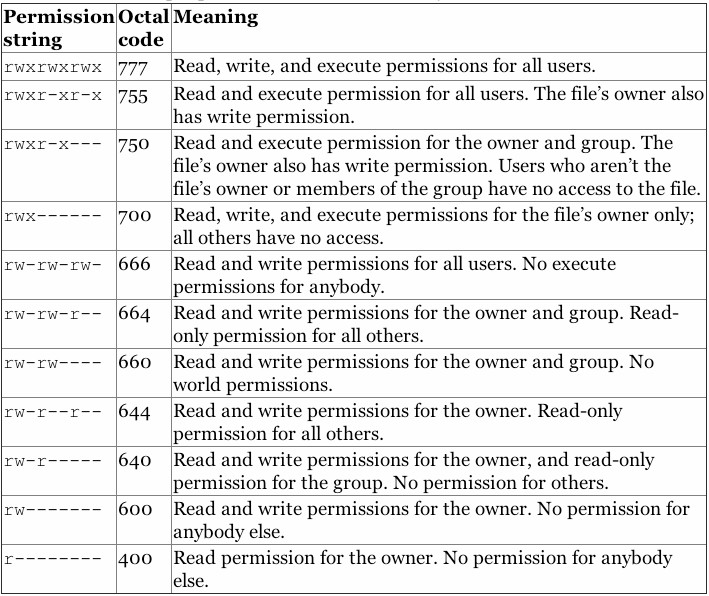
Examples of Modes (and Permissions) – Now that know how to read the mode of a file, and understand the meaning of each permission, we will present a few examples of common modes, with brief explanations, to bring the concepts together.
- -rw——-: A file that is only accessible by its owner
- -rwxr-xr-x: A file that is executable by every user on the system. A “world-executable” file
- -rw-rw-rw-: A file that is open to modification by every user on the system. A “world-writable” file
- drwxr-xr-x: A directory that every user on the system can read and access
- drwxrwx—: A directory that is modifiable (including its contents) by its owner and group
- drwxr-x—: A directory that is accessible by its group
As you may have noticed, the owner of a file usually enjoys the most permissions, when compared to the other two classes. Typically, you will see that the group and other classes only have a subset of the owner’s permissions (equivalent or less). This makes sense because files should only be accessible to users who need access to them for a particular reason.
Another thing to note is that even though many permissions combinations are possible, only certain ones make sense in most situations. For example, write or execute access is almost always accompanied by read access, since it’s hard to modify, and impossible to execute, something you can’t read.
Sudo – Root is the super user and has the ability to do anything on a system. Therefore, in order to have protection against potential damage sudo is used in place of root. Sudo allows users and groups access to commands they normally would not be able to use. Sudo will allow a user to have administration privileges without logging in as root.
In order to provide a user with sudo ability, their name will need to be added to the sudoers file. This file is very important and should not be edited directly with a text editor. If the sudoers file is edited incorrectly it could result in preventing access to the system. Therefore the visudo command should be used to edit the sudoers file. At a command line, log into your system as root and enter the command visudo. Below is the portion of the sudoers file that shows the users with sudo access.
# User privilege specification
root ALL=(ALL:ALL) ALL
cjones ALL=(ALL:ALL) ALL
kbrown ALL=(ALL:ALL) ALL
lmartin ALL=(ALL:ALL) ALL
After you have given your user account sudo privileges, save the sudoers file and log out as root. Now log in as your user and test the privileges as your user with sudo access. When a new user needs sudo access, you will now be able to edit the sudoers file with your own login using the following command:
sudo visudo
Chmod Command – The command chmod is short for change mode. Chmod is used to change permissions on files and directories. The command chmod may be used with either letters or numbers (also known as octal) to set the permissions. The letters used with chmod are in the table below:
| Letter | Permission |
| r | Read |
| w | Write |
| x | Execute |
| X | Execute (only if file is a directory) |
| s | Set user or group ID on execution |
| t | Save program text on swap device |
| u | Current permissions the file has for owner |
| g | Current permissions the file has for users in the same group |
| o | Current permissions the file has for others not in the group |
It is important to remember that the first character of the first column of a file listing denotes whether it is a directory or a file. The other nine characters are the permissions for the file/directory. The first three characters are for the user, the next three are for the group, and the last three are for others. The example drwxrw-r– is broken down as follows:
- d is a directory
- rwx the user has read, write, and execute permissions
- rw- the group has read and write permissions
- r– all others have read only permissions
The dash (-) denotes permissions are removed. Therefore, with the “all others” group, r– translates to read permission only, the write and execute permissions were removed. Conversely, the plus sign (+) is equivalent to granting permissions: chmod u+r,g+x <filename>. The example above translates as
- u is for user
- r is for read
- g is for group
- x is for execute
In other words, the user was given read permission and the group was given execute permission for the file. When setting multiple permissions for a set, a comma is required between sets.
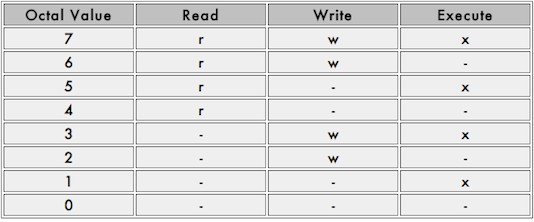
Chmod Octal Format – To use the octal format, you have to calculate the permissions for each portion of the file or directory. The first ten characters mentioned above will correspond to a four digit numbers in octal. The execute permission is equal to the number one (1), the write permission is equal to the number two (2), and the read permission is equal to the number four (4). Therefore, when you use the octal format, you will need to calculate a number between 0 and 7 for each portion of the permission. A table has been provided below for clarification.
Although octal format may seem difficult to understand, it is easy to use once you get the gist of it. However, setting permissions with r, w, and x may be easier. Below are examples of how to use both letters and octal format to set permissions on a file or directory.
- Sample syntax: chmod <octal or letters> <file/directory name>
- Letter format: chmod go-rwx Work (Deny rwx permission for the group and others)
The output of ls -al after the chmod command above would looks as follows:
dr——– 2 user user 4096 Dec 17 14:38 Work
Octal format: chmod 444 Work
The output of ls -al after the chmod command above would look as follows:
dr–r–r– 2 user user 4096 Dec 17 14:38 Work
An octal table showing the numeric equivalent for permissions is provided below.
Sticky Bit – In addition to the most common read/write/execute file permissions, there are some additional modes that you might find useful, specifically the +t mode (sticky bit) and the +s mode (setuid bit). These functions describe the behavior of files and executables in multi-user situations.
When set on a file or directory, the sticky bit, or +t mode, means that only the owner (or root) can delete the file, regardless of which users have write access to this file/directory by way of group membership or ownership. This is useful when a file or directory is owned by a group through which a number of users share write access to a given set of files. To set the sticky bit on a file named /root/sticky.txt, issue the following command:
chmod +t /root/sticky.txt
To remove the sticky bit from a file, use the chmod -t command. Note, to change the sticky bit, you need to be either root or the file owner. The root user will be able to delete files regardless of the status of the sticky bit.
The setuid bit, or +s, when set on files allows users with permissions to execute a given file the ability to run that file with the permissions of file owner. For instance, if the file work was owned by the root user and the marketing group, members of the marketing group could run the work program as if they were the root user. This may pose potential security risks in some cases and executables should be properly evaluated before receiving the +s flag. To set the +s bit on a file named /usr/bin/work, issue the following command:
chmod g+s /usr/bin/work
In contrast to the +s mode for the ownership of a file, the effect of the +s mode on a directory is somewhat different. Files created in +s directories receive the ownership of that directory’s user and group, rather than the ownership of the user that created the file and their default group. To set the setguid (group id) option on a directory, use the following command:
chmod g+s /var/doc-store/
To set the setuid (user id) for a directory named /var/doc-store, issue the following command:
chmod o+s /var/doc-store/
/etc/passwd – The full account information is stored in the /etc/passwd file. This file contains a record per system user account and has the following format (fields are delimited by a colon).
[username]:[x]:[UID]:[GID]:[Comment]:[Home directory]:[Default shell]- Fields [username] and [Comment] are self explanatory.
- The x in the second field indicates that the account is protected by a shadowed password (in /etc/shadow), which is needed to logon as [username].
- The [UID] and [GID] fields are integers that represent the User IDentification and the primary Group IDentification to which [username] belongs, respectively.
- The [Home directory] indicates the absolute path to [username]’s home directory, and
- The [Default shell] is the shell that will be made available to this user when he or she logins the system.
/etc/group – Group information is stored in the /etc/group file. Each record has the following format.
[Group name]:[Group password]:[GID]:[Group members]- [Group name] is the name of group.
- An x in [Group password] indicates group passwords are not being used.
- [GID]: same as in /etc/passwd.
- [Group members]: a comma separated list of users who are members of [Group name].

After adding an account, you can edit the following information (to name a few fields) using the usermod command, whose basic syntax of usermod is as follows.
# usermod [options] [username]
Setuid – When the setuid permission is applied to an executable file, an user running the program inherits the effective privileges of the program’s owner. Since this approach can reasonably raise security concerns, the number of files with setuid permission must be kept to a minimum. You will likely find programs with this permission set when a system user needs to access a file owned by root.
Summing up, it isn’t just that the user can execute the binary file, but also that he can do so with root’s privileges. For example, let’s check the permissions of /bin/passwd. This binary is used to change the password of an account, and modifies the /etc/shadow file. The superuser can change anyone’s password, but all other users should only be able to change their own.

Thus, any user should have permission to run /bin/passwd, but only root will be able to specify an account. Other users can only change their corresponding passwords.
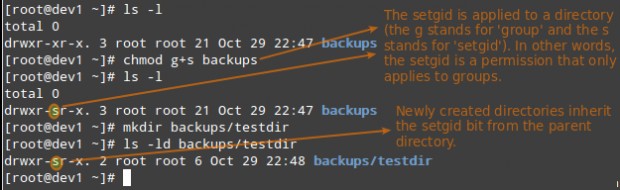
Setgid – When the setgid bit is set, the effective GID of the real user becomes that of the group owner. Thus, any user can access a file under the privileges granted to the group owner of such file. In addition, when the setgid bit is set on a directory, newly created files inherit the same group as the directory, and newly created subdirectories will also inherit the setgid bit of the parent directory. You will most likely use this approach whenever members of a certain group need access to all the files in a directory, regardless of the file owner’s primary group.
# chmod g+s [filename]
To set the setgid in octal form, prepend the number 2 to the current (or desired) basic permissions.
# chmod 2755 [directory]
Setting the SETGID in a directory
Pluggable Authentication Modules (PAM)
Many interactive commands are security sensitive. An obvious example is passwd used to change a user’s password. Such commands require users to authenticate themselves even though they have successfully logged in to the system. Also many server daemons carry out tasks on behalf of remote users, and most of these require the daemon to authenticate the remote user.
Early versions of Unix had all such programs (applications and daemons) directly read and parse the /etc/passwd file, so they could authenticate users. This became a problem when the format of /etc/passwd changed to include aging information in the second field. Every program that needed to authenticate users had to be updated and re-compiled. Sometime after that, single (remote) user databases became common in large organizations, using technology such as NIS. This meant a second set of such commands (all NIS commands start with the letters “yp”, as in yppasswd). Soon shadow passwords became common, then Kerberos, then different password encryption (actually, hashing) algorithms (such as MD5), then LDAP, etc. Every such change either requires custom versions of applications and daemons, or a re-write of the existing versions. And for every program that needed authentication!
At some point, someone came up with the idea that programs that need authentication should use a standard library for that, which in turn could be configured to use different databases and/or new algorithms just by adding new DLLs (called shared object files in Linux or Unix). This system became known as PAM (Pluggable Authentication Modules). Using PAM, some new authentication DLL can be invoked by the PAM library just by editing a text configuration file (which says which authentication modules to use). “PAM-ified” programs do not need to be changed in any way to use different authentication modules. Only a text configuration file (one for each program) needs to be updated to change how some program authenticates users.
PAM offers the following advantages:
- a common authentication scheme that can be used with a wide variety of applications.
- significant flexibility and control over authentication for both system administrators and application developers.
- a single, fully-documented library which allows developers to write programs without having to create their own authentication schemes.
Modern (and most legacy) applications and daemons that need authentication have been re-written (hopefully for the last time!) to use PAM. There are many PAM modules available for every system, each supporting a different authentication method. New ones can be easily found on the Internet, or created by programmers. A nice benefit of this design is that different programs can use different PAM modules for authentication, all on the same system. (Each program’s text configuration file may specify a different set of PAM modules to use.)
In addition to authentication, PAM modules can be used for session setup and tear-down, logging, and various other uses.
PAM Config files – In the PAM configuration file for some program (application or daemon), the administrator lists all the PAM modules that should be used to implement the access policy. This list is called a stack. When a program needs to authenticate a user, each PAM module is invoked in the order listed in the configuration file for that program. Each module can return success or failure. The results of all the modules are combined into a single result. This process is controlled by the “control-flag” listed for each module. Generally, if any one module “fails”, then PAM informs the application that access is denied.
The exact behavior of PAM in the event that one module fails can be changed in the configuration file, allowing for complex policies to be implemented. For example you can configure some program to try to authenticate with LDAP first, and if that fails try local files. Then allow access if either module succeeds.
The /etc/pam.d/ directory contains the PAM configuration files for each PAM-aware application. In earlier versions of PAM, the /etc/pam.conf file was used, but this file is now deprecated and is only used if the /etc/pam.d/ directory does not exist.
PAM Service Files – Each PAM-aware application or service has a file in the /etc/pam.d/ directory. Each file in this directory has the same name as the service to which it controls access.
The PAM-aware program is responsible for defining its service name and installing its own PAM configuration file in the /etc/pam.d/ directory. For example, the login program defines its service name as login and installs the /etc/pam.d/login PAM configuration file.
Each PAM configuration file contains a group of directives formatted as follows:
<module interface> <control flag> <module name> <module arguments>
Each of these elements is explained in the following sections.
Module Interface – Four types of PAM module interface are currently available. Each of these corresponds to a different aspect of the authorization process:
- auth — This module interface authenticates use. For example, it requests and verifies the validity of a password. Modules with this interface can also set credentials, such as group memberships or Kerberos tickets.
- account — This module interface verifies that access is allowed. For example, it may check if a user account has expired or if a user is allowed to log in at a particular time of day.
- password — This module interface is used for changing user passwords.
- session — This module interface configures and manages user sessions. Modules with this interface can also perform additional tasks that are needed to allow access, like mounting a user’s home directory and making the user’s mailbox available.
In a PAM configuration file, the module interface is the first field defined. For example, a typical line in a configuration may look like this:
auth required pam_unix.so
This instructs PAM to use the pam_unix.so module’s auth interface.
Module interface directives can be stacked, or placed upon one another, so that multiple modules are used together for one purpose. If a module’s control flag uses the “sufficient” or “requisite” value, then the order in which the modules are listed is important to the authentication process. Stacking makes it easy for an administrator to require specific conditions to exist before allowing the user to authenticate. For example, the reboot command normally uses several stacked modules, as seen in its PAM configuration file:
[root@MyServer ~]# cat /etc/pam.d/reboot#%PAM-1.0
auth sufficient pam_rootok.so
auth required pam_console.so
#auth include system-auth
account required pam_permit.so
- The first line is a comment and is not processed.
- auth sufficient pam_rootok.so — This line uses the pam_rootok.so module to check whether the current user is root, by verifying that their UID is 0. If this test succeeds, no other modules are consulted and the command is executed. If this test fails, the next module is consulted.
- auth required pam_console.so — This line uses the pam_console.so module to attempt to authenticate the user. If this user is already logged in at the console, pam_console.so checks whether there is a file in the /etc/security/console.apps/ directory with the same name as the service name (reboot). If such a file exists, authentication succeeds and control is passed to the next module.
- #auth include system-auth — This line is commented and is not processed.
- account required pam_permit.so — This line uses the pam_permit.so module to allow the root user or anyone logged in at the console to reboot the system.
Control Flag – All PAM modules generate a success or failure result when called. Control flags tell PAM what do with the result. Modules can be stacked in a particular order, and the control flags determine how important the success or failure of a particular module is to the overall goal of authenticating the user to the service. There are four predefined control flags
- required — The module result must be successful for authentication to continue. If the test fails at this point, the user is not notified until the results of all module tests that reference that interface are complete.
- requisite — The module result must be successful for authentication to continue. However, if a test fails at this point, the user is notified immediately with a message reflecting the first failed required or requisite module test.
- sufficient — The module result is ignored if it fails. However, if the result of a module flagged sufficient is successful and no previous modules flagged required have failed, then no other results are required and the user is authenticated to the service.
- optional — The module result is ignored. A module flagged as optional only becomes necessary for successful authentication when no other modules reference the interface.
Module Name – The module name provides PAM with the name of the pluggable module containing the specified module interface. In older versions of Red Hat Enterprise Linux, the full path to the module was provided in the PAM configuration file. However, since the advent of multilib systems, which store 64-bit PAM modules in the /lib64/security/ directory, the directory name is omitted because the application is linked to the appropriate version of libpam, which can locate the correct version of the module.
Module Arguments – PAM uses arguments to pass information to a pluggable module during authentication for some modules. For example, the pam_userdb.so module uses information stored in a Berkeley DB file to authenticate the user. Berkeley DB is an open source database system embedded in many applications. The module takes a db argument so that Berkeley DB knows which database to use for the requested service. The following is a typical pam_userdb.so line in a PAM configuration. The <path-to-file> is the full path to the Berkeley DB database file:
auth required pam_userdb.so db=<path-to-file>
Invalid arguments are generally ignored and do not otherwise affect the success or failure of the PAM module. Some modules, however, may fail on invalid arguments. Most modules report errors to the /var/log/secure file.
Sample PAM Configuration Files – The following is a sample PAM application configuration file:
#%PAM-1.0
auth required pam_securetty.so
auth required pam_unix.so nullok
auth required pam_nologin.so
account required pam_unix.so
password required pam_cracklib.so retry=3
password required pam_unix.so shadow nullok use_authtok
session required pam_unix.so
- The first line is a comment, indicated by the hash mark (#) at the beginning of the line.
- Lines two through four stack three modules for login authentication.
- auth required pam_securetty.so — This module ensures that if the user is trying to log in as root, the tty on which the user is logging in is listed in the /etc/securetty file, if that file exists. If the tty is not listed in the file, any attempt to log in as root fails with a Login incorrect message.
- auth required pam_unix.so nullok — This module prompts the user for a password and then checks the password using the information stored in /etc/passwd and, if it exists, /etc/shadow. In the authentication phase, the pam_unix.so module automatically detects whether the user’s password is in the passwd file or the shadow file. The argument nullok instructs the pam_unix.so module to allow a blank password.
- auth required pam_nologin.so — This is the final authentication step. It checks whether the /etc/nologin file exists. If it exists and the user is not root, authentication fails.
- account required pam_unix.so — This module performs any necessary account verification. For example, if shadow passwords have been enabled, the account interface of the pam_unix.so module checks to see if the account has expired or if the user has not changed the password within the allowed grace period.
- password required pam_cracklib.so retry=3 — If a password has expired, the password component of the pam_cracklib.so module prompts for a new password. It then tests the newly created password to see whether it can easily be determined by a dictionary-based password cracking program. The argument retry=3 specifies that if the test fails the first time, the user has two more chances to create a strong password.
- password required pam_unix.so shadow nullok use_authtok — This line specifies that if the program changes the user’s password, it should use the password interface of the pam_unix.so module to do so. The argument shadow instructs the module to create shadow passwords when updating a user’s password. The argument nullok instructs the module to allow the user to change their password from a blank password, otherwise a null password is treated as an account lock. The final argument on this line, use_authtok, provides a good example of the importance of order when stacking PAM modules. This argument instructs the module not to prompt the user for a new password. Instead, it accepts any password that was recorded by a previous password module. In this way, all new passwords must pass the pam_cracklib.so test for secure passwords before being accepted.
- session required pam_unix.so — The final line instructs the session interface of the pam_unix.so module to manage the session. This module logs the user name and the service type to /var/log/secure at the beginning and end of each session. This module can be supplemented by stacking it with other session modules for additional functionality.
Creating PAM Modules – You can create or add new PAM modules at any time for use by PAM-aware applications. For example, a developer might create a one-time-password creation method and write a PAM module to support it. PAM-aware programs can immediately use the new module and password method without being recompiled or otherwise modified.
This allows developers and system administrators to mix-and-match, as well as test, authentication methods for different programs without recompiling them.
Apply for Linux Administration Certification Now!!
http://www.vskills.in/certification/Certified-Linux-Administrator
