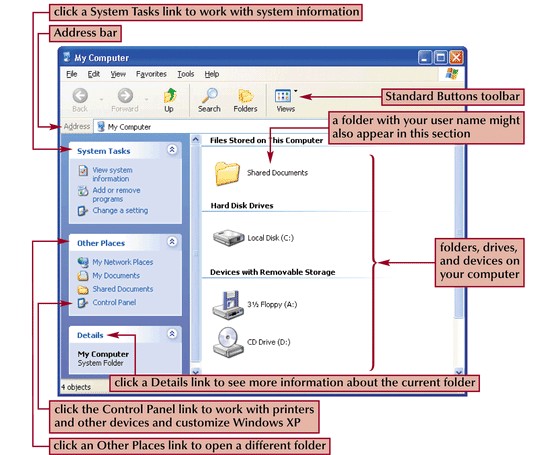
Windows Explorer– It gives facility of viewing files and folders, opening programs or files, creating or copying or moving and deleting or renaming files or folders to other locations, searching for a particular file or type of file, changing file attributes, and formatting new disks by right-clicking. Double-click folder in left pane to show its contents in right pane. Click the plus sign (+) on left of folder expands the folder without changing display in right pane. Click minus sign (–) next to folder collapses it. File is highlighted if clicked in right pane and for multiple files press Shift key while selecting multiple files at once but for individual files selection press control key clicking each file.

File Properties – File or folder has properties of its name, location, attributes (hidden or read only), size, modify and create dates which show or modify by right-click and select “Properties” option.
Folder or File Creation – It can be done by MD, EDIT,COPY commands and by GUI also as
- Open Windows Explorer and go to location where new folder or file is to be created.
- Click File and select New or right click in right pane’s empty space and highlight new option.
- Click Folder or type of file desired
- Type in the name and press Enter.
Folder or File Deletion – It can be done by RD, DELTREE,DEL commands and by GUI also as
- Open Windows Explorer and go to location of folder or file to be deleted.
- Select file or folder to be deleted
- Right click and select delete option or press delete key, it is shifted to recycle bin.
- For permanent deletion, delete it from recycle bin or press ‘Shift’ and ‘delete’ during deletion
The “Send To” function
For making shortcuts specifically on the desktop, the Send To function of the right-click can be used. Simply right-click on the desired file or folder and select “Desktop (create shortcut)” from the “Send To” menu. “Send To” gives us options for object specific operations.
Create Shortcut
Shortcut is a file which points or acts as a link to a file, folder or program. Thus when we double
click shortcut, associated file, folder or program opens up. Steps to create a shortcut
- Right-click an open area on the desktop, point to New, and then click Shortcut.
- Click Browse button.
- Locate the program or file to which you want to create a shortcut, click the program or file, click Open, and then click Next.
- Type a name for shortcut and then click Finish.
Or to create a shortcut to a file or folder or program, follow these steps
- Right-click the program or file to create the shortcut to.
- Click Create Shortcut.
- The shortcut is now at the bottom of the window.
- Drag the shortcut to desired location.
The Search Option
It is very helpful feature of MS-Windows XP to locate a file or folder which had been created or worked upon but we are not aware of its location.
To use the find feature do as follows
- Click the Start Button, and then click Search option.
- The Search window appears. As a default, it will search your C: drive. Click “All files and folders” option.
- Now give details like file name (full/part), location to search, content of file and also select other options of size, date of modification and advanced options and then click “Search” button. In few seconds any files or folders matching the search request show up in the bottom pane.
Searching for files
If you don’t remember which folder you saved a file in, you can search for it. To search for a file
- Click Start, and then click Search.
- In the left pane, click the type of file you want to search for, or click “All files and folders”.
- Based on the type of file you chose to search for, specify your criteria. If you know part of the file name, type it. Then click Search.
- Windows XP searches your computer, which may take several minutes. Windows XP then displays the search results, which you can browse just like files in a folder. Once you are done searching, click “Yes” for finishing the search.
Recycle Bin
When a file is deleted, Windows places it in the Recycle Bin and the Recycle Bin icon changes from empty to full. Items deleted from a floppy disk or network drives are permanently deleted and are not sent to the Recycle Bin. Items in Recycle Bin remain until deleted from it also or can be restored back to their original location. When it fills up, Windows automatically cleans out. To permanently delete, either delete from recycle bin or instead of delete, press shift and delete key.
Changing the storage capacity of the Recycle bin
- On the desktop, right-click Recycle Bin, and then click Properties.
- Move slider to increase or decrease disk space for storing deleted items.
Apply for IT Support Certification
https://www.vskills.in/certification/certified-it-support-professional

