Track, Accept, and Reject changes to Workbooks
Excel 2013 workbook, you can decide which changes to accept or reject by choosing the Accept/Reject Changes option from the Track Changes commandbutton’s drop-down menu on the Ribbon’s Review tab (or pressing Alt+RGC).
When you do this, Excel reviews all the highlighted changes made by you and others who’ve worked on the shared file, enabling you to accept or reject individual changes.
When you first choose the Accept/Reject Changes option, Excel displays the alert dialog box, informing you that Excel will save the workbook. When you click OK to close this alert dialog box, the program opens the Select Changes to Accept or Reject dialog box, which contains the same three check boxes and associated drop-down items (When, Who, and Where) as the Highlight Changes dialog box.
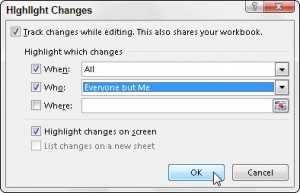
By default, the When check box is selected along with the Not Yet Reviewed setting in the Select Changes to Accept or Reject dialog box. When this setting is selected, Excel displays all the changes in the workbook that you haven’t yet reviewed for everyone who has modified the shared file.
To review only those changes you made on the current date, choose the Since Date item from the When drop-down menu. To review changes made since a particular date, edit the current date in the Since Date drop-down list.
To review only changes that other people have made, only those changes you’ve made, or only those changes a particular co-worker has made, choose the appropriate item (Everyone But Me, your name, or another user’s name) from the Who drop-down menu.
If you want to restrict the review to a particular range or region of a worksheet, click the Where combo box and then select the range or nonadjacent cell ranges with the cells to review.
After you select which changes to review in the Select Changes to Accept or Reject dialog box, click the OK button. Excel then closes this dialog box, highlights the cell in the worksheet that contains the first change to review, and opens the Accept or Reject Changes dialog box, where you indicate whether to accept or reject the change.
To accept the change, you click the Accept button. To reject the change and keep the original value, you click the Reject button instead. Excel then highlights the next cell in the worksheet that needs reviewing, while at the same time displaying a description of the change in the Accept or Reject Changes dialog box.
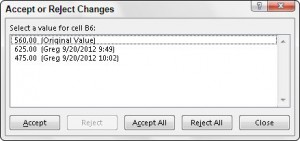
If you know ahead of time that you want to accept or reject all the changes that have been made since you last reviewed the workbook or the date you specified, click the Accept All button or the Reject All button, respectively.
When you accept or reject the last change identified in the workbook, the Accept or Reject Changes dialog box automatically closes, and you can then save the workbook (Ctrl+S) with the editing changes made as a result of this review.
Apply for MS Excel Certification Now!!
https://www.vskills.in/certification/excel-online-certification-course
