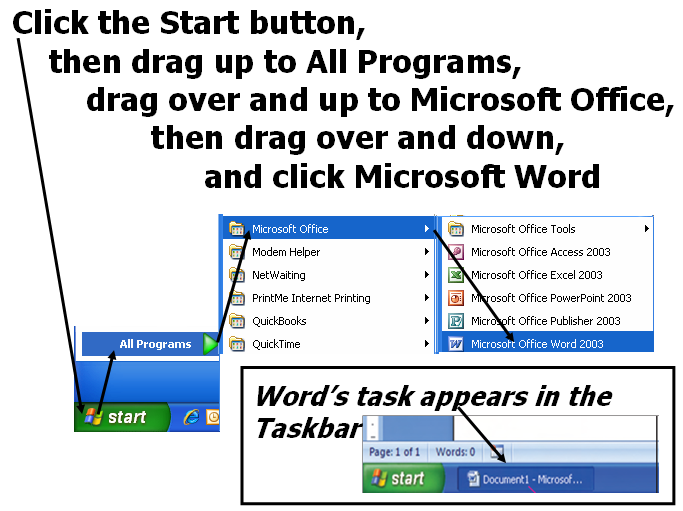
Various parts of the interface are explained –
The Desktop
It is screen which is shown after computer is started and Windows is loaded. It is an area on which you can place items you are working on or the items that are waiting for your attention. Normally these items are contained in windows such as programs that you are working with or the files that you are looking at. Further it can also contain icons, dialog boxes, and the mouse pointer.
Window
These are areas of the screen with a border around them that contains the programs or files that you are currently using.
Icons
They are small graphic objects that represent specific programs to be used
Dialog box
Area of the screen within window that contains messages or asks you to supply some information that is needed.
Mouse pointer
It shows where the mouse is currently pointing
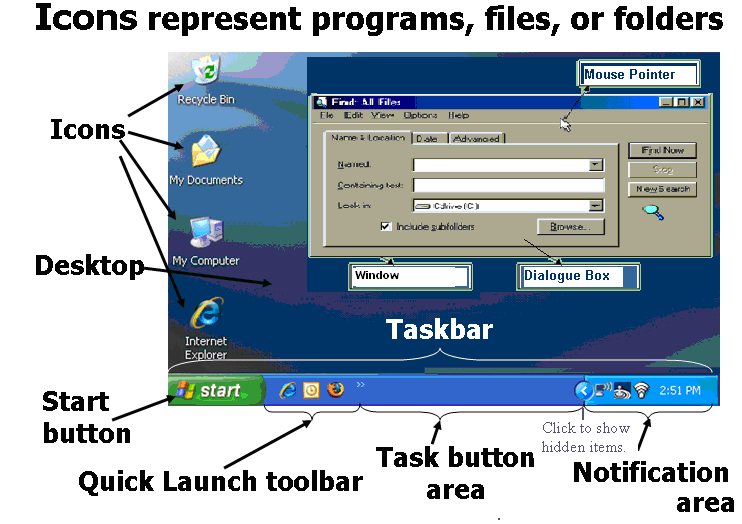
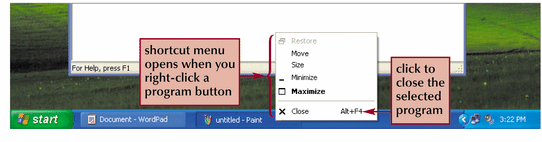
The Task Bar
It is a bar displayed on a full edge of desktop to launch and monitor running applications. Microsoft incorporated a taskbar from Windows 95 onwards. It is a place for controlling running programs in windows-XP. You can start a program, switch among programs already running, open the Control Panel (for setting many options for different functions), Find a file, get help, shut down windows, and execute commands.
The default position for the taskbar in Microsoft Windows is at the bottom of the screen and includes from left to right the Start menu button, Quick Launch bar, taskbar buttons, and notification area. The tasks on the task bar will expand or contract to fill the space depending upon the number of tasks opened if you move the mouse pointer to a task, the full task name is displayed. The various parts of taskbar are –
Quick launch toolbar
It contains shortcuts to applications. Windows provides default entries, such as to Internet Explorer Browser. User may add any further shortcuts that they choose. A single click on the icon launches the application.
Task or Taskbar Button area
Windows places a taskbar button of an application started by user on the taskbar.
Notification area
It is the portion of the taskbar that displays icons for system and program that have no presence on the desktop but to indicate the status of an operation or to notify the user about an event which are running in background. It also has the time and the volume icon. It also shows printer icon, during printing. The notification area is commonly referred to as the system tray.
The Start Button
The start button opens a Start Menu, which provides a central launching point for application and tasks.
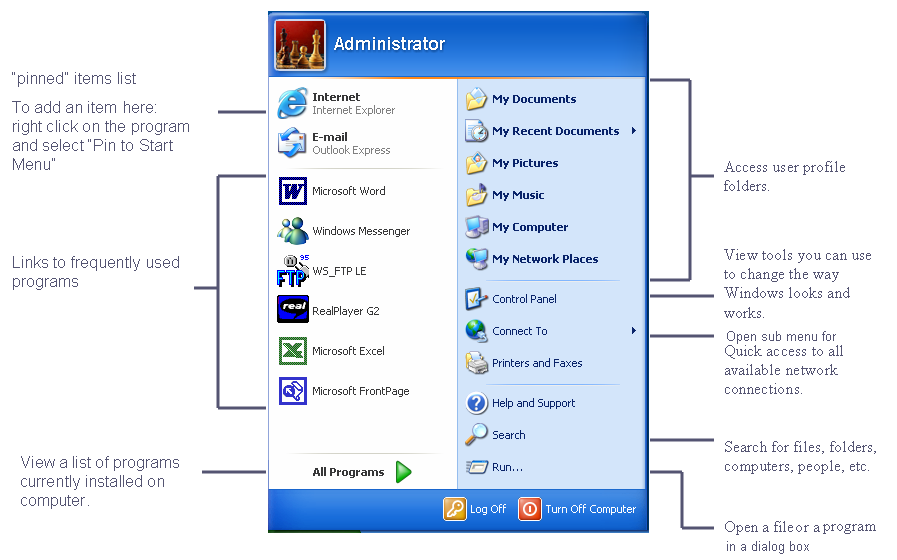
The Start Menu
It provides a customizable nested list of programs for the user to launch, as well as a list of most recently opened documents, a way to find files and get help, and access to the system settings. Windows XP’s Start Menu was expanded to encompass My Documents folders, My Computer and My Network Places from the Windows desktop.
It provides a much quicker and easier way to open programs and consolidates a list of programs into one place.
Microsoft uses the Start Menu in each version of Windows as a way to hide the complexities of the operating system as programs and files can also be opened by navigating to them in the Windows Explorer interface.
| Component | Use |
| My Documents | Windows default linking to a folder for storing user documents. |
| My Recent Documents | Sub menu listing files which were being worked upon recently. |
| My Pictures | Windows default linking to a sub folder in My Documents for storing picture. |
| My Music | Windows default linking to a sub folder in My Documents for storing music. |
| All Programs | It lists all user or system programs to choose for running. |
| Control Panel | It helps in changing the settings of many windows features. |
| Printers & Faxes | It is a link in control panel for configuring printer & fax. |
| Search | It is used to search for a file or folder on a computer or on network. |
| Help & Support | Opens windows help facility, to review topics from a table of contents. |
| Run | Type the path and filename of a program, file, or folder to open. |
| Turn Off Computer | Prepares your computer to be turned off or Log Off or Restart. |
An arrowhead on the right means that if this option is selected, a second menu (a sub menu) will open. The Run option has three dots after them which mean that a dialog box will open, asking you to enter the command you want to run if you select it.
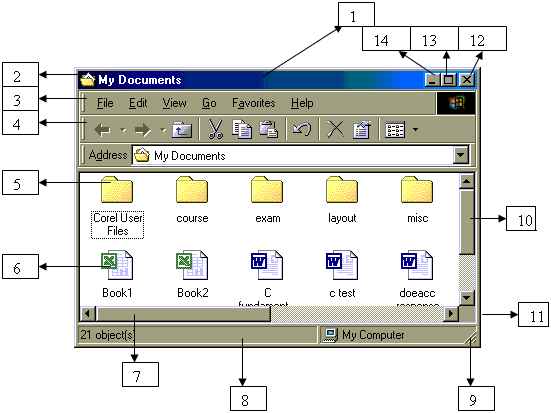
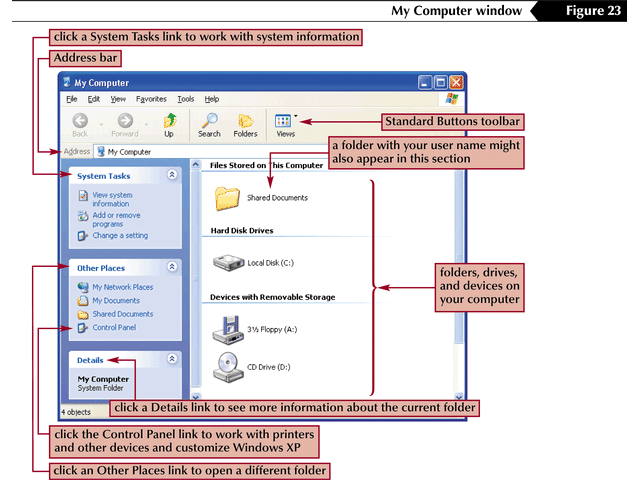
Parts of a Window
It is a screen area containing user interface used to display the output of and may allow input to one or more processes. It usually has a rectangular shape that can overlap with the area of other windows and can be arranged on a desktop. They can be manipulated with a mouse cursor or even keyboard. They can be resized, moved, restored or closed. Windows usually include a menu-bar, toolbars, controls, icons and often a working area.
| No. | Part | Use |
| 1 | Title Bar | It contains the name of the program or the path and the name of the folder in the window and is also used to move window to some other location |
| 2 | Control Menu Icon | Opens the control menu from which you can move, size or close the window |
| 3 | Menu Bar | Contains the drop down menus that are available in the window |
| 4 | Toolbar | Contains tools related to the contents of the window. |
| 5 | Folder Icon | Represents a folder which can contain other folders or files |
| 6 | File Icon | Represents a folder which contain other folders or files |
| 7 | Horizontal Scroll Bar | Allows moving the contents of windows horizontally |
| 8 | Status Bar | Provides messages and information about what is displayed or selected in the window. |
| 9 | Sizing Handle | Allows sizing of the window in two dimensions |
| 10 | Vertical Scroll Bar | Allows moving the contents of the windows Vertically |
| 11 | Window Border | Separates the window from the desktop and is used to size the window |
| 12 | Close Button | Closes the window |
| 13 | Maximize Button | Increases the size of the window to fill the desktop |
| 14 | Minimize Button | Decreases size of the window to see other windows or desktop. |
As shown in the figure below
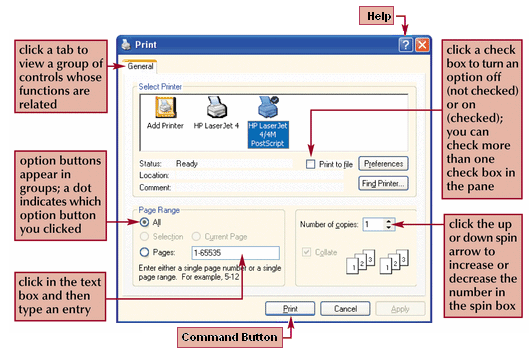
Dialog Box
Dialog Boxes have various components and their purposes are as follows
| Component | Use |
| Title Bar | Contains the name of the dialog box and is also used to move it |
| Tabs | It allows you to select among several pages in a dialog box |
| Option buttons | Also called “Radio Buttons” allow you to select one among mutually exclusive options |
| List box | Allows you to choose one or more items from a list , which may have a scroll bar to move the list |
| Check Boxes | Allows you to choose one or more items from a list, which may have a scroll bar to move the list. |
| Drop down list box | Opens a list of items from which you can choose one that is shown when the list is selected. |
| Text Box | Allows you to enter and edit text |
Using the Mouse
The mouse is used to move the pointer on the screen and to indicate a choice by pressing a button. There is also standard terminology for using the mouse as given below.
| Mouse Action | Used For |
| Point On | To move the mouse until the tip of the pointer is on top of the object to select |
| Click On | To point on an object to select by quickly press and release of the left mouse button once |
| Right click On | To select & open object’s menu by quickly press and release of the right mouse button once |
| Double click On | To open or execute the object by select and quick press and release of the left mouse button twice in rapid succession. |
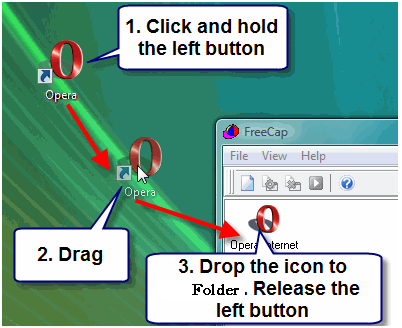
| Drag | To move an object with mouse by point on an object you want to move and press and hold the left mouse button while moving the mouse and dragging the object with you. When you reach the place where you want it, release the mouse button. |

Drag and drop
Drag-and-drop is the action of (or support for the action of) selecting an object by “grabbing” it and dragging it to a different location. The drag and drop method can be used in several ways. Either the left or the right mouse button can be used for drag and drop with somewhat different behavior. I prefer the right-click method and this will be the basis for the rest of the discussion. Dragging with the right-click brings up the context menu shown in the figure below.
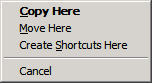
One way to employ drag and drop is to use the menu entry “Copy Here” to make a copy of an existing shortcut in a different location. For example, an entry in the Start-All Programs menu can be dragged to the desktop or to the Quick Launch bar to place a copy of a shortcut in a more readily available spot. This method is probably already familiar to many. Shortcuts can also be made from files or folders by using the menu entry “Create Shortcuts Here”. Open the folder containing the object whose shortcut is desired, hold down the right-click, and drag to the desired destination, such as another folder or the desktop.
The “Send To” function
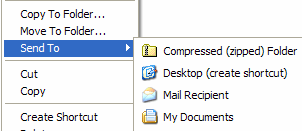
For making shortcuts specifically on the desktop, the Send To function of the right-click can be used (as per the figure). Simply right-click on the desired file or folder and select “Desktop (create shortcut)” from the “Send To” menu. “Send To” gives us options for object specific operations.
Create Shortcut
Shortcut is a file which points or acts as a link to a file, folder or program. Thus when we double click the shortcut, the associated file, folder or program opens up.
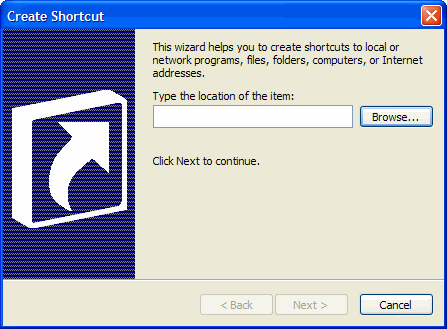
The most general method for creating shortcuts uses the “New” function of the context menu that appears when a vacant spot within a folder window or on the desktop is right-clicked (figure on the left). Right-click in the folder where the shortcut is to be placed and select the entry “Shortcut” from the menu the dialog box shown below will open. The location of the target item can be entered or the “Browse” function can be used to locate it. First dialog box for creating new shortcut
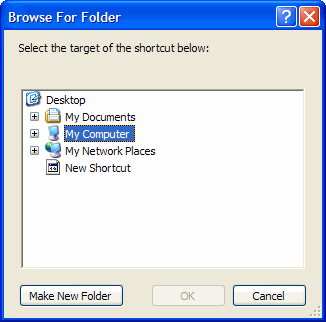
If the “Browse” button is selected, the dialog shown below will open. Here you can select the file or folder that you wish to create a shortcut for (the target). Once the desired folder or file has been selected, click the “OK” button. Dialog box for Browse function is as under
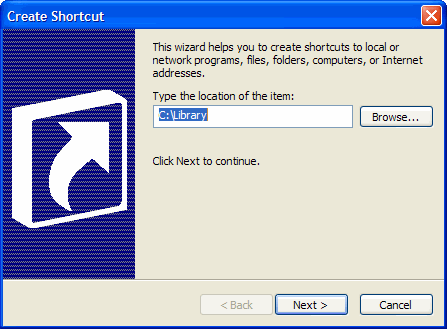
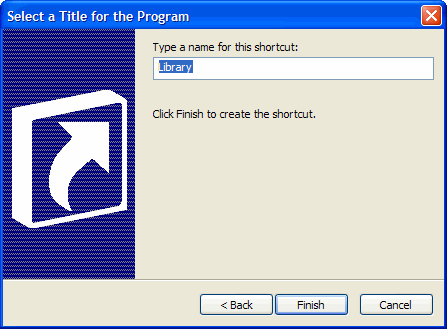
The Create Shortcut window will reappear, this time with the desired file or folder entered as shown below. In this example, the folder “C:\Library” has been chosen. Dialog box with location of target entered
Click “Next” and a window where the shortcut can be named appears. After entering a name or accepting the default, click “Finish”.
Exploring My Computer
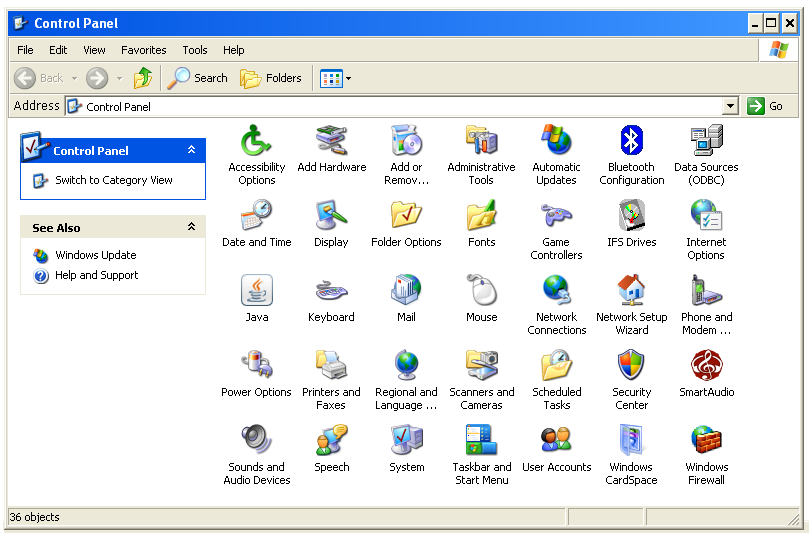
The Control Panel
| Control Panel Item | Used For |
| Accessibility Options | We can set keyboard, mouse, sound and display for persons who are visually, aurally or motor impaired. |
| Add New Hardware | It helps in installation of new hardware like CD-ROM, display adapters, etc. |
| Add or Remove Programs | We can add or remove different modules of Ms-Windows or other application software. |
| Date and Time | It sets the current date and time and also the zone in which we are present. |
| Display | It sets the colors and fonts for various Windows screens, title bars, etc. Also it sets the background pattern or picture for Desktop, Screen saver, screen resolution, display driver and energy saving mode. |
| Fonts | Adds and deletes typefaces for screen display and printer output. |
| Keyboard | Sets cursor blink rate, rate at which keys repeat when it is held down, determine the language for the keyboard and declare the type of keyboard. |
| It controls how your e-mail will be handled. | |
| Phone and Modem | Add, remove and set the properties of the modem connected to the computer system. |
| Mouse | Sets the speed of mouse’s pointer motion relative to hand motion and how fast a double click has to be to have the effect. Swapping between functions of left and right buttons, setting the shape of various pointers. |
| Network Connections | Function varies with network type. It sets the network configuration (hardware and software), network identification, etc., if connected to a network. |
| Power Options | Applicable only if we are having a battery powered computer, it can show the condition of battery charge. |
| Printers and Faxes | Displays the installed printers, can modify their properties and install new printer also. |
| Regional Settings | Sets how Window displays time, date, numbers and currency. |
| Sounds & Audio Devices | Turns on or off sound on occurrence of some events, if appropriate hardware is present. Can set up various sound-schemes, which is a collection of sounds Changes the Audio, MIDI, CD music and other multimedia device drivers setting and properties, if installed. |
| System | Display information about your system’s internal devices, can optimize system performance and also a number of system troubleshooting options. |
As shown in the picture –
Display Properties
Using this feature of control panel you can change overall view of Windows XP. The following are the various types of control tabs.
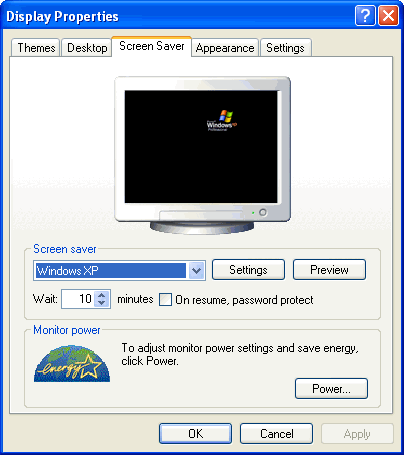
Theme Tab
A theme is a background plus a set of sounds, icons, and other elements to help you personalize your computer with one click.” As you would expect, the default theme is called Windows XP. To change to a different theme, click the drop down list box to view the additional choices. The selection is a transparent, self-serving direct link promotion of the Microsoft Plus for Windows XP website.
The Browse option is handy when looking for themes that are not located in the default themes directory, especially useful if you have lost track of some downloaded themes. The Save As button is used to save the current theme under a different name. Use any of the installed themes you have as a starting point. Make your modifications to the background, fonts, sounds, mouse pointers, etc. When the modifications are done, return to the Theme tab and the name of the theme you used originally will now be shown as Original Theme Name (Modified). Click the Save As button and assign the modified theme a new name.
The Delete button is the final option on the Themes tab. If you aren’t satisfied with a theme creation select it from the drop down list and click Delete. XP will only allow modified or additional themes that have been added to be deleted. The default themes that shipped with XP cannot be deleted, indicated by the Delete button being grayed out.
Desktop Tab
Themes and their modifications are built from a number of different components. Under this section we focus on the desktop tab which contains a number of those component parts. Whether or not your intention is to design a new theme, in essence you are doing just that when you make the first change to the interface. Whether you save the theme with a snappy, personalized name or just let it use the Old Theme Name (Modified) format, this section we are about to explore is one of the building blocks for theme creation. Use one of the methods discussed earlier to open display properties and place the focus on the desktop tab
The primary focus of the desktop tab is the possible backgrounds that can be used in XP. Scroll through the list and click on each one to see a preview in the monitor display. The icon to the left of each image name indicates the image format. Assuming that XP was installed to C:\Windows, the bitmap (.bmp) images will be located in C:\Windows while the JPEG (.jpg) images are located in C:\WINDOWS\Web\Wallpaper. Any image with a .bmp, .gif, .jpeg, .jpg, .dib, .png, .htm, or .html extension can be used as a background.
The browse button is used to select additional images. For this you need to click on browse to open the window. Notice that the browse window opens to the My Pictures folder by default, but you can select any drive, folder or network resource to search for images. The default search criterion is set to only search for Background Files. Click on the drop down selection box for Files of Type and select either All Picture Files or HTML documents as the search criteria.
The Position button is composed of three settings which facilitate positioning of the selected image and how it displays on the desktop. Select one of the background images from the list and click Position to display the following options
- Center In this case the selected image is positioned directly in the middle of the screen. The desktop area is covered is dependent on the size of the original image with no adjustment is made to the original image dimensions.
- Tile In this case repeating pattern of the image is created until the entire desktop surface is covered. Images which are geometric or have a regular repeating pattern work best when tiled, eliminating the severe breaks that will be evident where the images abut each other with no adjustment is made to the original image dimensions.
- Stretch In this case the selected image expands both horizontally and vertically until the desktop surface is covered. The size and orientation of the original image play a large role in how the finished desktop appears.
- Color button This option opens a selection screen to a number of color presets enabling you to use any custom color. The only limitation imposed is the graphics color quality setting governing the system. The desktop color can be set and used in conjunction with the Center command for an image to have the desktop color frame the image.
- Customize Desktop This customize option button is placed at the lower left corner of the Display Properties tab. Click on Customize Desktop option and the Desktop Items Property Sheet focused on the General tab will open.
- Change This option is used to make the task to assign a new icon to the desktop elements simpler which were previously selected. Click on the item that you intend to change followed by clicking the Change button. The Change Icon Property Sheet will open that will display icons used as a replacement for the one you selected previously by clicking on it and selecting OK.
- Restore Default button This option is used in case you don’t like the change you made thereby retaining back the default XP icon.
- Desktop Cleanup The wizard scans your desktop for shortcuts which have not been used and moves them to the Unused Desktop Shortcuts folder it creates on your desktop. Note that this option only applies to shortcuts, not to folders or other items. The wizard gives you the option to keep or move the shortcuts before any changes are implemented.
- New button This option opens the New Desktop Item. You can either click the Gallery button to open a Microsoft website where Active Desktop content can be downloaded or use the Location area to type in the URL of the website. In case you don’t know the URL, use the Browse option which will open to your Favorites menu such that you can select the site you want. The URL will be entered into the Location area automatically. Click the Finish button and the Add Item to Active Desktop confirmation window will open. Select OK to verify the site selection or click Customize option to enter the Offline Favorite Wizard that allows some quick settings relating to management of the offline content.
- Delete button In this case highlight the site, click the button, confirm and poof. The option will be deleted.
- Synchronize option This option is used to refresh the desktop web content by highlighting the site and clicking the synchronize option.
- Properties button This option is used with the focus on the Web Document tab by highlighting the site of choice and clicking on the Properties button. The naming convention used for this property sheet will show the URL followed by the word Properties. The Property Sheet will contain three tabs Web Document, Schedule and Download.
- Web Document It contains the basic information about the site you have chosen as it relates to this computer. The site URL, the number of times this computer has accessed the site and some general summary information are included. The one user defined option on this page involves making the Site Available Offline. Leave this box checked and the site content will be dynamically updated without user intervention according to the schedule created in the Schedule and Download options. Uncheck the box and the Schedule and Download tabs will disappear since there will be no offline content updates.
- Download This option configures the amount of content that is made available offline from the Active Desktop site. The Content to download section specifies how far down in the link structure below the home page you wish to download. In case you wish to be notified when the site content changes, fill in the e-mail and server names in the section after checking the box. In the end it allows you to enter site login information by clicking the Login button if the site requires a username and password.
- Schedule This option is used to set the information regarding the method and time for synchronizing desktop items. If you want to synchronize your content manually, select the top radio button and select the lower radio button to set a defined schedule for synchronization]. There can be more than one schedule to correspond to different active desktop content.
- Add This option is used to create a new schedule done by clicking the Add… button to open the New Schedule. Set the time and frequencies options and assign the schedule a name. If you have multiple sites and schedules, assign the schedule the same name as the site for easier reference. The check box at the bottom allows you to automatically connect to the internet for the scheduled update. Click OK and return to the Schedule tab.
- Remove Select and highlight a schedule and Click Delete to remove the portion.
- Edit This option takes you back to the edit screen that was accessed when the Add button was pressed and you set the update time and frequency options which allows editing of a selected schedule it does it in much greater detail via a series of four tabs.
- General Tab This option provides the name of the schedule, when it is scheduled to synchronize content, when it last synchronized the content and when the next synchronization is scheduled to occur.
- Synchronization Items Under this the first option allows you to choose a network connection method via the dropdown box. The second option allows is to select what content you want to synchronize and the third option allows automatic network connections if not already connected at the scheduled time of synchronization.
- Schedule The first thing in this tab before setting a schedule, is go to the bottom of the property sheet and check if you have multiple schedule. This places all the schedules into a drop down box at the top of the sheet. In addition, it makes a New and Delete buttons appear so you can delete obsolete schedules or create a new schedule. Use the Schedule Task boxes to enter your preferred settings. The Advanced button allows you to further refine the update schedule. By carefully manipulating the dates and frequency on this screen you can have minute by minute updates if the kind of content you use requires this frequency level.
- Settings This final tab allows further refinement to task completion, idle time and whether or not the tasks should be run if the computer switches to battery power.
Appearance Tab
- If you want to change the appearance of only one screen element, first click on windows and buttons and select windows XP styles or windows classic styles , then click the advance buttons and select menu in item, and change the settings in Size and Color for the item and its font size, color, bold and italic.
- If you want to change the appearance of all screen elements simultaneously, click an appearance scheme in Scheme.
Effects Tab
Effect methods to smooth edges of screen fonts in use to better readability of large screen fonts select standard types for desktop monitor and clear for flat type screen.
- Click on Use Large icon and you will see the files, folder icons are displayed large.
- Click the show window contents while dragging check box to see only the window content when you drag an icon.
- Click on the show Shadow under menu and specifies whether menus casts a slight shadow and its looks a three dimension.
- Click on Hide underline letters for keyword navigation until you press the Alt Key, to specify whether to suppress the drawings of keyboard shortcuts and input focus indicators until you actually start using the keyboard to navigate in windows, generally with the Alt, Tab, or arrow keys.
Settings Tab
To adjust display to actual dimension, following steps are followed
- In screen area make sure the setting is higher than 640 x 480 mega pixels. If 640 x480 is the only setting available to you, you cannot adjust to actual dimensions.
- Click advanced to open the properties page for your computer.
- On the general tab, in “DPI setting”, click “custom setting”.
- Hold a ruler up to the ruler on your screen, and then drag the screen ruler until it matches the ruler you are holding.
- In Colors, click the number of colors that you want your monitor to display.
Mouse
Using this option you are able to change Mouse properties.
For exploring the mouse properties following steps should be followed
- Click Start
- Choose Control panel
- Click Mouse
Buttons Tab
- Switch Primary and Secondary buttons: Mouse button can be swapped as per the way of handling. If any person is left-handed, he can change the normal use of left button to right that will be easier to operate for him. In case you are left handed and you want to use your strongest finger for the primary mouse button, you can do that by switching to the button functions.
- Double-click speed: To adjust the Double-click speed of your mouse drag the slider. To test the speed, double click the image in the test area. Click on the Click lock option for just highlighting the file or folders and drag it for one second not to hold down the mouse button and drop to your destination.
Pointers tab
Using this control tab you can change mouse pointer shapes for different process. There are predefined schemes for pointer shapes, which can be selected instead of individual change.
Pointer Option Tab
- Motion: This control tab is used to adjust pointer movement
- Snap to: When a new dialog box is open, automatically the pointer stay on the OK or Apply buttons.
- Visibility: Adds the trial to the mouse pointer click on Display pointer trials, to change the pointer trial drag the slider. This option is useful if you are using a screen for any such of demonstration.
- Hide the mouse pointer when you are typing click Hide pointer while typing.
- At the time of typing if you press Ctrl key you can see the pointer. Show the location to the pointer when you press the Ctrl key.
Wheel Tab:
Click on this Roll the wheel on notch to scroll for scrolling one line and also scroll page wise, this is similar to the page up and page down key.
Hardware Tab:
From this option you can see in which port your mouse is attached and thereby display the list of device.
Regional and Language Option:
This feature of control panel allows changing default setting of numbers, currency, date and time as per currently selected region.
- Regional Setting Tab: On the regional setting tab, click the name of the region you want and set date, time, number and currency format as you wish to suit your requirement from customize option.
- Number Option: This control tab allows changing the display of numbers in the computer. Here you can change the decimal symbol, number of decimal places, digit-grouping symbol, and number of digit in-group, appearance of negative values etc.
- Currency Option: Using this control tab you can set the currency symbol, position of the currency symbol, appearance of the negative values etc.
- Time Option: Time style, time separator etc can be changed using this control tab.
- Date Option: Here you can declare Date style and date separator for short date and long date types. Also you can define a certain range of years that can be interpreted by the computer when you are using two digits for year.
Changing Regional Language
You can use the Regional and Language Options tool in Control Panel to customize the way Windows handles dates, times, currency values, and numbers. To open the Regional and Language Options tool follow the steps as under
- Initially click Start, and then click Control Panel.
- Then click Date, Time, Language, and Regional Options, and then click Regional and language Options.
- If you want to change one or more of the individual settings, click Customize.
Note: The location selection that you make includes default display options for the way dates, times, and numbers are displayed.
Changing the Date Display
- In the Customize Regional Options dialog box, click the Date option to specify any changes you want to make to the short date and the long date.
- Use the following guidelines if you do not see the format you want in the Short date or Long date boxes
- For displaying single-digit numbers without a leading zero, type d for the day setting, type y for the year setting, and type M for the month setting.
- For displaying leading zeros with single-digit numbers, type dd for the day setting, type yy for the year setting, and type MM for the month setting.
- For displaying the last two digits of the year, type yy for the year setting.
- For displaying four digits for the year, type yyyy for the year setting.
- For displaying abbreviations for the day or month, type ddd for the day setting and type MMM for the month setting.
- For displaying the full name of the day or month, type dddd for the day setting and type MMMM for the month setting.
- For displaying additional text, type single quotation marks (‘) around text.
NOTE: Type an uppercase M for the month setting. The lowercase m is used for the minute setting.
- To specify how your computer interprets two-digit years, on the Date tab, under When a two-digit year is entered, interpret it as a year between, type or click the year that you want to configure this setting to end at.
NOTE: Not all programs use this option. If the program you are using does not correctly interpret two-digit years, consult the documentation or manufacturer of that program.
Changing the Time Display
- Click the Time option to specify any changes you want to make In the Customize Regional Options dialog box.
NOTE: To arrange the settings so that the leading zeros in single-digit hours, minutes, or seconds are not displayed, type a single uppercase H, or lowercase letters, such as h, m, or s.
- In case you do not see the format you want in the Time format box, use the following guidelines
- For displaying time in a 24-hour format, type an uppercase H or HH for the hour.
- For displaying time in a 12-hour format, type lowercase h or hh for the hour.
- For displaying leading zeros in single-digit hours, type HH or hh.
- For displaying a single letter to indicate AM or PM, type lowercase t.
- For displaying two letters to indicate AM or PM, type lowercase tt.
- For displaying text, type single quotation marks (‘) around text.
Changing the Currency Value Display
Click the Currency option in the Customize Regional Options dialog box, to specify any changes you want to make. You can alter the currency symbol, the formats used for positive or negative amounts, and the punctuation marks.
NOTE: If you want to switch currencies, change the currency symbol, and then click OK or Apply. The other fields change to reflect the new currency.
Changing the Number Display
Click the Numbers option in the Customize Regional Options dialog box, to specify any changes you want to make. You can change the decimal symbol and list separator, the format used for negative numbers and leading zeros, and the measurement system
Wizards
Windows XP, like many other Microsoft programs, includes many Wizards, programs to take you step by step through the process of creating or configuring something. For example, the Internet Connection. Wizard leads you go through the many steps required to set up a Dial-up Networking connection to an Internet Service Provider (ISP). Wizards include instructions for each step, telling you what information you must provide, and making suggestions regarding what choices to make.
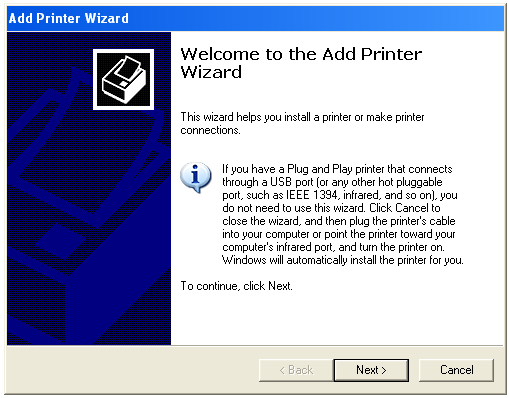
Most Wizards display window after window of information and questions, with Back, Next, and Cancel buttons at the bottom of the each window. When you click the Internet Explorer icon, you get the fist step of the Internet Connection Wizard for registration. Fill out the information requested by the wizard, and then click the Next button to continue. If you need to return to a previous Wizard window, click the back button. To exit the Wizard, click the Cancel button. The wizard’s last screen usually displays a Finish button, since there is no “next” screen to see. As for example, add printer wizard which shows on clicking “Add a Printer” option, has been shown in the figure
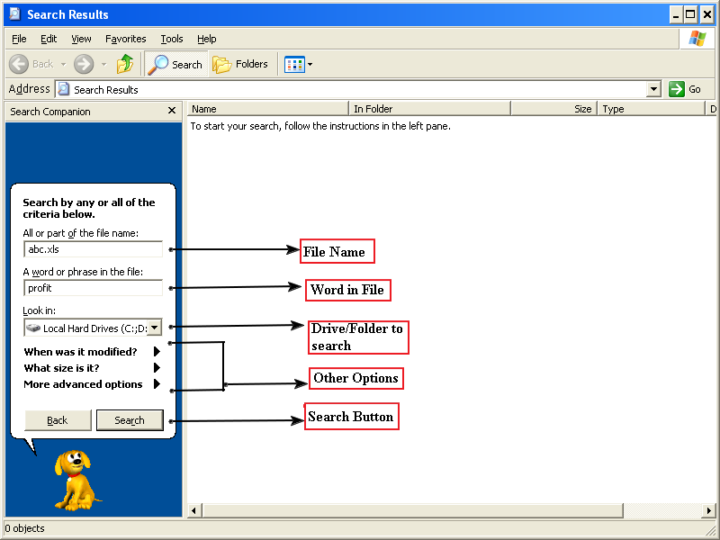
The Search Option
It is very helpful feature of MS-Windows XP to locate a file or folder which had been created or worked upon but we are not aware of its location.
To use the find feature do as follows
- Click the Start Button, and then click Search option.
- The Search window appears. As a default, it will search your C: drive. Click “All files and folders” option.
- Now give details like file name (full/part), location to search, content of file and also select other options of size, date of modification and advanced options and then click “Search” button. In few seconds any files or folders matching the search request show up in the bottom pane.
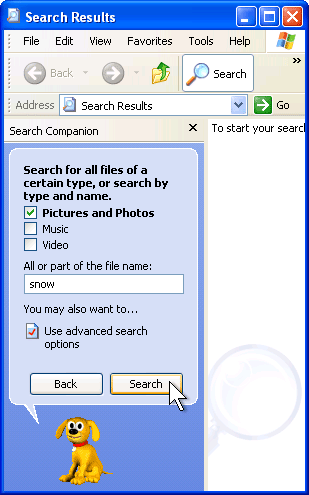
Searching for files
If you don’t remember which folder you saved a file in, you can search for it. To search for a file
- Click Start, and then click Search.
- In the left pane, click the type of file you want to search for, or click “All files and folders”.
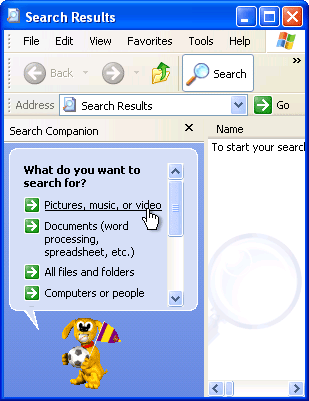
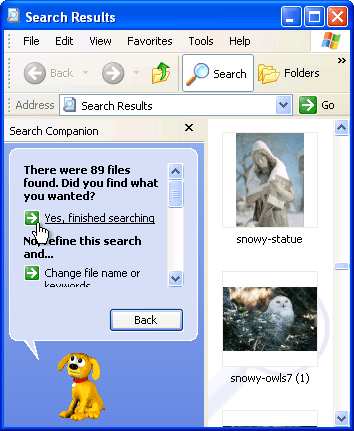
- Based on the type of file you chose to search for, specify your criteria. If you know part of the file name, type it. Then click Search.
- Windows XP searches your computer, which may take several minutes. Windows XP then displays the search results, which you can browse just like files in a folder. Once you are done searching, click “Yes” for finishing the search.
File Properties
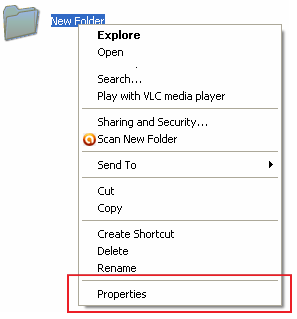
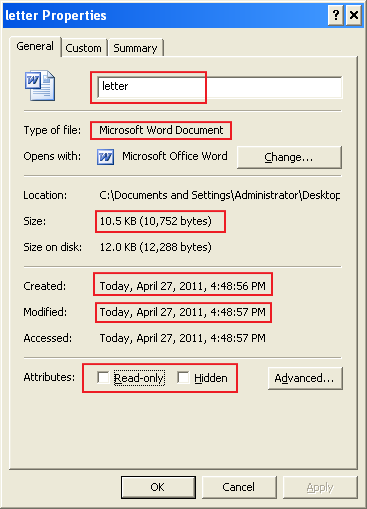
Every object i.e. a file or an icon or a folder in Windows has some specific properties associated with it. For example a file has the property of its name, its location, attributes (hidden or read only etc.), size, modification and creation dates. Properties are associated with the object for giving details about the object. Properties for an object (file, folder or icon) are shown by right-click on the object and in the context menu clicking on the “Properties” option. Property for a file object is shown in the figure below
Printer Management
When you print something from an application, a Windows printer driver (Printer Control Program) for the current printer formats the material to be printed to a form understood by the printer and sends it to the printer and then the printer prints it.
You can have several printers installed on your system. Each such installed printer has a printer driver in the Window XP printer folder. The default printer indicates that anything you print goes to the default printer unless you specifically tell your program to use a different printer. In the Printers folder, you can make any of your printers the default.
Spooling
Windows also provides spooling. It means that your PC stores document data on disk until the printer can accept it. When you print a document from an application, the information to be printed is stored temporarily in the queue (storage for print jobs) until it can be printed. If you print a long document to a slow printer, spooling lets you continue working with your application while the printer works. (“Spool” stands for simultaneous Printer Operation On-Line).
To change the printer settings do as follows
- Click the Start Button, click Control Panel
- Then click Printers and Faxes.
- Change the settings depending on the printer you are using.
Recycle Bin
The Recycle Bin provides a safety net when deleting files or folders. When you delete any of these items from your hard disk, Windows places it in the Recycle Bin and the Recycle Bin icon changes from empty to full. Items deleted from a floppy disk or network drives are permanently deleted and are not sent to the Recycle Bin.
Items in the Recycle Bin remain there until you decide to permanently delete them from your computer. These items still take up hard disk space and can be undeleted or restored back to their original location. When it fills up, Windows automatically cleans out enough space in the Recycle Bin to accommodate the most recently deleted files and folders.
If you’re running low on hard disk space, always remember to empty the Recycle Bin. You can also restrict the size of the Recycle Bin to limit the amount of hard disk space it takes up.
Windows allocates one Recycle Bin for each partition or hard disk. If your hard disk is partitioned, or if you have more than one hard disk in your computer, you can specify a different size for each Recycle Bin.
Changing the storage capacity of the Recycle bin
- On the desktop, right-click Recycle Bin, and then click Properties.
- Move the slider to increase or decrease the amount of disk space that is reserved for storing deleted items.
Point to be noted
- A deleted item that is larger than the storage capacity of the Recycle Bin will not be saved. It will be permanently deleted.
- If you want to use different Recycle Bin settings for different drives, click Configure drives independently, and then click the appropriate drive tab to change the Recycle Bin settings for that drive.
- If you want to use the same Recycle Bin settings for all drives, click Use one setting for all drives.
To remove items permanently when you delete them
- On the desktop, right-click Recycle Bin, and then click Properties.
- Select the Do not move files to the Recycle Bin check box.
Note: If Do not move files to the Recycle Bin check box is selected, you will not be able to recover any items that you delete.
Delete or restore files in the Recycle Bin
On the desktop, double-click Recycle Bin and do the following
- To restore an item, right-click it, and then click Restore.
- To restore all of the items, on the Edit menu, click Select All, and then on the File menu, click Restore.
- To delete an item, right-click it, and then click Delete.
- To delete all of the items, on the File menu, click Empty Recycle Bin.
Note: Deleting an item from the Recycle Bin permanently removes it from your computer. Items deleted from the Recycle Bin cannot be restored.
- You can also delete items by dragging them into the Recycle Bin. If you press SHIFT while dragging, the item is deleted from your computer without being stored in the Recycle Bin.
- Restoring an item in the Recycle Bin returns that item to its original location.
- To retrieve several items at once, hold down CTRL, and then click each item that you want to retrieve. When you have finished selecting the items that you want to retrieve, on the File menu, click Restore.
- If you restore a file that was originally located in a deleted folder, the folder is recreated in its original location, and then the file is restored in that folder.
The following items are not stored in the Recycle Bin and cannot be restored
- Items deleted from network locations.
- Items deleted from removable media (such as 3.5-inch disks, USB drives).
- Items those are larger than the storage capacity of the Recycle Bin.
To prevent delete confirmation messages from appearing
- On the desktop, right-click Recycle Bin, and then click Properties
- Clear the Display delete confirmation dialog check box.
To empty the Recycle Bin
- On the desktop, double-click Recycle Bin.
- On the File menu, click Empty Recycle Bin.
Note: If you only want to remove some of the items in the Recycle Bin, hold down CTRL, and then click each item that you want to remove. When you have finished selecting the items that you want to remove, on the File menu, click Delete.
Font Management
It is a facility on Windows XP to manage various fonts on the computer so as to print text in different styles.
Font
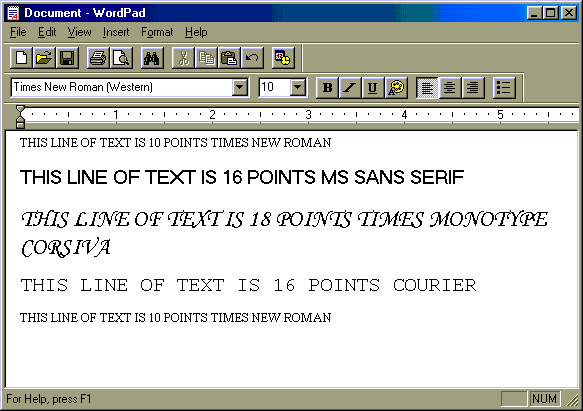
Modern computer screens and printers can display text in a variety of typefaces and sizes.
Font and typefaces are commonly used interchangeably but wrongly. So Font refers to the set of all characters and numbers in a given size and normal. For example New Times Roman 10-point is a font and the typeface is New Times Roman. Windows comes with a small set of fonts, but many programs and printer drivers include fonts of their own. Once a font is installed, any program can use it.
Installing and using Fonts
Windows provides a simple way to install and use fonts.
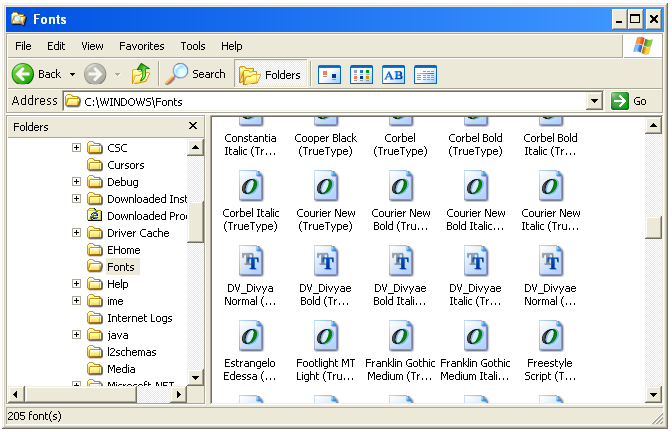
To view fonts installed on your system do as follows
- Open the folder C:\Windows\Fonts in a Folder window, or windows Explorer Window. The window as in figure appears.
- To install a new font click the File Menu and choose Install New Font…..The Add fonts dialog box as in figure appears.
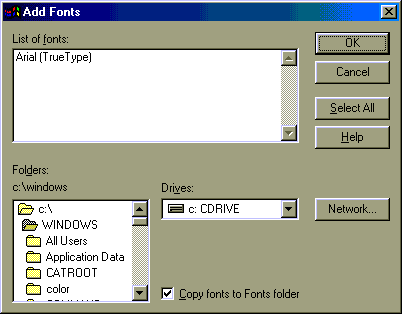
In the Drives and Folder boxes, select the drive and folder where the files are located for the new font or fonts.
- In the list of Fonts box, select the fonts you want to install.
- Windows copies the fonts files into its font folder (C:\Windows\fonts).
- Click OK, and Windows installs the fonts you want.
To delete a font or fonts, select the fonts you want to delete and click the File Menu and choose Delete. You choose a font in three steps.
- The name of the font (the name of the typeface).
- The style (regular, bold, italic) and the point size.
- True Type fonts are available in any size and style and are identified by the TT logo before the font name. Older fonts are available in only a few fixed sizes and styles.
Apply for Data Entry Operator Certification Now!!
https://www.vskills.in/certification/certified-data-entry-operator
