Certify and Increase Opportunity.
Be
Govt. Certified Facebook Apps Developer
In most cases developers will follow a common process to create new apps and release them to the public. This section will walk you through some of the features available on the Facebook Platform to help you manage the development, testing, staging and production release of your apps.
The guide is separated into the following sections:
- Develop
- Test
- Soft Launch with Geo-Restriction
- Full Launch
Step 1. Develop
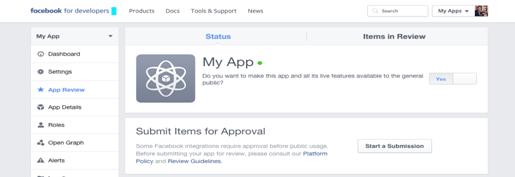
When you first create an app it is created in Development Mode. Development mode gates access to the app while it’s in development and prevent any social features from leaking to the public until you are ready to launch.
When your app is in development mode only the people that you have configured via the Roles setting (more information on this below) will have access to use the app. Any person that has not been explicitly whitelisted in a Role will not be able to see the app, nor will they see any Feed stories, Requests or other social distribution features.
Development mode can be toggled on and off in the App Review tab:
Next you will need to set up access to your app via Roles. Users that have been placed in a Role will have access to your app, as designated by the specific roles below.
The Facebook App Dashboard supports 4 different roles:
- Administrator: Administrators have full access to the app, including the ability to delete the app. This should only include trusted employees that will maintain your app.
- Developer: Developers have access to all settings required to create and maintain your app. They do not have the ability to delete the app. This should be the default role for most employees that need access to configuration settings.
- Testers: Testers are able to view and use your app while in development mode but cannot view any of the developer settings and do not have access to the App Dashboard.
- Insights Users: These users have access to Insights for the app, our analytics package. This role should be used for stakeholders of your app that do not need access to any configuration settings and may not be technical in nature.
- Test Users: Not to be confused with the Tester role, Test Users are temporary Facebook accounts that you can create to test various features of your app.
You can configure and maintain your roles in the App Dashboard under the Roles tab:
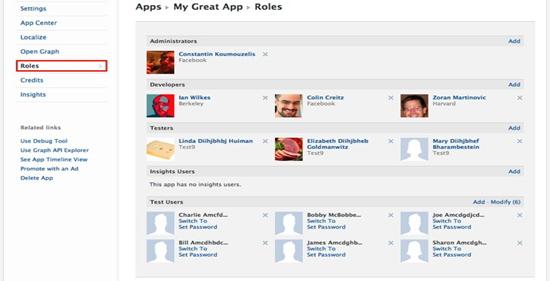
Users can be added by specifying their name (if they are your friend), email address or Facebook User ID. Users are not required to be friends in order to be added to a Role.
Now that your basic settings access have been configured, you can proceed with the development of your app.
Step 2. Test
Once you have completed enough functionality in your app that you are ready to test your integration with Facebook, make sure to use Test Users to go through your end to end flows and social features. Test Users are not real Facebook users and cannot interact with real Facebook users, allowing you to test features of your app without risk of interactive with the public. They can be created en masse and allow you to create multiple configurations of social graphs that may be useful in your testing.
You can create Test User directly within the App Dashboard in the Roles Tab. Click on the Add button next to Test Users:
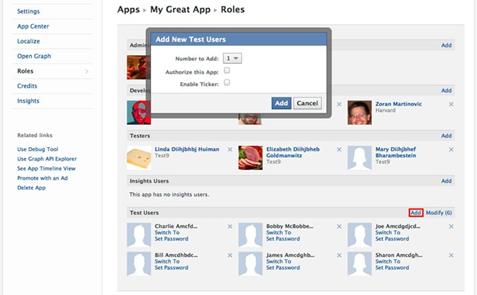
This will open a dialog where you can select how many test users you want to create (up to 10), automatically auth the app for these users and enable the Facebook Ticker if necessary. You can also click the Modify button to bring up a more detail interface to manage your test users:

In this interface you can make Test Users friends with each other, add them to other apps you are working on, or delete them in bulk.
If the App Dashboard interface is not sufficient for your needs or you would like to create more than 10 users at a time you may want to take a look at our Test User API.
Additionally, you can invite real Facebook users to test your app. For a Facebook user to be eligible as a an app tester, the user must have a Facebook developer account.
Step 3. Soft Launch with Geo-Restriction
Now that your app is feature complete and has finished your rounds of QA, consider soft launching your app in a few specific countries before releasing it to the world. Alternatively you may have age specific content within your app and want to restrict it to specific age ranges. You can configure these restrictions in the App Dashboard under Settings > Advanced > User Restrictions:

By adding countries into the Country Restrictions setting, you can restrict access to users that are only accessing your app from the countries you have specified. If no countries have been added to this list, your app will be available worldwide. Next, to take your app live for the users in the countries you selected, change your development mode from ‘No’ to ‘Yes’ as mentioned in Step 1.
By using this feature you can test how your app performs against a limited set of users in a specific location, allowing you to test and tweak your app before your full launch.
Step 4. Full Launch
Now that your app is ready for launch there are a couple of final steps you should consider to take your content live.
- Make sure to remove any country restrictions you specified in Step 3.
- Make sure you change your development mode so that the app is public from Step 1. At this point your app is now visible to all Facebook users.
- Make sure to submit your app into App Center. App Center is a great place for users to find great quality apps and will help you increase organic distribution to your app. To get your all listed in App Center you will need to fill out your app description and images assets (including screenshots), then submit them for review.
- You may want to consider adding localized assets for your app into App Center. This will allow you to provide a translated App Detail Page in App Center for users that are viewing in other languages than English.
Apply for Facebook Apps Certification Now!!
http://www.vskills.in/certification/Certified-Facebook-Apps-Developer
