Ports and Printers
To install a standard port
- In Control Panel, open the Printers and Faxes folder, right-click the printer that you want to configure, and click Properties.
- On the Ports tab, click Add Port.
- In the Printer Ports dialog box, select Standard TCP/IP port, and click New Port to launch the Add Standard TCP/IP Printer Port Wizard.
- Complete the Add Standard TCP/IP Printer Port Wizard by using the information provided in Table 3.3.Table 3.3 Using the Add Standard TCP/IP Printer Port Wizard
Wizard Page Action Printer Name or IP Address To identify the printer that will be connected to the port, type its name in the Printer Name or its IP address in the IP Address box. Port Name In the Port Name box, type a port name, which can be any character string, or use the default name that the wizard supplies. Additional Port Information Required To configure a standard port, click Standard, and then select one of the listed devices. If you do not know the details of the port, try using the Generic Network Card.To create a custom configuration, click Custom, and then configure the port by using the Configure Standard TCP/IP Port Monitor screen that appears. If the wizard cannot determine the appropriate protocol for the port, it prompts you for the information. Follow the vendor’s instructions for selecting either the RAW or LPR option.
If you are not prompted for more information, continue to step 5.
- Review the port information, and click Finish.The new port is listed on the Ports tab of the Properties property sheet.
How to setup a Standard TCP/IP Port to print to Print Server?
1. Run the Print Server Configuration Utility to get the IP address of your Print Server.
The Print Server Configuration Utility is included in the Administrator Utility which can be downloaded from our download page.
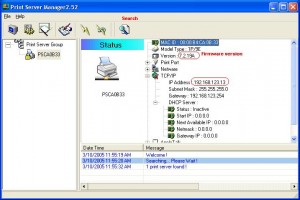
If your Print Server Configuration looks like the following, click on PrintServer Status tab. Take a note about the Active IP address.
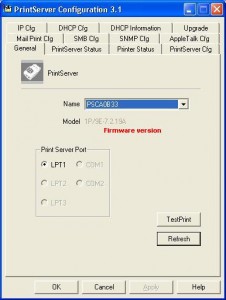
If your Print Server Configuration Utility looks like this, get the IP address
It is optional to assign print server a fixed IP address in your network, but we suggest you do so.
In the above Print Server Configuration Utility, click on Setup button and go to TCP/IP, then you can assign a fixed IP address to print server. In the above example, our print server has fixed IP address 192.168.123.13. Close Print Server Configuration.
If you have no idea about IP address, you may click here for some basic knowledge for networking.
2. Click on the Start button. Select Run. Type “command” hit OK. Under the Command Prompt, type “ipconfig” hit Enter. You will see the IP address of your computer. Write down the IP address of your computer. Please note the first three digits of the Print Server IP address should be the same as the first three digits of your computer IP address. In our example, both use 192.168.123.x IP addresses.
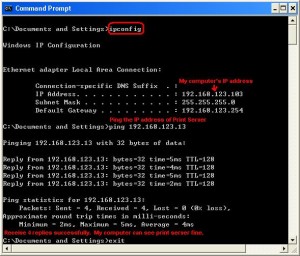
3. Under the command prompt, PING the IP address of your print server. In our example, ping 192.168.123.13 and receive 4 replies. Type Exit hit Enter to close the command prompt.
4. Click Start menu, go to Printers and Faxes. If you already have a printer driver icon existed, you can skip this step and go to step 5.
Click on Add Printer icon, click Next. Select the option “Local printer attached to this printer” and remove the check on “Automatically detect and install my Plug and Play printer”. Click Next.

Select the option “use the following port: LPT1”. Click Next.

Select your printer driver provided by your Windows OS.
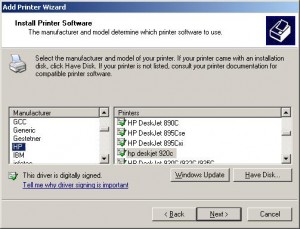
If you do not see your printer in the list, you can click “Have Disk” button and provide the driver or install the printer driver by your printer manufacturer.
Click Next. You don’t need to share the printer and don’t print a test page. Click Finish button while the driver is installed successfully. Once you see the print driver icon created in Printers&Faxes group, you can continue to Step 5.
5. Right click on your printer driver icon and select Properties. Go to Ports tab. Click on Add Port.

6. Select Standard TCP/IP Port. Click New Port. Click Next.
7. Input the IP address of your print server. Click Next.
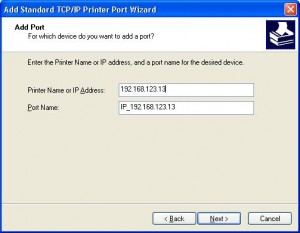
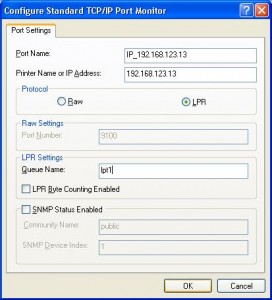
9. Select Protocol: LPR. Input the Queue name: lpt1. Please note, the queue name must be lower case of LPT1 for single port print server. If you have multiple port print server and the printer is on the second port, the queue name will be lpt2. If the printer is on the third port, the queue name will be lpt3.
10. Click OK. Click Next. Click Finish. Click Close. You will be back to the Ports tab.
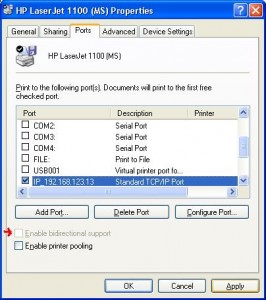
Check the new created Standard TCP/IP Port. If you have the option “Enable bidirectional support”, make sure it is not checked. Click on Apply.
11. Click on the General tab and print a test page.
Note, if you want to enable your Firewall, the LPR protocol uses TCP Port 515. You can follow the above procedure, then in the Exception of the firewall, add the TCP Port 515. That will make the printing go through your firewall.
Apply for DTP Certification Now!!
http://www.vskills.in/certification/Certified-DTP-Operator
